MS SQL Azure to MS Access – Using VBA to Dump Azure Tables into MS Access Tables

The first thing you need to get sorted when moving to SQL Azure is having the ability to get your information out and safe if needs be. When experimenting with MS Azure and for applications that don’t have sensitive information it is nice to have that information available in an easily accessible format. Here are a series of functions that will copy Azure Tables linked to database into local MS Access tables with the prefix ZCOPY.

The starting point in this should be an MS Access database that should be linked to your SQL Azure Database. Only those tables that are linked will be copied. Remember the 2GB limit on Access.

I think I have got all the functions here that are required to make it work and include the complete module at the bottom but first I will breakdown the modules and list describe what each of the functions do.

First create a table to store the list of tables in the Azure Database

Public Function CreateTableT0001AzureTablesGlobal()
 
     Dim dbs As Database
     Set dbs = CurrentDb
 
        dbs.Execute "CREATE TABLE T0001AzureTablesGlobal " _
        & "(PKID AUTOINCREMENT, " _
        & "AzureTableName CHAR CONSTRAINT PKID " _
        & "PRIMARY KEY);"
   
End Function

Now Create a Function that will hold the SQL that takes the tables and makes them locally.

Public Function CreateTableT0002SQL()
 
     Dim dbs As Database
     Set dbs = CurrentDb
 
        dbs.Execute "CREATE TABLE T0002SQL " _
        & "(PKID AUTOINCREMENT, " _
        & "SQL MEMO CONSTRAINT PKID " _
        & "PRIMARY KEY);"
 
   
End Function

A function that allows for stepping through the table

Public Function AddByteColumn(TblName As String, FieldName As String)
'Just use byte data type as only going to use this for a flag

DoCmd.RunSQL "AlTER TABLE [" & TblName & "] ADD COLUMN " & FieldName & " BYTE;"

End Function

Step through the Linked Azure Tables and poupulate table T001 with their names

Public Function CreateandPopulateListofDBOTableNames()

'These will typically be the names of the SQL Server tables this should work both with SQL Server and SQL Azure

Dim db As DAO.Database
Dim tdf As DAO.TableDef
Dim rstList As DAO.Recordset

'Call CreateTableT0001AzureTablesGlobal

Set rstList = CurrentDb.OpenRecordset("T0001AzureTablesGlobal")
Set db = CurrentDb

For Each tdf In db.TableDefs
    ' ignore system and temporary tables and tables starting with T - personal choice option
    If Not (tdf.Name Like "MSys*" Or tdf.Name Like "~*" Or tdf.Name Like "T*") Then
       With rstList
       .AddNew
       rstList!AzureTableName = tdf.Name
       rstList.Update
      End With
    End If
    
Next

Set tdf = Nothing
Set db = Nothing

End Function

The next function is required to strip out additional spaces in names

Public Function FindXReplaceY(FixTable As String, FixColumn As String, X As String, Y As String) As Variant

Dim strSQL As String

strSQL = "UPDATE [" & FixTable & "] SET [" & FixTable & "].[" & FixColumn & "] = REPLACE([" & FixColumn & "]," & Chr$(34) & X & Chr$(34) & "," & Chr$(34) & Y & """);"

DoCmd.RunSQL strSQL

End Function

We can now write the VBA that will write the make table SQL that once run will put one make table query into the maketableSQL table for each Azure table.

Public Function CreateMakeTableSQL()

On Error GoTo Err_CreateMakeTableSQL
Dim rstSQL As DAO.Recordset
Dim rstSQLx As DAO.Recordset
Dim dbc As DAO.Database
Dim SQLStringAdd As String
Dim LCounter As Long

Set dbc = CurrentDb

LCounter = 1
While LCounter < 9000
LCounter = LCounter + 1
Set rstSQL = CurrentDb.OpenRecordset("SELECT T0001AzureTablesGlobal.PKID, T0001AzureTablesGlobal.AzureTableName, T0001AzureTablesGlobal.XFLag1 FROM T0001AzureTablesGlobal WHERE (((T0001AzureTablesGlobal.XFLag1) Is Null));")

SQLStringAdd = "SELECT * INTO COPY" & rstSQL!AzureTableName & " FROM " & rstSQL!AzureTableName & ";"

Set rstSQLx = CurrentDb.OpenRecordset("T0002SQL")
With rstSQLx
.AddNew
rstSQLx!SQL = SQLStringAdd
rstSQLx.Update
rstSQLx.Close
End With

With rstSQL
rstSQL.Edit
rstSQL!XFLag1 = 1
rstSQL.Update
rstSQL.MoveNext
rstSQL.Close
End With

Wend

Exit_CreateMakeTableSQL:
    Exit Function

Err_CreateMakeTableSQL:
Select Case Err.Number
 Case 3021
   Resume Exit_CreateMakeTableSQL
  Case Else
  Resume Exit_CreateMakeTableSQL
  End Select
 
End Function

And finally Run all the queries

Public Function RunQueriesFromTable2(SQLSource As String)

DoCmd.SetWarnings False

Dim StartTime As Date
Dim EndTime As Date
Dim rstZ As DAO.Recordset
Dim strSQL2 As String

StartTime = Now()

Set rstZ = CurrentDb.OpenRecordset(SQLSource)

Do Until rstZ.EOF

strSQL2 = rstZ!SQL
DoCmd.RunSQL strSQL2
rstZ.MoveNext

Loop

DoCmd.SetWarnings True

EndTime = Now()

MsgBox "Finished ALL SQL queries! Process started at " & StartTime & " and finished at " & EndTime

End Function

And a script to pull all of this together

Public Function GetAzureScript()

DoCmd.SetWarnings False
Call CreateTableT0001AzureTablesGlobal
Call CreateandPopulateListofDBOTableNames
Call FindXReplaceY("T0001AzureTablesGlobal", "AzureTablename", " ", "")
Call FindXReplaceY("T0001AzureTablesGlobal", "AzureTablename", Chr(10), "")
Call AddByteColumn("T0001AzureTablesGlobal", "XFLag1")
Call CreateTableT0002SQL
Call CreateMakeTableSQL
Call FindXReplaceY("T0002SQL", "SQL", " ", "")
Call FindXReplaceY("T0002SQL", "SQL", Chr(10), "")
Call FindXReplaceY("T0002SQL", "SQL", "SELECT*INTOCOPY", "SELECT * INTO ZCOPY")
Call FindXReplaceY("T0002SQL", "SQL", "FROM", " FROM ")
Call RunQueriesFromTable("T0002SQL")
DoCmd.SetWarnings True

End Function

The complete module

Option Compare Database
Option Explicit

Public Function GetAzureScript()

DoCmd.SetWarnings False
Call CreateTableT0001AzureTablesGlobal
Call CreateandPopulateListofDBOTableNames
Call FindXReplaceY("T0001AzureTablesGlobal", "AzureTablename", " ", "")
Call FindXReplaceY("T0001AzureTablesGlobal", "AzureTablename", Chr(10), "")
Call AddByteColumn("T0001AzureTablesGlobal", "XFLag1")
Call CreateTableT0002SQL
Call CreateMakeTableSQL
Call FindXReplaceY("T0002SQL", "SQL", " ", "")
Call FindXReplaceY("T0002SQL", "SQL", Chr(10), "")
Call FindXReplaceY("T0002SQL", "SQL", "SELECT*INTOCOPY", "SELECT * INTO ZCOPY")
Call FindXReplaceY("T0002SQL", "SQL", "FROM", " FROM ")
Call RunQueriesFromTable2("T0002SQL")
DoCmd.SetWarnings True

End Function

Public Function CreateandPopulateListofDBOTableNames()

'These will typically be the names of the SQL Server tables this should work both with SQL Server and SQL Azure

Dim db As DAO.Database
Dim tdf As DAO.TableDef
Dim rstList As DAO.Recordset

'Call CreateTableT0001AzureTablesGlobal

Set rstList = CurrentDb.OpenRecordset("T0001AzureTablesGlobal")
Set db = CurrentDb

For Each tdf In db.TableDefs
    ' ignore system and temporary tables and tables starting with T - personal choice option
    If Not (tdf.Name Like "MSys*" Or tdf.Name Like "~*" Or tdf.Name Like "T*") Then
       With rstList
       .AddNew
       rstList!AzureTableName = tdf.Name
       rstList.Update
      End With
    End If
    
Next

Set tdf = Nothing
Set db = Nothing

End Function

Public Function FindXReplaceY(FixTable As String, FixColumn As String, X As String, Y As String) As Variant

Dim strSQL As String

strSQL = "UPDATE [" & FixTable & "] SET [" & FixTable & "].[" & FixColumn & "] = REPLACE([" & FixColumn & "]," & Chr$(34) & X & Chr$(34) & "," & Chr$(34) & Y & """);"

DoCmd.RunSQL strSQL

End Function

Public Function CreateTableT0001AzureTablesGlobal()
 
     Dim dbs As Database
     Set dbs = CurrentDb
 
        dbs.Execute "CREATE TABLE T0001AzureTablesGlobal " _
        & "(PKID AUTOINCREMENT, " _
        & "AzureTableName CHAR CONSTRAINT PKID " _
        & "PRIMARY KEY);"
 
   
End Function

Public Function CreateTableT0002SQL()
 
     Dim dbs As Database
     Set dbs = CurrentDb
 
        dbs.Execute "CREATE TABLE T0002SQL " _
        & "(PKID AUTOINCREMENT, " _
        & "SQL MEMO CONSTRAINT PKID " _
        & "PRIMARY KEY);"
 
   
End Function

Public Function AddByteColumn(TblName As String, FieldName As String)
'Just use byte data type as only going to use this for a flag

DoCmd.RunSQL "AlTER TABLE [" & TblName & "] ADD COLUMN " & FieldName & " BYTE;"

End Function

Public Function CreateMakeTableSQL()

On Error GoTo Err_CreateMakeTableSQL
Dim rstSQL As DAO.Recordset
Dim rstSQLx As DAO.Recordset
Dim dbc As DAO.Database
Dim SQLStringAdd As String
Dim LCounter As Long

Set dbc = CurrentDb

LCounter = 1
While LCounter < 9000
LCounter = LCounter + 1
Set rstSQL = CurrentDb.OpenRecordset("SELECT T0001AzureTablesGlobal.PKID, T0001AzureTablesGlobal.AzureTableName, T0001AzureTablesGlobal.XFLag1 FROM T0001AzureTablesGlobal WHERE (((T0001AzureTablesGlobal.XFLag1) Is Null));")
SQLStringAdd = "SELECT * INTO COPY" & rstSQL!AzureTableName & " FROM " & rstSQL!AzureTableName & ";"

Set rstSQLx = CurrentDb.OpenRecordset("T0002SQL")
With rstSQLx
.AddNew
rstSQLx!SQL = SQLStringAdd
rstSQLx.Update
rstSQLx.Close
End With

With rstSQL
rstSQL.Edit
rstSQL!XFLag1 = 1
rstSQL.Update
rstSQL.MoveNext
rstSQL.Close
End With

Wend

Exit_CreateMakeTableSQL:
    Exit Function

Err_CreateMakeTableSQL:
Select Case Err.Number
 Case 3021
   Resume Exit_CreateMakeTableSQL
  Case Else
  Resume Exit_CreateMakeTableSQL
  End Select
 
End Function

Public Function RunQueriesFromTable2(SQLSource As String)

DoCmd.SetWarnings False

Dim StartTime As Date
Dim EndTime As Date
Dim rstZ As DAO.Recordset
Dim strSQL2 As String

StartTime = Now()

Set rstZ = CurrentDb.OpenRecordset(SQLSource)

Do Until rstZ.EOF

strSQL2 = rstZ!SQL
DoCmd.RunSQL strSQL2
rstZ.MoveNext

Loop

DoCmd.SetWarnings True

EndTime = Now()

MsgBox "Finished ALL SQL queries! Process started at " & StartTime & " and finished at " & EndTime

End Function
MS Access front end – MS SQL Azure back end Link to Configuration Set UP FMS Group

This is an excellent article on linking MS Access to SQL Azure – which is just great if you are wanting to use your VBA skills direct on your SQL Database.

FMS Professional Solutions Group – Luke Chung MVP article

It should be noted that the Primary Key will need to be set to Integer in the SQL Database rather than Big Int otherwise it will appear as #DELETED# when you go in and view the data. This may not be an issue going forward for some users of Office 365 Access 2016 as Microsoft are introducing support for Big Int in MS Access. Congratulations to Microsoft on that small but important change.

Upload XLS information to a specific table or new table within an SQL Azure Database

I have started experimenting with Microsoft Azure if you haven’t already you can get a free experimentation account here;

Microsoft Azure Trial account with £125 credit

This gets your registered on Microsoft’s cloud and after a free trial period you will be able to continue with a Pay as You go Account which depending on the services that you go for can start at very cheap rates.

In order for this to work you will need the following
1) Microsoft Azure account
2) An SQL Azure Database
3) SQL Server Management Studio downloaded and installed on the machine you will be uploading from, this can be obtained from SSMS download link be warned its over 800mb. Here I use SSMS 2016
4) Know your server name this is generally [Yourname].database.windows.net
5) Login and Password (I use SQL Server Authentication)

Testing things out I have been using the Web Apps Service to run a website and connect to an SQL Azure Database – both on the cheapest options.

What makes the website particularly cheap is that it can be stopped and started and by paying for it by the minute you can really get a powerful demonstration sites up and running and stop them immediately after the demonstration for very little money.

So after having created an Azure SQL database (Microsoft Create Azure Database Tutorial)I wanted to get a decent number of records into it. Which would be the starting position when taking on most work.
Here I use the Lichfield Planning Application information previously referred to in this post QGIS Import. What I did was take the 45,000 records of planning applications from the shape file. I did this by opening up the dbf file of the shape collection in Excel 2003 and then saving it in excel format. This will be used later to import into the database.

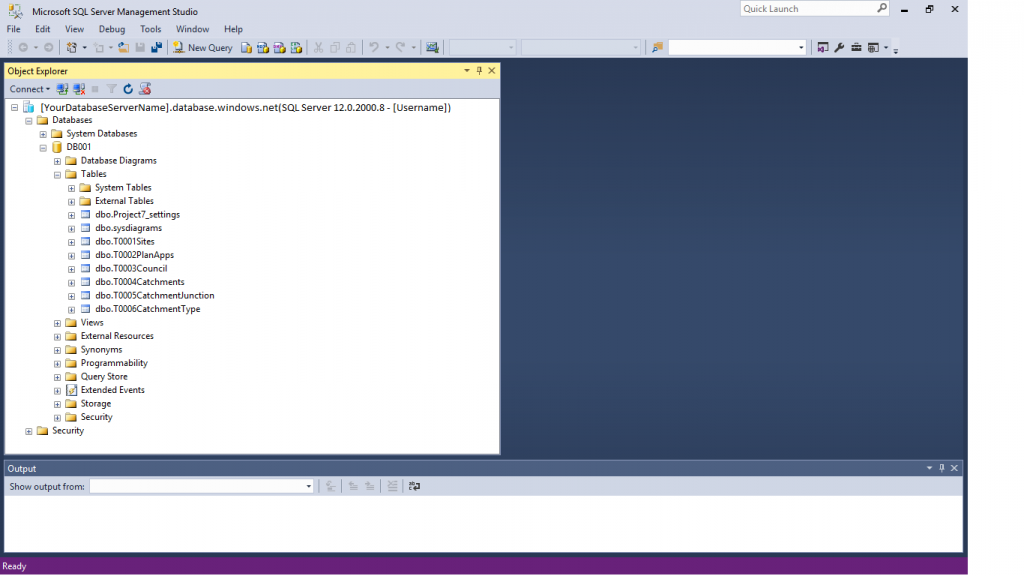
Having your excel file ready the next step is to open up SQL Server Management Studio and connect to your Azure Database. The parameters with regard to username and servername will have been setup when you created your Azure database it is important that when you create your Azure database you somehow record these details.

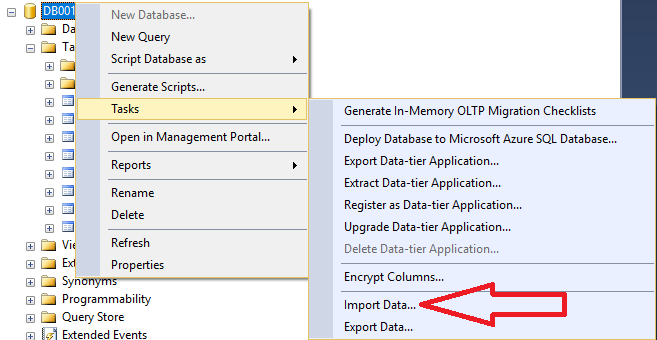
Next highlight the database – in my case this was DB001 and right click to get tasks.

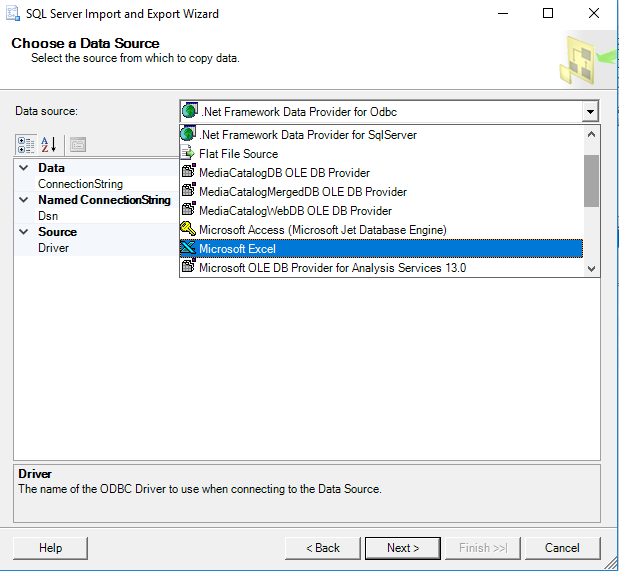
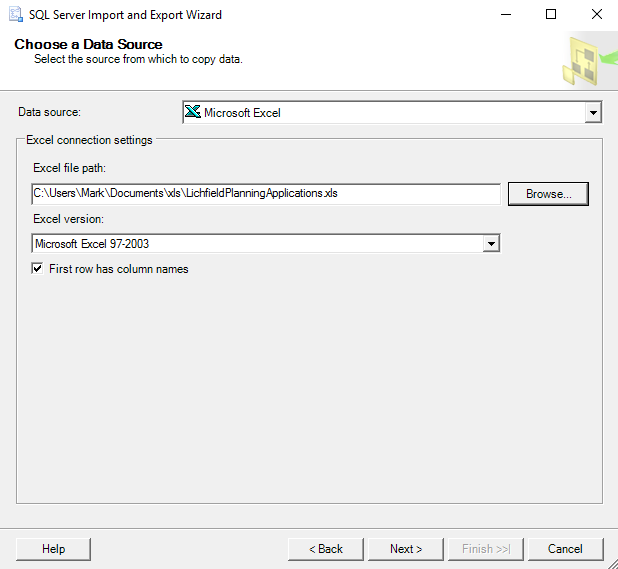
At this point you enter the import wizard windows dialog boxes and having passed the opening welcome screen , a screen that can be turned off for subsequent navigations, you should hit your first screen that allows you to define the format of the file that should be imported.

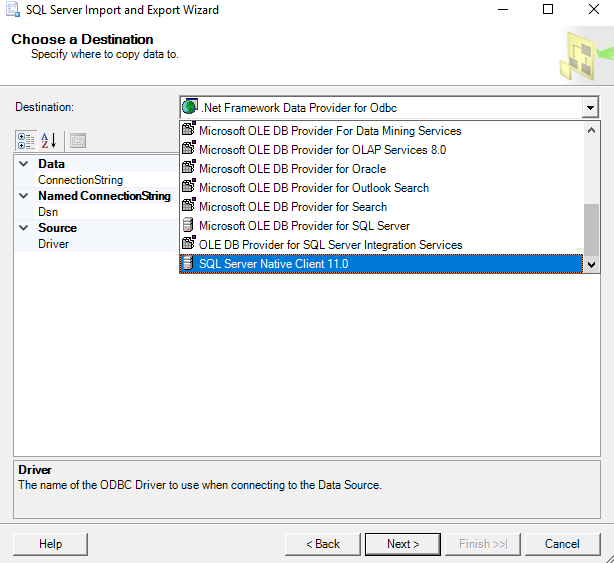
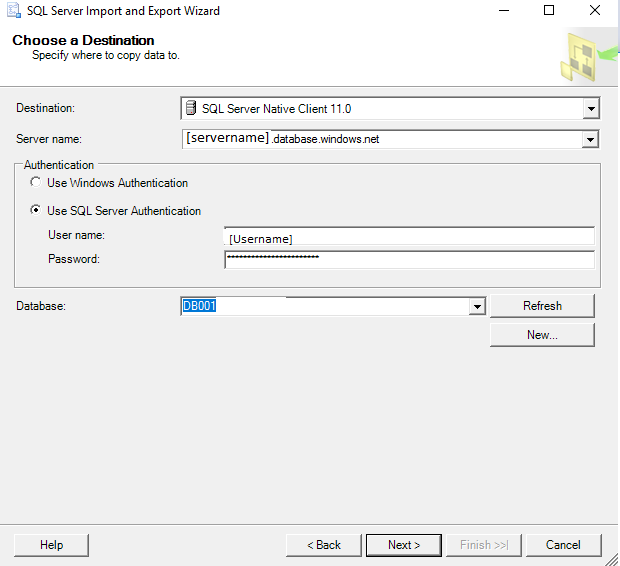
The next step is about the only one that is slightly confusing – you are given a number of different options for the target – for me SQL Server Native Client 11.0 worked for me.

Now using the previous parameters specific to your database server and your database name complete the next dialog.

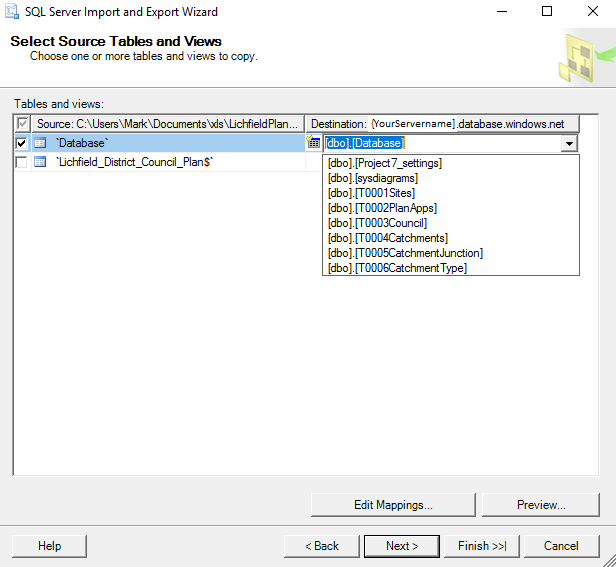
The next dialog asks you whether you want to copy all information or want to write a query to filter the information to be imported. For my example I chose the all import item. Here I select the database and then I am able to see the from and too destinations.

If you wish to import into an existing table use the drop down to select tables from the database – if you wish to import into a new table you can type in the name of the new table within the square brackets.

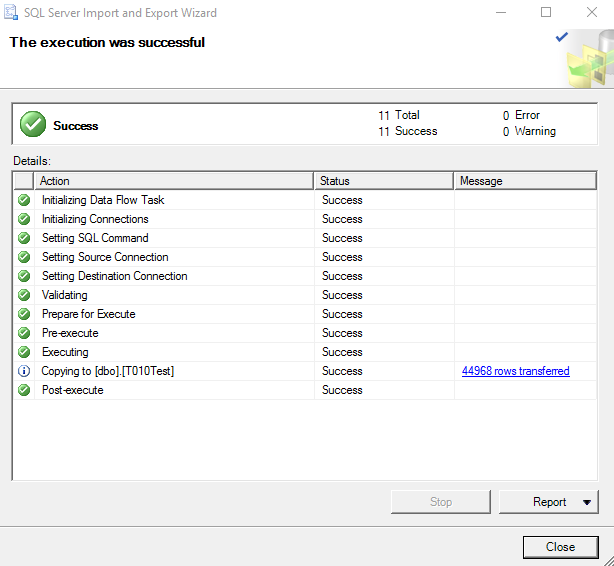
Here I create a new table called T010Test and import and then continue through the import wizard dialogs until on completion of import you should see a similar screen to that below. It is possible to go into the edit mappings if you are copying into a table that already exists. This will give you a preview showing to what extent the mapping will be successful and how the fields map. You may wish to alter the names of columns to match your target table at this point.

QGIS 2.8.1 Getting Shape Files into SQL Server 2008 Express R2

For digital mapping the shp extension is the equivalent of csv files – A significant amount of information is still held in shape files and even if it is not, nearly every GIS package can export to shape format. It’s therefore pretty vital that you understand how to get this format into your backends.

Turns out QGIS 2.8.1 comes with a very handy excecutable called ogr2ogr.exe
On my computer this was downloaded with my installation of QGIS 2.8.1 and placed in the the following directory

C:\Program Files\QGIS Wien\bin

It looks like this executable has been a part of the the download for sometime so if you are on a different version of QGIS I suspect the file will be on your machine but in a directory other that QGIS Wien – whatever your version is.

If in doubt a simple search on ogr2ogr should give you the location.

From the command prompt you need to either navigate to the location of ogr2ogr.exe or place the full path into the instruction. In the following I have navigated to the appropriate directory using change directory command at the prompt. I then input the following.

ogr2ogr -overwrite -f MSSQLSpatial "MSSQL:server=MARK-LENOVO\SQLEXPRESS;database=Geodatabase;trusted_connection=yes" "C:\Users\Mark\Documents\shp\polygon\n_america.shp"

On return it will start to import the information creating a new table in your SQL Server instance within the database listed in your parameter string. It looks like it just names the table the same as the shape file, I suspect if that name already exists as a tablename in SQL Server that table will be overwritten with the new shape file. Also note that the import process can take a fair bit of time for large files so be patient. I tested it initially with a small import which it did relatively quickly, I then went and hit it with 500 thousand records and it took a little over 2 hours. Still good to know that it can cope.

Once you have imported the information into SQL you should perform some form of spatial indexing on the table.
I have noted that layers that have spatial indexing are drawn differently than non spatial indexed layers. Layers with spatial indexes are drawn in more rapidly all over the district much like a spray from a can. Non spatial indexed layers appear on screen slower as if painted from one side to the other.

SQL Saturday coming to Edinburgh again 13 June 2015

SQL Saturday is coming to Edinburgh again Saturday 13 June 2015 I hope to attend. I have attended the two previous events I highly recommend it. Thanks must go to Jennifer Stirrup and others for taking time out to organise and speak at it.
Venue is Pollock Halls on the edge of Holyrood Park in the beautiful city of Edinburgh.

Edinburgh SQL Saturday event page

Access Connection Strings – Link

Some notes on using SQL Server connection strings both using the default ODBC client drivers and also the native SQL Server driver.

Juan Soto of Access Experts explains connection strings from MS Access to SQL Server

Additionally I am hearing that it is better to use the SQL Server Native Client ODBC driver than the default SQL Server driver as a recent security update on SQL Server has caused issue with some applications using the default SQL driver.

Juan Soto of Access Experts explains issues with November 2014 SQL Server update for MS Access applications

Enabling Geospatial integration in applications.

Despite the fact that spatially enabled databases have been around pretty much everywhere for quite sometime there’s still a heck a lot of enterprise applications out there that are not using the feature even though their backends support it.

SQL server has had the facility since 2008 , Oracle has it as well although it is with the expensive Oracle 11g Enterprise edition.

So if its available why are so many applications not using it?

Well one of the reasons is that many of the applications which would benefit from introduction are central to organisations and were in existence long before the feature was available in backend databases. So why not introduce it as an update? Well the problem is a geospatial attribute is a form of primary key more accurate than the often completely arbitrary primary keys that most tables will take as their reference. Adding it is likely to require not just the addition of a geospatial attribute which will be a defacto primary but potentially adding a full table not as a child but as a parent to the previous parent records – the former parent records requiring the addition of foreign keys that relate to their parents.

As most of you know altering primary keys in tables is pretty much equivalent to transplant surgery for a database.
Totally wiping a primary key and starting with a different primary key that needs to then be captured for itself and related back to its children is if anything several orders of magnitude worse than that..

Doesn’t sound good does it.

This is another case where if you have paying clients or you have a purchased product that isn’t going to happen until there is an outside force from a competitor. But the benefits are legion. As it stands most information in geographical systems is flat files that has to be updated directly within either the web gis or a gis desktop. These programs are really terrible making an application fully geospatial by design allows the UI you to display the geographical information in the GIS – web or desktop and related information in forms which often have vastly improved searching / linking to other systems drop down boxes well pretty much everything.

Leave plenty of time for it but would be proper automation. Too many GIS systems are mirrored copies of a database that periodically have to be updated. This is not the long term optimum.

Connecting to SQL Server – authentication and QGIS

Within QGIS when you set up a connection to a MS SQL Server instance you are presented with two options. Here’s a bit of clarification on what the two options entail.

* Trusted connection – this is the same thing as using Windows Authentication and authentication is managed by the domain and authorization is handled by SQL Server – This could be handled by an Active Directory Security Group.

* Login – SQL Server can also use its own logins such as a user. These are both authenticated and authorized by SQL Server. They are only viable if SQL Server is configured to run in Mixed Authentication mode.

image001

Summary and Links for Microsoft MCSE Data Platform Solutions Expert

mcsepicture

PLEASE NOTE THIS IS AN OLD POST Microsoft has replaced this qualification

Microsoft MCSE Data Platform
Some notes on the syllabus for this – thinking of taking it.

Earning an MCSE : Data Platform certification will qualify you for
jobs such as database analyst and database designer

1 : Querying Microsoft SQL Server 2012
Exam 70-461 – MS SQL 2012 credit towards certification MCSA and MCSE

* Create Database Objects (24%)
* Work with data (27%)
* Modify data (24%)
* Troubleshoot and optimise (25%)

2 : Administering Microsoft SQL Server 2012 Databases
Exam 70-462 – MS SQL 2012 credit towards certification MCSA and MCSE

* Install and configure (19%)
* Maintain instances and databases (17%)
* Optimise and troubleshoot (14%)
* Manage data (19%)
* Implement security (18%)
* Implement high availability (12%)

3 : Implementing a Data Warehouse with Microsoft SQL Server 2012
Exam 70-463 – MS SQL 2012 credit towards certification MCSA and MCSE

* Design and implementation of data warehouse (11%)
* Extract and transform data (23%)
* Load data (27%)
* Configure and deploy SSIS solutions (24%)
* Build data quality solutions (15%)

After completing steps 1-2 you’ll earn a Microsoft certified Solutions
Associate (MCSA) SQL Server 2012 certification

4: Developing Microsoft SQL Server 2012 Databases
Exam 70-464 – MS SQL 2012 credit towards certification MCSE

* Implement database objects (31%)
* Implement programming objects (21%)
* Design database objects (24%)
* Optimise and troubleshoot queries (24%)

5 : Designing Database Solutions for SQL Server 2012
Exam 70-465 – MS SQL 2012 credit towards certification MCSE

* Design database structure (29%)
* Design databases and database objects (32%)
* Design database security (15%)
* Design a troubleshooting and optimisation solution (24%)

Complex Event Processing (How Cool)

complexEventProcessing2

As part of my timing software solution I had been interested in seeing if there was a better solution to the constant pulling of information from the timing boxes. It would for instance be far better to have some sort of push mechanism where calculations were only made when new information was received.

Turns out that with the advent of big data (which to my mind is being driven by sensors) it seems to be a bit of a hot topic. Doubtless brought on by the myriad number of devices and sensors which are in the market at the moment. Microsoft have a framework called StreamInSight which is free to those that already have SQL Server 2012 licence (not sure which level)

I still have a lot of questions.
Leading on from the post I did on designing my own timing software I consider that it would be useful as a single time could come in and it could be linked up with its partner times and a lap number could be calculated that would allow the relatively easy display via pivot. A process that could occur as the information came in rather than being pulled and batched which is the way my system does it at the moment.

Not sure how I can get my hands on the framework though… Would love to try it out.

Resources here.

StreamInsight: More than Just an API

Attaching Databases to SQL Server 08R2 Express

jigsaw2
It should be noted that the following although the easiest way to get a new database into an instance it should not be used in a production environment. In fact doing so may get you sacked. If experimenting though this method should be fine. If in doubt seek help as in a production environment you would want to look through all the code before attaching anything into an instance.

Go to SQL server management studio and on the Databases tree
Right click and select
Attach…..

Attach database window should appear which will allow you to use the Add… button to navigate to the
\Data\ subdirectory where all the sql server databases are held.

IMPORTANT – prior to loading a file in the database will have needed to have been DETACHED and you should always move anything mdf file that you are wanting to put into a database into the data subdirectory.
This ordinarily is done by going to database in question scrolling down to the database and right clicking on the database

Tasks > – Detach…

WARNING
If a database has not been detached properly it may NOT be possible to re-attach the database this is of course a security feature. So experimenting with simple moving files about will not work…

The listed code below does it at command line but the above works in SSMS

The default location for databases in SQL 08R2 Express is
C:\Program Files\Microsoft SQL Server\MSSQL10_50.SQLEXPRESS\MSSQL\DATA

The default location for database in SQL 2012 is
C:\Program Files\Microsoft SQL Server\MSSQL11.[InstanceName\MSSQL\DATA

Stopping and Starting SQL Server Instance 08R2 Express

startstop

Simply within SSMS right click on the instance and hit STOP and
To start an instance if you are still in SSMS you can simply right click and hit start

Note if you stop a SQL Server instance from within SSMS AND then exit SSMS and try and go back in you will be denied as SSMS is unable to connect to a service that is not up and running.

In such a case to restart the instance you need to go to SQL server configuration manager and click on the instance and restart from there.
In Windows 8.1 you can get to config manager by using the search facility.

Windows 10 Alternative
Hit the search ring
type in services.msc
A new dialog should appea that will have Services(Local) with several columns – Name / Description / Status / StartupType
You want the Status to be Running
Use the mouse to highlight SQL Server (MSSQLServer) and then right click
Start

Your server should now be running

Allowing sa login and altering password SSMS SQL 08 R2 Express

password-security

Recently I installed SQL Server 08 R2 Express.

As part of the standard installation the sa login is disabled as default.

Clearly although this is a useful security feature it is a bit awkward if you are wanting to undertake certain tasks and as part of the installation this security feature is in no way obvious.

So what do you do to re-enable it?

Firstly log into SSMS under the machine windows login.

Go to the Security section of the server (not any of the databases) and expand the Logins branch. SA the system admin should be listed and if it is disabled it will have a small red down arrow next to it.

To re-enable highlight sa and right click

Select properties

Select Status

now alter the following
Permissions to connect to database engine
Set this to GRANT

Login
Set this to Enabled

Now highlight instance itself and right click and go to properties.
Within server properties highlight Security.
And change set server authentication to
SQL Server and Windows Authentication mode.

You should have sa login now enabled – don’t worry if sa still has a small red arrow next to it the SSMS client needs to be refreshed to see changes to set up.

If you want to change the password for the SSMS server I would recommend running the following.

ALTER LOGIN sa ENABLE ;
GO
ALTER LOGIN sa WITH PASSWORD = 'DifficultPass9£' ;
GO

Note you can enforce the requirement for a strong password within the same security section of the sa login if you require.

Attach DSN Less Connection to Link MS Access to SQL Server

link2

This code is generally available all over the tinternet nonetheless I list it here for my own personal use. I use an autoexec macro to trigger the code on open

With a Run Code action to trigger the AttachDSNLessTable…
So the code in the macro might look something like this
AttachDSNLessTable(“Table01Invoices”,”Table01Invoices”,”Server01″,”AccountingDatabase”,””,””)

Alternatively you could run it from the immediate window of the VBA module section.
Ctrl + G to get the immediate window up then create the function with the required parameters placing a question mark in front of the function eg
?AttachDSNLessTable(“Table01Invoices”,”Table01Invoices”,”Server01″,”AccountingDatabase”,””,””)

Pressing return will result in True result and when you go to the tables section Table01Invoices or your table should appear. Note if you have the tables section open of the database window then you will need to refresh.

Honestly works a treat and you can totally revolutionise processes if you are allowed to use the ease of front end design of something like MS Access with the scalability and power of SQL Server.

Needless to say vendors tend to be universally unwilling to give me details of their(/our!) backends.

'//Name     :   AttachDSNLessTable
'//Purpose  :   Create a linked table to SQL Server without using a DSN
'//Parameters
'//     stLocalTableName:Name of the table
'//     stRemoteTableName: Name of the table that you are linking to on the SQL Server database
'//     stServer: Name of the SQL Server that you are linking to
'//     stDatabase: Name of the SQL Server database that you are linking to
'//     stUsername: Name of the SQL Server user who can connect to SQL Server, leave blank to use a Trusted Connection
'//     stPassword: SQL Server user password
Function AttachDSNLessTable(stLocalTableName As String, stRemoteTableName As String, stServer As String, stDatabase As String, Optional stUsername As String, Optional stPassword As String)
    On Error GoTo AttachDSNLessTable_Err
    Dim td As TableDef
    Dim stConnect As String
    
    For Each td In CurrentDb.TableDefs
        If td.Name = stLocalTableName Then
            CurrentDb.TableDefs.Delete stLocalTableName
        End If
    Next
      
    If Len(stUsername) = 0 Then
        '//Use trusted authentication if stUsername is not supplied.
        stConnect = "ODBC;DRIVER=SQL Server;SERVER=" & stServer & ";DATABASE=" & stDatabase & ";Trusted_Connection=Yes"
    Else
        stConnect = "ODBC;DRIVER=SQL Server;SERVER=" & stServer & ";DATABASE=" & stDatabase & ";UID=" & stUsername & ";PWD=" & stPassword
    End If
    Set td = CurrentDb.CreateTableDef(stLocalTableName, dbAttachSavePWD, stRemoteTableName, stConnect)
    CurrentDb.TableDefs.Append td
    AttachDSNLessTable = True
    Exit Function

AttachDSNLessTable_Err:
    
    AttachDSNLessTable = False
    MsgBox "AttachDSNLessTable encountered an unexpected error: " & Err.Description

End Function