Methodology Compound Interest Calculation (Updated October 2023)

A formula that can be used for calculating compound interest

A = P( 1 + (r/n) )^nt ; R = r * 100

Where:
A= Total Accrued Amount (Principal + Interest)
P = Principal Amount
R = Rate of Interest per year as a decimal 
; r = R/100 so 4% is 4 and r would be 0.04
t = number of periods
n = compounding period
(^ indicates to the power of)

Note: Remember BODMAS when calculating with variables

Reasoning – this breaks interest down into individual compounding periods. For example, within a year when dealing with months, r would be divided by 12 if the source of interest is annual based. The individual periods are then compounded using the power over all the periods eg 24 periods for 2 years – see the examples below. NOTE the r/n is an empirical adjustment required because quoted interest rates from most sources are over a year (annual). Whenever obtaining interest rates from a source we must be careful with the r/n calculation as it may need to be ignored. If for some reason the period over which interest is defined in the source list is anything other than annually this r/n calculation may require alteration..

UK Base Interest Rates source
Bank of England Base Rate

XLS File of Base Rate changes since 1664 to June 2022
Note – I took a snap shot at June 2022 for latest go to Bank of England base rate where there is(at October 2022) a constantly updated xls file.

So for example if we want to calculate interest on £100,000 over a period of 4 years and 8 months based on an interest rate of 4.0% over the base of 0.5% over differing compound periods;
Compounded annually;
A = 100,000 ( 1 + (0.045/1) )^4.67 = £122,821.10
A = £122,821.10

Compounded Monthly;
A = 100,000 ( 1 + (0.045/12) )^56 = £123,319.40
A = £123,319.40

Compounded Daily
A = 100,000 ( 1 + (0.045/365) )^1704 = 123,376.30
A = £123,376.30
Please note : simplification this calculation leap years re-calculate if important
(^ indicates to the power of)

Methodology – How to calculate the Interest rate to be used

At the Bank of England the Monetary Policy Committee (MPC) made up of appointed members set the bank of England Base rate. When they do this it normally makes the national news. For example on the 3rd of August 2023 the Monetary Policy committee set the interest rate at 5.25%. This is the interest figure I use in the above compound interest rate when I need to calculate interest to be added by the council for holding money over a given period. But because for any given period it is unlikely that interest rates will have been uniform for the entire period it is necessary to either calculate one figure for the entire period or alternatively calculate the interest on the principle for each sub period and aggregate the figure for each of the periods. Below shows a method of calculating a single average daily interest rate for any period given changes to the rates.

So for example:

Calculate the interest rate to be used for a return of developer contributions received on the 11 May 2023 and required to be returned on the 18 August 2023 in the knowledge that the interest rate on the 11 May 2023 was 4.5% but was raised by the MPC to 5% on 22 June 2023 and then raised to 5.25% on the 03 August 2023. Develop a framework that can be used to calculate an applicable interest rate that can be used in the compounding interest rate calculation.

Average interest rate over this period is calculated as 477.75/99 or 4.825757%

This figure is consistent with the reporting by the Bank of England which changes rates on individual days rather than at the end of years or months. As such we should use the Compounding on a Daily basis to calculate the compounded interest to be returned as a result of holding this money for 99 days.

Normally, for developer contributions, additional interest will be calculated over periods of years rather than mere days but the above template can be used for any given time period. Additionally and importantly it calculates the total number of days which is also required for the compound interest rate calculation.

MS Azure – SQL Azure – Reliability update 001 (38 days) – using Azure Logic App to execute a Stored Procedure

So a month ago in an non critical application I set up a trigger for a stored procedure to copy records (about 3000) from one table to another 6 times a day.

Approximately 38 days in and I have 100% reliability.

I have firewalled the required IP addresses listed by Microsoft
Azure Logic Apps list of IPs for Firewalls

I will keep running this for testing purposes to identify the reliability and report back

MS Azure – TSQL a simple example using a Common Table Expression (CTE)

A common table expression (CTE) is a temporary result set that you can reference within a SELECT, INSERT, UPDATE, DELETE, or CREATE VIEW statement. A CTE is similar to a derived table in that it is not stored as an object and exists only for the duration of the query.

I’m finding them useful as you can use them within a view to contain all the references required for that particular view. This I feel makes things more maintainable.

An example of a simple common table expression (CTE) in T-SQL:

WITH CTE_EmployeeSalaries AS
(
    SELECT EmployeeID, Salary
    FROM Employees
    WHERE Salary > 50000
)
SELECT *
FROM CTE_EmployeeSalaries;

This CTE defines a virtual table named CTE_EmployeeSalaries that contains all employees with a salary greater than 50,000. The CTE is then used to select all rows from this virtual table.

Common table expressions (CTEs) have several advantages:

1.Improved readability: can make complex queries easier to read and understand by breaking them up into smaller, more manageable pieces.
2.Improved maintainability: Because CTEs are self-contained, they can be easily modified or replaced without affecting the rest of the query.
3.Improved performance: In some cases can improve query performance by reducing the need for subqueries.
4.Recursive queries: CTEs can be used to perform recursive queries, which are useful for querying hierarchical data such as an organizational chart or a bill of materials.
5.Temporary results: can be used to store intermediate results that are used multiple times within a single query. This can be more efficient than repeatedly calculating the same intermediate results.
6.Better alternative to view: CTEs can be used as an alternative to views, which can be difficult to modify and are not always optimized for performance.
7.Reusable: CTEs can be defined once and used multiple times within a single query or in multiple queries within the same session.

MS Azure TSQL writing comments

In TSQL, comments can be added to code in two ways:

1.Single-line comments: These start with two hyphens (–) and continue until the end of the line. For example:

-- This is a single-line comment

2.Multi-line comments: These start with a forward slash and an asterisk (/) and continue until the closing asterisk and forward slash (/). For example:

/*
This is a multi-line comment. It can span
multiple lines and is often used to provide
detailed explanations or to comment out large
blocks of code.
*/

When writing comments, it’s important to keep them clear and concise, and to use them to explain why something is being done rather than how it is being done. This helps to make your code more readable and easier to understand for other developers who may be reading it.

SQL Azure – Using Azure Logic Apps to execute a Stored Procedure in SQL Azure

It is important in a lot of systems to be able to run queries on a regular schedule. Previously I have outlined that this can be done using an automation account. It is also possible to accomplish this using an Azure Logic App to call a Stored Procedure.

The procedure is
Create Logic App
Add items to it

Firstly using SSMS connect to the database and create an example stored procedure.

CREATE PROCEDURE [dbo].[TestInsert]
AS
BEGIN
SET NOCOUNT ON

INSERT INTO dbo.T0003NLPRSitesTarget
(sitename)
SELECT Sitename from dbo.T0003NLPRSites
END
GO

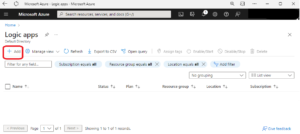
Next log into your Azure Portal and identify the following icon

Select it and then hit the Add button..

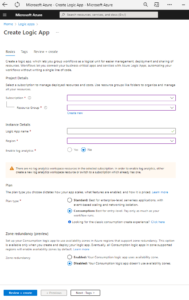
You will be presented with the following screen

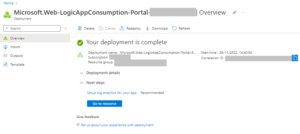
Now you should be taken to an overview showing that the logic app has been created

Hit Go to resource

You should be presented with the following screen

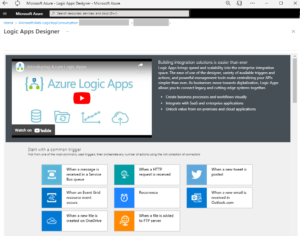
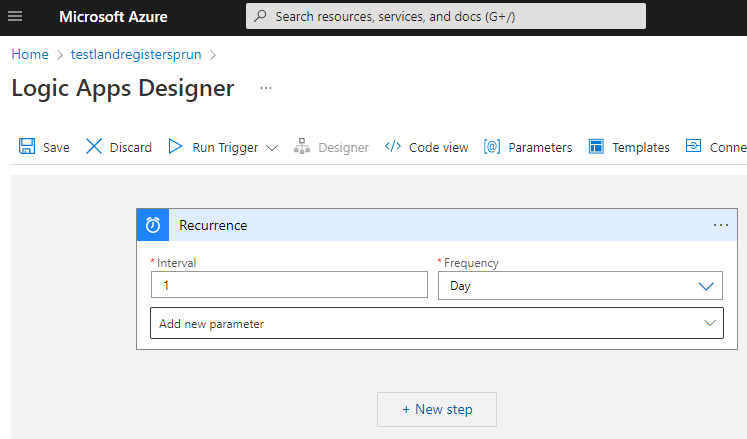
Here we choose Recurrence

You will be presented with the following Logic Apps Designer

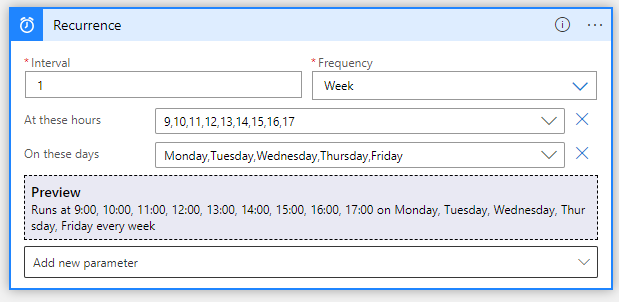
Here is an example
Interval is like how many times the logic app will run over what Frequency
So if we put 3 in Interval and Frequency Day it would run once every 3 days
At these hours – sets specific times when the logic app will run within the set Frequency
On these days – allows for you to set what days the logic app will run At these hours

To explain the logic app running work from the bottom up. So the below example

On Monday, Tuesday , Wednesday, Thursday and Friday at 9,10,11,12,13,14,15,16 and 17 hours

Every week this will run (If Interval had been set to 3 it would have been every three weeks on Monday,Tuesday,Wednesday, Thursday and Friday at the hours 9,10,11,12,13,14,15,16 and 17 hours it would run.

Now hit next step and then type in execute stored procedure

You will first need to set up the connection to the database and then enter the parameters of the server database name database username and password or your chosen security to connect to the database and then you will be taken to the appropriate item.

You will need to set up the firewall on the server to ensure otherwise the logic app is likely to stop working at somepoint..

You can get a list of the appropriate firewall rules to set up by going here..

Managed connectors outbound IP addresses

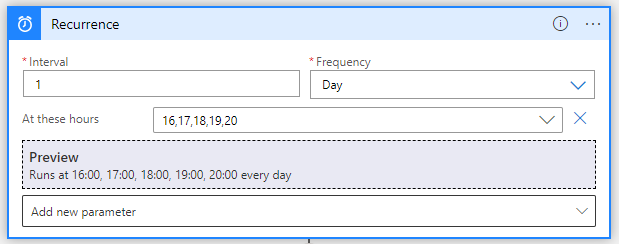
So after further testing with the following parameters I discovered that in practice SQL Azure is a bit loose about the hours recurrence option. For example the following

Has been runnnig at 43minutes past the hour. Which is indicative of when I hit a run trigger at..

I will be checking to see when it next runs but I suspect it is going to be 17:43

SQL Azure (Basic notes on backup operation)

If you are running things on the cloud you always want to be thinking about backups and ensure that you are really aware of what is happening with backups and how to restore from backups. You should regularly check what is happening with backups and regularly practice restoring databases.

Basic / Standard and Premium SQL Azure has two basic options for restore.

Point in Time Restore and
Long Term Retention

They perform the same task – they collect old databases that can be used to restore to a server if need be but what varies in the UI by which you restore them.

First point – Long Term Retention Policy is attached to the server and you go into it by first navigating to your server and then looking to the left hand section marked as Data management.

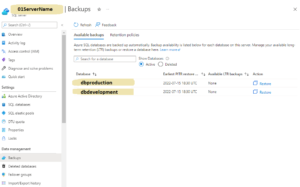
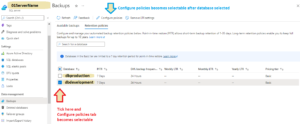
Select Backups and you will be presented with a list of all the long term backups of the databases on that server. The following are a couple of basic dtu databases and what can bee seen on the fictional server 01SeverName

In the above table you can see that Long Term Retention policy has NOT been set. How do you change this.

Firstly ensure that you are on the retention policies tab and then tick the particular database you would like to set the retention policy for in the lower section this will allow you to Configure a policy for that particular database.

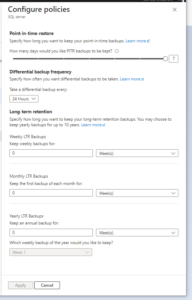
Here are the options for a BASIC DTU database

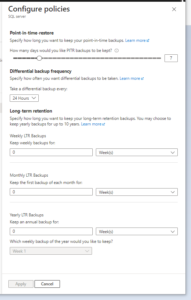
Compare this with the options for a database in the Standard Tier

Set it up and then hit apply and you should be good to go.

MS SQL Azure – CREATE USER with read only access to 2 tables

In a lot of situations you may need a satellite website feeding off the main website with greatly reduced access.

It is a good idea to only give that user access to only what they need and limit it down to the bare minimum.
Here I have an azure database called LandRegister and I connect to it in the usual way through SSMS.

Use LandRegister

USE LandRegister
GO

CREATE user TestUserRestricted with password = 'Password01';

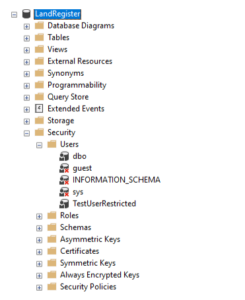
Next you can go to the security section after a refresh to see if the user has been added.

And then grant access to the tables you wish them to see.

USE LandRegister
GO

GRANT SELECT on dbo.T0003NLPRSites to TestUserRestricted
GRANT SELECT on dbo.T0024Authority to TestUserRestricted;

TestUserRestricted can now be used by your web application without any fear that
1) A USER cannot login to a server through SQL Server Management Studio
2) That they can see anything except the tables listed.
3) That in this case they can do anything except select statements on the stated tables. (So no write delete or updates on table)

Here I give full access to the table

USE LandRegister
GO

GRANT INSERT,SELECT,DELETE,UPDATE ON 
dbo.T039Country to TestUserRestricted;

And it works with views as well

Use LandRegister
GO

GRANT SELECT on dbo.v032 to TestUserRestricted;

MS Azure & Web Applications – TSQL Create a check constraint on nvarchar column specifying a minimum length in DB and through the front end ensure enforce OWASP security

Double security!
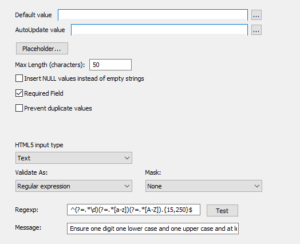
Enforce length in database and then through the front end by validating in this case password values (PHPRunner example).

First the backend
You have a nvarchar(128) column in MS Azure SQL Database (or any Microsoft SQL Server database) and you wish to add a check constraint that does not allow a value in the column to be less than lets say 15 characters long.

tablename = users
field = userpassword

ALTER TABLE dbo.users
ADD CONSTRAINT [MinLengthConstraint] 
CHECK (DATALENGTH([userpassword]))>14;

And then a good way to check the constraints on an individual table using TSQL through SSMS for MS AZURE.

SELECT TABLE_NAME, 
CONSTRAINT_TYPE, 
CONSTRAINT_NAME 
FROM INFORMATION_SCHEMA.TABLE_CONSTRAINTS 
WHERE TABLE_NAME ='users';

Front End
Now for double security in your web application use a regular expression to prevent users entering a weak password.

^(?=.*\d)(?=.*[a-z])(?=.*[A-Z]).{15,128}$
^               # start of the string
(?=.*\d)        # a digit must occur at least once
(?=.*[a-z])     # a lower case letter must occur at least once
(?=.*[A-Z])     # an upper case letter must occur at least once
.{15,128}       # 15-128 character password must be a minimum of 15 characters and a maximum of 128
$               # end of the string

OWASP – Open Web Application Security Project

cPanel – take a manual backup of a MariaDB / MySQL database

There are no shortages of articles on how to take a backup of a MySQL or MariaDB database from cPanel however given how important it is I like to write these things down showing how I accomplished this for my own reference. Its extremely easy to do a download which means that you should not have any opportunity or reason not to do it regularly if you have an important database that for instance is part of a web application.

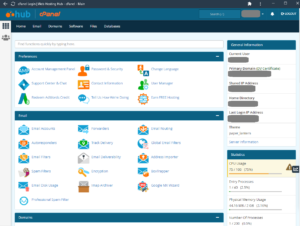
1. Enter your given cPanel management portal.

2.Find the database section and select the phpMyAdmin icon.

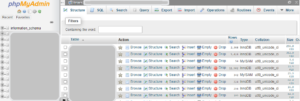
3.Select the database you are interested in from the lefthandside.

4.Click export in the menu section and then its just a case of clicking go. An SQL will be downloaded to the download directory (on a windows machine). And keep this and you can run this to create a new database.

And its very easy to go in and check if its ok you can use any good ide or you could change the suffix to TXT and then just look at it in word.
Happy backing up.!!!

MS Azure – Web App Service – Notes on creating a staging web front end on an existing Web App Service

At some point in developing sites for clients you will may want a satellite site feeding off the main database but with prototype features on it. Considering that certain levels of web app service come with free staging sites you may as well use these rather than either the free service which may be less well provisioned or a separate paid site that you will have to pay additional money for. The number of slots available will depend on the service you are on.

Beginners guide to setting up a staging slot

Once you have the site up and running you operate it in the same way as a normal service and so you can get the publishing details from the Get Publish Profile.

SQL Azure – Creating a numbers table using a Cartesian Product and then expanding dates between two field values for individual records

The following code uses a Common Table Expression to create a numbers table ,which is then used to expand all dates between two date values of an individual record. This structure could be used in a variety of circumstances where you are needing to charge costs to a product over a period of time or if you are needing to record consecutive dated values between two dates.

I am using Whisky Casks as an example here. Imagine a cask came in on a day and needs to be matured for a period and there will be a charge for every day that the cask is being stored to an account. Clearly going forward you might want to set up an overnight process to create the daily charges. But what happens where you wish to retrospectively create charges. Charge records will build up quickly and it will be difficult to manually keep on top of the required record correction.

Firstly I create a table that will hold a single record for each date a cask is in bond between the two tables. There are additional columns here as I need them for my use case (casks in bond).

SET ANSI_NULLS ON
GO

SET QUOTED_IDENTIFIER ON
GO

CREATE TABLE [dbo].[t066tempexpand](
	[pkid] [int] IDENTITY(1,1) NOT NULL,
	[chargedate] [datetime] NULL,
	[accountcode] [nvarchar](16) NULL,
	[pkidt002] [int] NULL,
	[pkidt053dailystoragecharge] [int] NULL,
	[locationwarehouse] [nvarchar](50) NULL,
 CONSTRAINT [PK_0000temp] PRIMARY KEY CLUSTERED 
(
	[pkid] ASC
)WITH (PAD_INDEX = OFF, STATISTICS_NORECOMPUTE = OFF, IGNORE_DUP_KEY = OFF, ALLOW_ROW_LOCKS = ON, ALLOW_PAGE_LOCKS = ON) ON [PRIMARY]
) ON [PRIMARY]
GO

Next we create a CTE numbers table and use this to explode a single record for each dated day between the two dates in this case bondindate and a disgorge date. I have an extra filter here that filters what casks are being put into the table (here pkid>2000). Other filters could be where disgorgedate is not null. The following line will be used to identify the charge date.
dateadd(day,v.number,d.bondindate)
and
join Numbers v on v.number between 0 and datediff(day, bondindate, disgorgedate)
The first line shows the date that will be charged. The join is particularly elegant as it filters or restricts the records within the numbers table stored as a common table expression to multiple records of an individual cask based on all dates between two field values. The starting date identifies where to explode from and the second identifies the ending date (in this case the disgorge date) identifies where it must end. Another example if you were wanting to bring it up to todays date or the day before today , if you have an overnight process running at midnight getdate()-1.

The cross join in the common table expression definition is used to create a cartesian join on itself, from my investigations there is no particular significance to the sys.columns table used other than this is a system table that holds all columns in all tables in the database and therefore is likely to be somewhat large. It so happens in the database that I am using there are a lot of tables and a lot of columns so a single self cross join creates more than enough numbers than I will ever need. If you wish to create further records you can further cross join the sys.columns table on itself by repeating cross join line with subsequent aliases eg (cross join sys.columns c). After experimentation I discovered for instance if I left out the cross join there were only some 4,000 records in my numbers table. This is suspect reflects the fact that I have 4,000 columns in the tables of my database. In my case 4,000 X 4,000 or the cartesian product of the sys.columns table on itself results in 16 million records more than enough numbers for me. It should be noted that I am restricting the CTE numbers table to the top 20,000 anyway which in our case relates to over 54 years which is more back dating than I think I will ever need. It should be noted the original code I discovered had three cross joins presumably because the number of tables and so columns in the database was much smaller.

;WITH Numbers(number) AS (
  select top(20000) row_number() over (order by (select 0))-1
  from sys.columns a
  cross join sys.columns b
)

INSERT into t066tempexpand
(chargedate,
accountcode,
pkidt002,
pkidt053dailystoragecharge,
locationwarehouse)
select 
dateadd(day,v.number,d.bondindate) 
chargedate,
accountcode, 
pkid,
pkidt053dailystoragecharge,
locationwarehouse
  from t002caskfill d
  join Numbers v on v.number between 0 and datediff(day, bondindate, disgorgedate)
  where pkid > 2000

Here I am joining with an extra table to find out the daily storage charge and this is just a test.

select
a.chargedate,
a.accountcode,
a.pkidt002,
b.dailycharge,
a.pkidt053dailystoragecharge,
a.locationwarehouse,
b.chargecode
from dbo.t0000temp a
join dbo.v128dailycaskstoragelk023 b on a.pkidt053dailystoragecharge=b.pkid 
order by pkidt002,chargedate;

And lastly I insert all this information into a Charge history table.

INSERT INTO dbo.t0032chargehistory
(chargedate,
accountcode,
pkidt002cask,
chargedamount,
pkidt053chargecode,
locationwarehouse,
chargecode)
select
a.chargedate,
a.accountcode,
a.pkidt002,
b.dailycharge,
a.pkidt053dailystoragecharge,
a.locationwarehouse,
b.chargecode
from dbo.t066tempexpand a
join dbo.v128dailycaskstoragelk023 b on a.pkidt053dailystoragecharge=b.pkid 
order by pkidt002,chargedate;

SQL Azure – Create a Function that uses multiple If Else statements

Example create function code / SQL Azure / that uses the IF ELSE statement to calculate dates between three parameters(referenced to fields) to determine an integer difference between dates – in this case whisky in a bond we are calculating number of days and the parameters are – date cask arrived in bond, date cask out of the bond and date cask is disgorged.
In English I am calculating number of days in a bond from the bond in date to todays date if there is no bond out date or disgorge date. If either of those dates exist the number of days in bond is the bond in date to the earlier of either of those dates.

I add in an extra day so that if a cask comes in on Tuesday and goes out the following days the number of days is counted as 2.

Clearly this is a nice structure that can be used in multiple contexts with different factors. I use the most common option in the first switch in the thought that this will speed things up on the server.

CREATE FUNCTION [dbo].[calculatedaysinbondcorrect]
(
@datebondin Date,
@datebondout Date,
@datedisgorge Date
)
RETURNS integer
as
BEGIN
DECLARE @date1 DATE, @date2 DATE, @date3 DATE;
DECLARE @daysinbond INT;

SET @date1 = DATEADD(DAY,-1,@datebondin)
SET @date2 = @datedisgorge
SET @date3 = @datebondout

IF ((@date2 is null) and (@date3 is null))
	BEGIN 
		SET @date2 = getdate()
	END
ELSE If ((@date3 is null) and (@date2 is not null))
	Begin
		Set @date2 = @datedisgorge
	END
ELSE IF  ((@date3 is not null) and (@date2 is null))
    BEGIN
		SET @date2 = @datebondout
	END	
ELSE IF (@date2 > @date3)
	BEGIN 
		SET @date2 = @datebondout
	END
ELSE IF (@date2 < @date3)
	BEGIN 
		SET @date2 = @datedisgorge
	END
ELSE IF (@date2 = @date3)
	BEGIN 
		SET @date2 = @datedisgorge
	END

SELECT @daysinbond = DATEDIFF(dd, @date1, @date2)

RETURN @daysinbond;
END

Favicon Creation a suggested method

Icons are not just about branding.

They also assist users in distinguishing your application from other applications that may be open on the desktop. Now in the past the configuration of these icons seems to have been a bit flaky with different browsers requiring different formats. After quite a bit of research I have managed to settle on a procedure which will get you good icons for your php applications.

Firstly identify a picture that you wish to make into an icon.

Next get as good a quality 256 by 256 png of the icon you wish to display ensuring that if you require transparent background you include it into the png.

Next go into Inkscape and make 2 exports
1) as a 256 by 256 icon. This will be for desktop windows computers.
2) as a 57 by 57 icon titled apple-touch-icon.png

Then go to an icon converter site

The one I used to go to doesn’t seem to exist anymore but the following site seems to do a good job.

RedKetchup Icon Converter

There should be a step procedure here go through each step.

Step 1 : Choose the png file that you exported from Inkscape
Step 2 : Choose your preferred shape I normally just choose the square
Step 3 : It is important here to choose the multi size in one icon option as follows.

Note if you select multiple image shapes you will get multiple icon sizes. Download the generated ico file and then rename it to favicon.ico.

Place the favicon.ico file and the apple-touch-icon.png file in the root directory of your PHP application and upload to server everything should now work its way to desktop icons.

SQL Azure – Script to identify all Users in a SQL Azure DATABASE and how to remove Users

SELECT name AS username, 
     create_date, modify_date, 
     type_desc AS type, 
     authentication_type_DESC AS authentication_type 
FROM sys.database_principals 
WHERE type NOT IN ('A', 'G', 'R', 'X') 
     AND
          sid IS NOT null ORDER BY username;

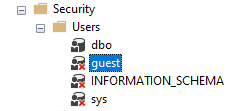
And to remove a user one of the easiest ways both to see all the users and remove any of the individual users. After connecting to your Azure Database within the database in question identify the Security Branch and then the Users branch – right click on the user you wish to remove and select DELETE.

This follows on from the post whereby we were trying to creat a user see here
Creating Contained Users

IDOX – Using Public Access to find Planning Application History

A significant number of authorities in the UK have the same software that allows members of the public viewing access to most of their recent planning application data. The last time I looked the software was in place for almost the whole of Scotland, Northern Ireland and close to 3/4 of authorities in England and Wales.

Part of this provision includes a public access web site that allows members of the public access to planning application details via a mapping screen. With practice this can be used to search and research planning application history. When first using the public website users tend to be defeated by the user interface.

Here’s a quick guide to assist in finding available planning applications relative to a particular site if you know its location on a map.

We will take West Lothian as an example. The UI slightly varies between councils but the principles are the same for a significant number of authorities

Firstly navigate to the Public Access Search screen of the authority that you are interested in.

https://planning.westlothian.gov.uk/publicaccess/

You should be presented with the following screen.

Two thirds of the way down on the right is a tab marked – Map – click this.

You should see something similar :-

Using your mouse navigate to the land parcel you are interested in determining the planning application history for.

Next hit the filter ICON

Note on some authority sites this has been replaced by a drop down combination on the right.

Hitting this icon on West Lothian site reveals a slider – initially it is set to 6 months for West Lothian

Chances are you will want to know all of the planning application history so move that slider all the way across to all time.

Now back on the map you should see many more boundaries representing many more planning applications.

Users can now zoom in on the particular site they are interested in e.g. Wilkieston below

Now using the mouse you can click at the position you are interested in and the attributes of the planning application at the location you click will be revealed in a further dialog.

At this point you can note down the planning application references for further research or you can hit the link marked Application Details – here I click on the link related to 0761/P/18

Which takes you to the Planning Application details page.

Want to see any available associated documents linked to the application.

Look to the text line beneath the table of attributes. The 2 documents is a link that takes you to available docs linked to the application. The number will be different according to the planning application.

Clicking on it brings up the Planning Application Documents screen where you should be able to download or view the documents.

SQL Azure – Azure Automation Hybrid Worker Setup and RunAs Account

UPDATE January 2024 – For SQL Azure you are better using Logic Apps and whitelisting the IP records of the outbound Logic Apps IPs which are specific to the location you are running you are hosting your logic app
See Link for Logic App setup example
and
Azure Logic App IP addresses to White List

My old notes…
The highs and lows.

You’re flying high – you’ve created a stored procedure that you’ve managed to reference in your automation account within a powershell runbook and you’ve got it nicely churning over on an extremely regular basis. You want to run it daily or weekly but as a test you run it hourly just to ensure that it works before releasing it to production. A day passes ok and you think wow this is really great. Then you forget about it and come back to it a week later. You find that somehow it stopped working at 1 am on Tuesday.

What happened????

Sorry you got hit by a block resulting from dynamic IP change on the runbook in the Automation Account – DAMN.
(there is probably a good reason for having a dynamic IP on automation accounts but damn it was really going too well)

So after quite a lot of investigation I found those in the know seemed to be saying the solution is.
Azure Automation linked to a Hybrid Worker

I kept investigating this and I kept getting directed to Microsoft documentation which although really extensive was just not helping me really get my head around things. It wasn’t until I found Travis Roberts that things started to click… I link to three of his videos below.

So the downsides of Hybrid Worker setup..

  • Despite being the recommended solution configuration is complicated.
  • You need to create a VM with a static IP just to run the hybrid worker (and then grant firewall access to the databaseserver for that VM)
  • That VM needs to have 2 cores and 4Gb of Ram (yes unfortunately not the smallest VM so you could be looking at $25 a month charge)
  • You need to set up log analytics
  • It is recommended that log analytics is in the SAME Azure location as the sample database BUT not all Azure locations have log analytics set up… Use UK South! Hands up who has already set up their server and just realised it is in a location that doesn’t allow log analytics.
  • So I was really struggling with this after my runbook unexpectedly started failing. After several days of reading and searching I found Travis Roberts. Hallelujah for MVPs.

    So I haven’t done it yet but I think the procedure can all be defined in here.

    1. Setting up an Azure VM with a fixed IP (It can be any VM but Azure is good for me)
    Setup VM with static IP
    The server you setup will need to have internet connectivity with SSL outbound on port 443

    2. Setting up Azure Log Analytics a step by step guide
    Setting up Azure Log Analytics a step by step guide

    3. Azure Automation Setup and Linking Log Analytics to your Automation account
    Set up Azure Automation and link it to Log Analytics

    4. Configuring an Azure Automation Hybrid Runbook Worker to run your runbook.
    Installation of Hybrid Runbook Worker
    Includes information about Runbook Worker Group and
    RunAsAccount
    You add credentials to the Runbook Worker Group

    Firstly a big thank you to Travis Roberts for putting out those videos he has loads of Azure Centric content on his youtube channel which you can find here

    CAVEAT I haven’t implemented this myself properly and at the time of writing(December 2021) those videos are a couple of years old now. At the start of one of the Videos Travis indicates that things are changing quickly in the space and expect that there has been changes since these videos. Lets face it this should really be easier to do Azure is just frustrating their users with this complicated configuration.

    SQL Azure – Using Azure Automation and Runbooks to Schedule an Azure SQL Stored Procedure

    UPDATE January 2024 – I have moved away from Runbooks for scheduling Azure SQL stored procedures towards using logic apps but keep this here as its always good to have alternative methods of completing the same task. Link to Logic Apps Setup

    Original Post
    Its vital to be able to run stored procedures on a schedule it can be extremely important for doing daily housekeeping.

    This site was where I learned how to do this.
    How to Schedule an Azure SQL Database’s Stored Procedure

    Runbooks sit in Azure Automation and a Runbook consists of a script that performs a task.

    Runbooks can be written in Python or Powershell. See the last part of this post for an important additional issue.

    "Data Source=01server.database.windows.net;Initial Catalog=database;Integrated Security=False;User ID=01userid;Password=JK12jl423;Connect Timeout=60;Encrypt=False;TrustServerCertificate=False"
    
    # Instantiate the connection to the SQL Database
    $sqlConnection = new-object System.Data.SqlClient.SqlConnection
    $sqlConnection.ConnectionString = "Data Source=servername.database.windows.net;Initial Catalog=database;Integrated Security=False;User ID=userid;Password=password;Connect Timeout=60;Encrypt=False;TrustServerCertificate=False"
    
    $sqlConnection.Open()
    Write-Output "Azure SQL database connection opened"
    
    # Define the SQL command to run
    $sqlCommand = new-object System.Data.SqlClient.SqlCommand
    $sqlCommand.CommandTimeout = 120
    $sqlCommand.Connection = $sqlConnection
    
    Write-Output "Issuing command to run stored procedure"
    
    # Execute the SQL command
    $sqlCommand.CommandText= 'exec [dbo].[storedProcedure]'
    $result = $sqlCommand.ExecuteNonQuery()
    Write-Output "Stored procedure execution completed"
    
    # Close the SQL connection
    $sqlConnection.Close()
    
    Write-Output "Run completed"
    

    Honestly the hardest part is getting the code setting up the scheduling after that is relatively easy.

    WARNING : Runbooks have dynamic IPs so although you can set grant access to an IP your runbook will only run for a certain period before it stops working unless you either have a Hybrid Runbook Worker setup OR you allow Azure services and resources to access this server (which isn’t recommended) The next post I will do is my initial notes on how to configure a Hybrid Runbook Worker.

    SQL AZURE – Group records or widgets in Sets of a Specific Number

    Useful if you have factory products that are being packed into sets of a specfic number. In our case sixes.

    Swap out to a different amount if you need to. The last group in the record set will have a remainder level if the recordset is not perfectly divisible by the set integer.

    SELECT pkid,
    floor(((ROW_NUMBER() OVER(ORDER BY pkid))-1)/6)+1 as grpNum
    FROM t002caskfill
    

    Here is a screenshot of the above code being run on a table.

    PHP Runner : Tips and Tricks – Reload a page from event that belongs to a button

    For example on a page we have a button that parses text coming in.

    1. Add the following code to Javascript OnLoad event of the table in question

    window.tablePage = pageObj
    

    2. Add the following code to any Javascript event where you want to reload the table. Can be ClientAfterevent of any button

    if( window.tablePage ) {
    window.tablePage.reload({a:'reload'});
    }
    

    As far as I can tell what you name the pageObj in this case tablePage is up to you – at the point of naming you are creating this variable.
    My hunch is that you would want to name this something relating to the page and something not overly complicated but unique.

    The ClientAfterevent references the same pageObj for page refresh.

    My understanding of the way the code works is.
    On loading the page create a pageObj variable named window.tablePage

    After pressing the button if there is a pageObj variable named window.tablePage refresh it!