Geoserver Installation (Configuration for SQL Server on Windows)

Once you have your data in an Enterprise Grade database sharing that information becomes important. Some vendors, in particular Digital mapping SAAS vendors want you to transfer your data into their clouds but for a lot of authorities that is categorically impossible for large segments of their data. For example about 3/4 of UK planning authorities run on software built by a company called IDOX Group plc which holds its data in Oracle this cannot be moved. For Geographical data here’s where Geoserver comes in.

Geoserver Official Website

From the website
GeoServer is an open source server for sharing geospatial data.
Designed for interoperability, it publishes data from any major spatial data source using open standards.

GeoServer implements industry standard OGC protocols such as Web Feature Service (WFS), Web Map Service (WMS), and Web Coverage Service (WCS). Additional formats and publication options are available as extensions including Web Processing Service (WPS), and Web Map Tile Service (WMTS).

Another way of putting it Geoserver allows programs that display and manipulate geographic information to display and edit that data while keeping it safe and secure and located in enterprise databases. It can connect to SQL Server / Postgresql and I am told Oracle which are the main relational databases used by Local authorities today so once setup and configured it could be used to compare and contrast information in one location from variable datastores. Datastores that for historical reasons cannot be moved. Here I concentrate on SQL Server because we have a particular issue with new systems needing to connect to SQL Server but it would be great if we could get it working with Oracle as well.

The following are my notes on installation and configuration of Geoserver on Windows linking to SQL Server and in this case a remote(not on the same computer) SQL Azure instance I believe any remote SQL Server instance would be similar. This post is a detailed explanation of the installation of Geoserver locally on a laptop but I believe installation would be exactly the same on a Windows Server machine albeit additional steps would be required to publish to the web either internally or externally.

Its all configuration so remember your host names / IP numbers / ports / usernames / passwords / database, table and column names

To start this tutorial please ensure the following resources are available;

  • SSMS – installation of Sql Server Management Studio
  • SQL Azure instance with privileges to run SQL. Please note you will need to know the port number of your SQL server instance and have a Username and Password for your user.
  • Necessary privileges to set the firewall on the database which you will link to Geoserver –
  • QGIS – installation – If you don’t have a SQL Server instance with geodatabase already that you can use you will probably need this to add at least one record to a geometry enabled table I plan to expand my notes on this but at present you might be able to skip this
  • Geoserver 2.24.1 – installation files
  • Enough privileges on the computer you are installing geoserver to download installation files and move files into a library subdirectory of the c:/program file/geoserver directory
  • WorkFlow Synopsis Overview
    1)Download and install Java runtime engine (as above importantly here I use 11)
    2)Download and install Geoserver (2.24.1 in this case)
    3)Test that the Geoserver Admin dashboard is up and working
    4)Download and configure Geoserver Extension for SQL Server library (SQL Azure example)
    5)Good idea to setup a login specifically to your SQL Azure instance with least privilege – Your SQL Server instance with geodatabases may already have suitable logins. So steps 5 and 6 can be skipped
    6)Good idea to create an example table with Geodatabase in SQL Azure – will be used as a test connection table – NOTE if you already have a SQL Server with geodatabases you could use that instead.
    7)White list IP within the SQL Azure instance firewall rules to Geoserver computer
    8)Opening Geoserver and setting the ‘Store’ to reference your SQL Azure database using the login setup in step 5.
    9)Adding a new layer from the Store made in point 8 and seeing if you can Preview the layer – Ideally you should have a table that has some features in it. Setting the WMS and WFS up in Geoserver with sufficient rights to allow editing (if WFS setup)
    10)I don’t explain it in my post below but the next step would be to test in QGIS to see if you can setup a project in QGIS which can pull from Geoserver against a basemap and you check that the Polygons are actually where you want them to be.

    Workflow Detailed
    1)Download the install Java Runtime via JDK

    There are some complications here
    Initially I tried to use the Java Runtime engine 17 and went through the complete Geoserver installation but on testing I was getting a Java error when trying to view layers. After a short google I came across a stack overflow thread that indicated that geoserver support for JDE 17 was experimental and I should use Java Runtime engine 11. Deinstallation of 17 and installation of 11 solved this.

    Additionally there is the issue of where you obtain the Java Runtime installation from – there is the Adoptium location and then there is Oracle location. Oracle are making moves to charge for use of their Java Runtime engine so it is important that you use Adoptium resource to reduce costs.

    Later I will list the url to the JDK download for Java Runtime engine but it is important to realise that Adoptium is a safe source, well supported and noted as open source.

    https://adoptium.net/en-GB/members/

    so

    Google Search for Adoptium
    https://adoptium.net/en-GB/

    Navigate to other platforms and versions and target windows 64 bit JDK and 11 LTS version and download the .msi.

    After a short delay you will be shown the msi which will be in your downloads folder

    Double click on it to install.

    Now the only thing that is tricky here is to setup the java home directory as follows

    Video Installing Adoptium JDK on Windows

    In particular note this section

    2) Download and install Geoserver

    Go to the official Geoserver web page and follow the links to download the windows installer

    Here I use the windows version of Geoserver version 2.41.1 obtained January 2024 from the following url
    Geoserver Official Website

    See download button and then go to Windows Installer

    I chose the left option and then I chose the Windows Installer option

    This will download Geoserver-2.24.1-winsetup.exe to your download directory and you can then start the geoserver installation process

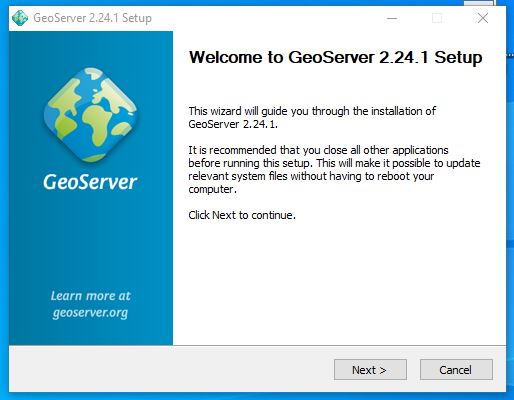
    Next open up the executable and follow the instructions

    Next agree the licence

    Next we reference the java library installed in the previous step – if you have set the java_home variable correctly it should automatically find JRE 11 for you and it will place it within the path reference below. I don’t have a screenshot of the JRE 11 reference here as on my first installation I referenced the Oracle 17 JRE – (note I went back de-installed geoserver installed JRE 11 and then reinstalled geoserver to counter the proprietary Oracle runtime library and importantly to fix the issue that I was facing of geoserver not being compatible with JRE 17

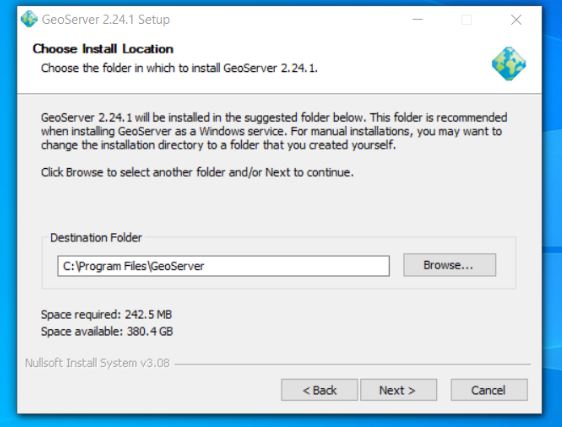
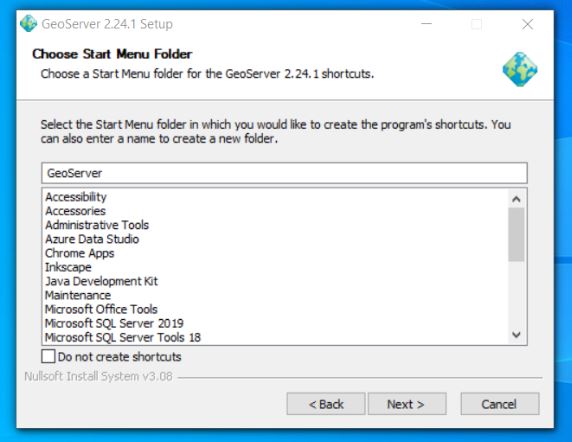
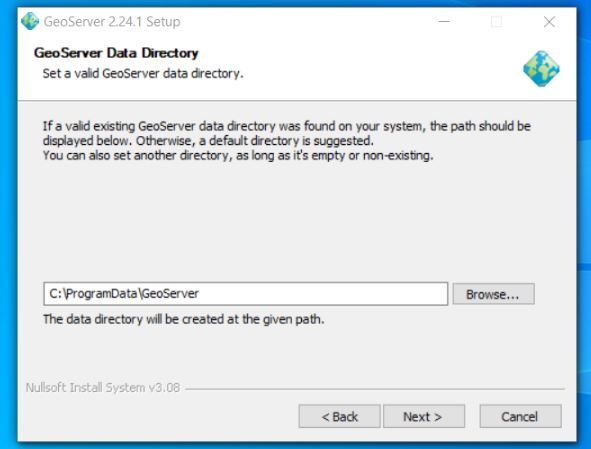
    The rest of the install from here is standard for a windows install

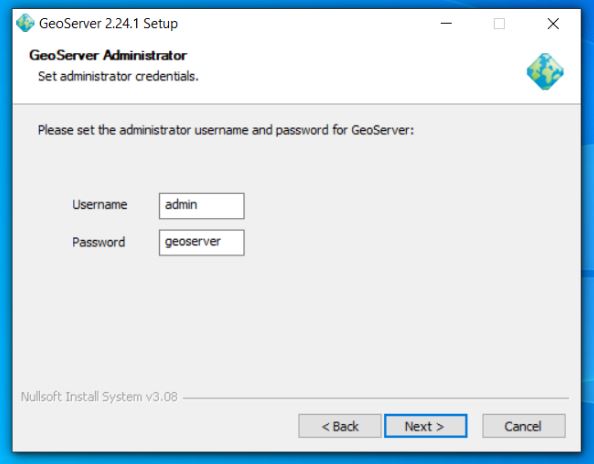
    Next setup the default admin password – defaults are admin / geoserver

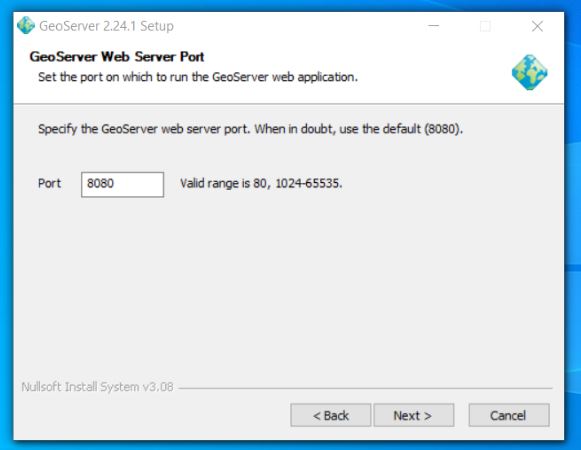
    Set up port geoserver runs on – default is 8080

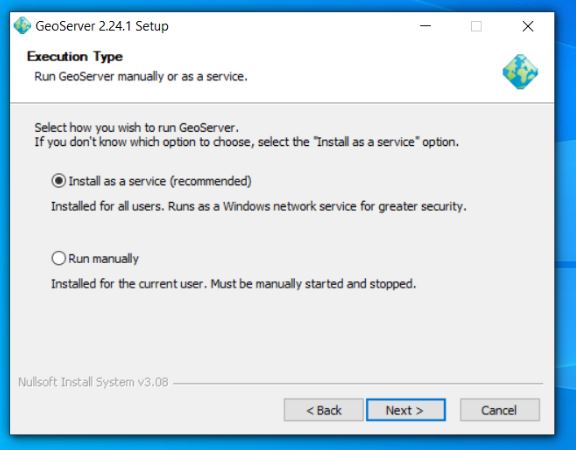
    Next choose the execution type I like to install geoserver as a service

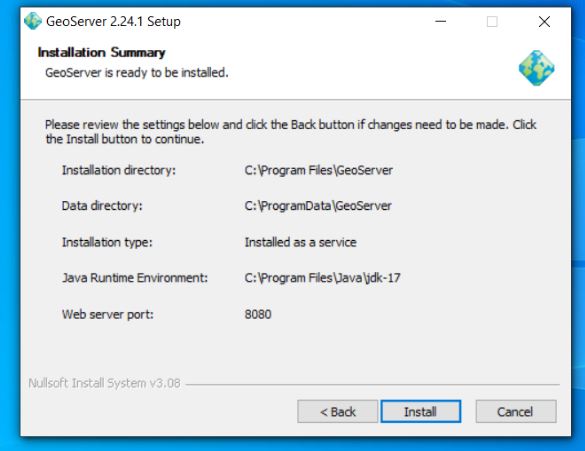
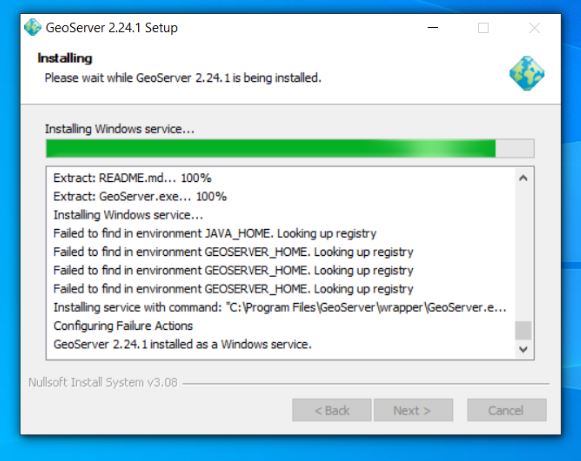
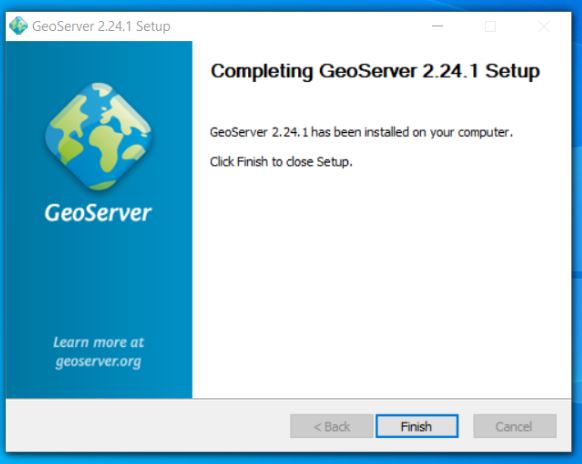
    Confirm your preferences and then trigger install

    Now you should see geoserver on your local machine as a service which you will need to ensure is running to access properly

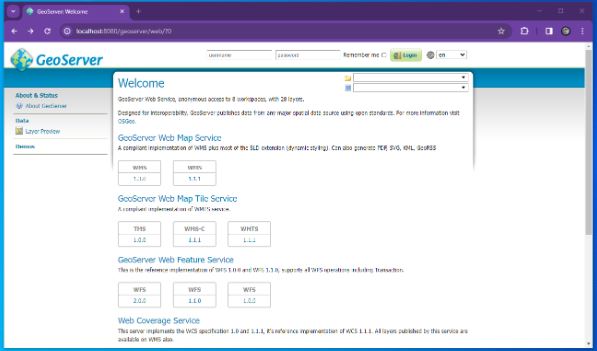
    3) Test that Geoserver Admin dashboard is up and working at least locally

    If you have used the same settings as me open a browser and navigate to the following url

    https://localhost:8080/geoserver/web

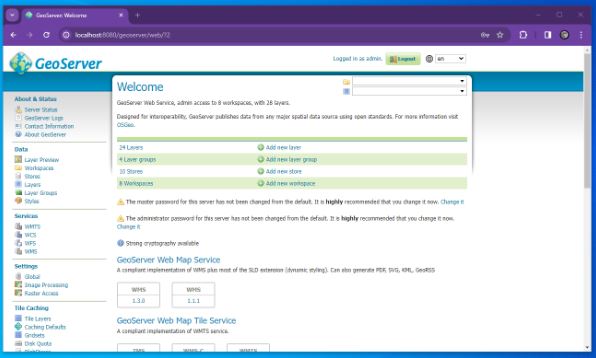
    Login with the username and password which is usually admin / geoserver

    At which point you should see something similar to the following

    4) Download and configure Geoserver Extension for SQL Server

    At install Geoserver comes with the ability to connect to Postgres but NOT SQL Server so we must install/configure plugin extension to enable Geoserver SQL Server connections.

    Here we go back to the geoserver.org website and go to download but this time instead of choosing the windows installer we look to the Extensions section and choose SQL Server

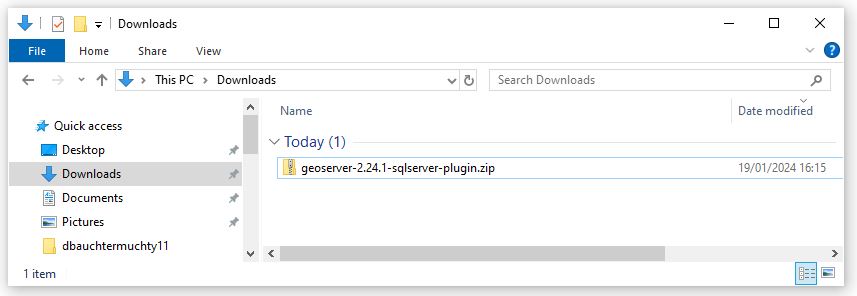
    This should download geoserver-sqlserver extension plugin

    Next copy all files with the jar suffix into the following directory

    C/program files/GeoServer/webapps/geoserver/WEb-Inf/Lib

    Next restart the geoserver and go back to the local host and sign in

    http://localhost:8080/geoserver/web/?0

    We are now very close to linking to SQL Server prior to that we must whitelist our geoserver so that your SQL Server instances will accept connections from your geoserver. Steps 5 and 6 are more about creating a user and ensuring you have a geodatabase with a georeferenced table skip to 7 if you want to read about white listing in SQL Azure or you have an alternative database that you could use with requirements already set up.

    5) Next its a good idea to create a user with least privilege this will be used to set up the link so go to SSMS

    Least privilege User Login Setup SQL Server

    Here allow the amount of access you wish users to have remembering the principles of least privilege

    6) Lets create an example table with geometry that we will be connecting
    When I first tried connecting to SQL Server (SQL Azure in my case) I didn’t have any georeferenced tables so I created one and added a few records. If you have a database already with tables with geometry or geography you might not need to do this step.

    So open SSMS and navigate to your database and use the following TSQL to create a table here I call it t064

    SET ANSI_NULLS ON
    GO
    
    SET QUOTED_IDENTIFIER ON
    GO
    
    CREATE TABLE [dbo].[t064](
    [PKID] [int] IDENTITY(1,1) NOT NULL,
    [geomcol] [geometry] NULL,
    [sitename] [varchar](30) NULL,
    PRIMARY KEY CLUSTERED
    (
    [PKID] ASC
    )WITH (STATISTICS_NORECOMPUTE = OFF, IGNORE_DUP_KEY = OFF, OPTIMIZE_FOR_SEQUENTIAL_KEY = OFF) ON [PRIMARY]
    ) ON [PRIMARY] TEXTIMAGE_ON [PRIMARY]
    GO

    This is a really simple table with three columns and you might want to link to it through QGIS and just create a few records – I would try and use a default projection of 27700 if you are UK based. I might come back with an example table with records..

    If you want to link to this table for testing then you should try and input at least one record here. I added records using QGIS and I hope to come back to this post and update it to be more specific

    7) White List the IP within your SQL Server or SQL Azure instance.
    Setting IP White List in SQL Azure

    8) Opening Geoserver and setting the ‘Store’ to reference your SQL Azure database using the login setup in step 5

    Navigate to the local host url for Geoserver namely

    http://localhost:8080/geoserver/web/?0

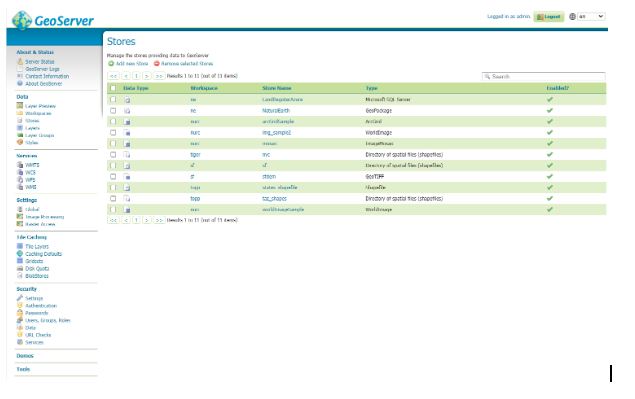
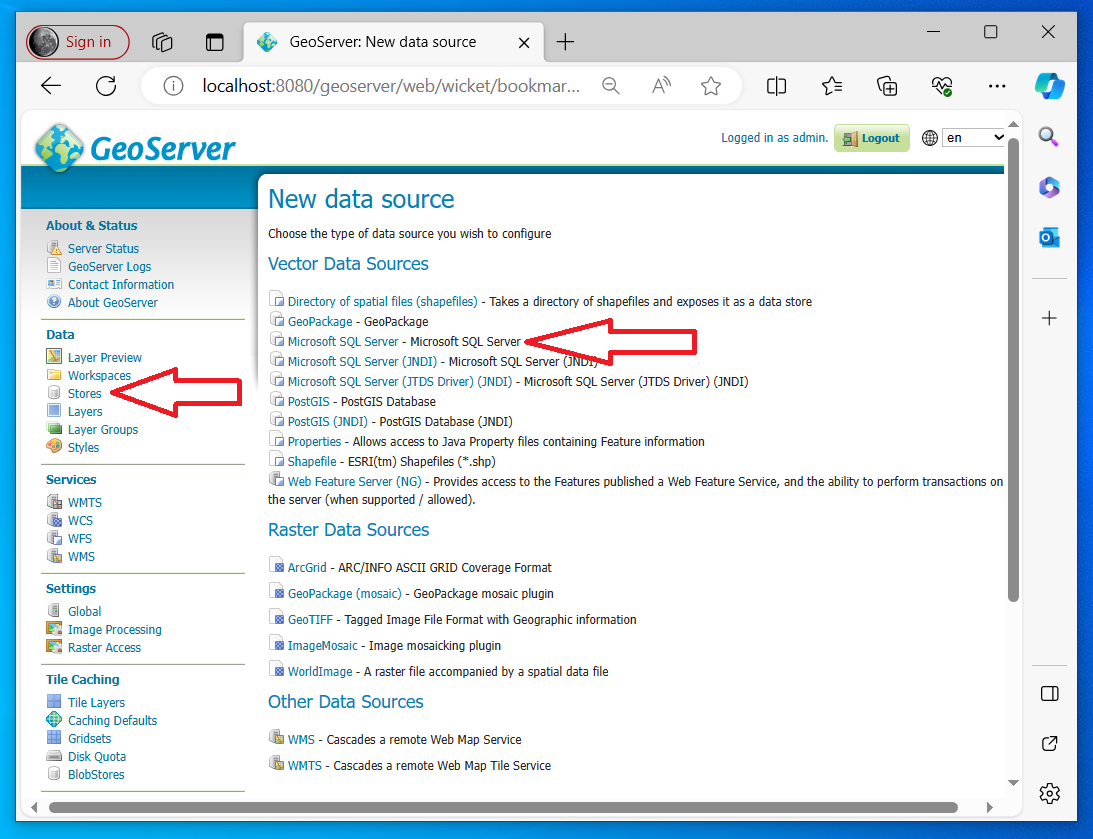
    Go to store and then you should see the following page

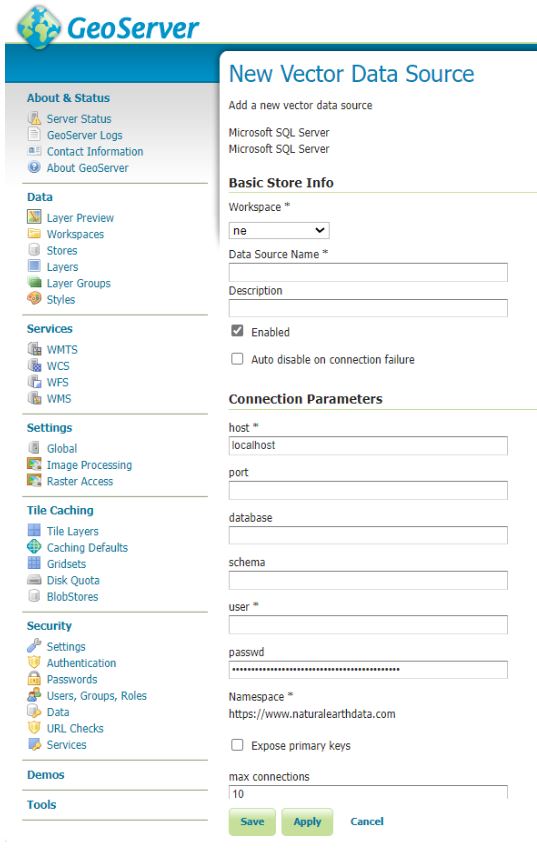
    Hit the Add New Store green plus button in the top left corner you will be presented with the following screen

    Fill out as many details as you can

    For SQL Azure this is likely to be similar to the following

    Host = namevariable.database.windows.net (normally unique to instance in SQL Azure)
    Port = 1433 (sql azure default)
    Schema = dbo (sql azure default is dbo but your database maybe bespoke)
    User = uservariable (remember least privilege is a good idea)
    Passwd = passwordvariable (should be unique to your database)
    

    Save and Apply and then your new connection should appear in your store

    Here’s an example…. (see top line)
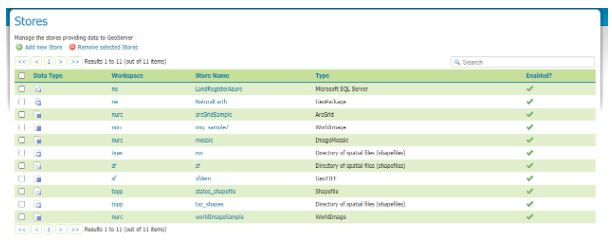
    For the purposes of this tutorial I setup a login with db_owner rights to the database LandRegisterAzure your mileage will vary.

    9) Next we add the layer which references the SQL Server

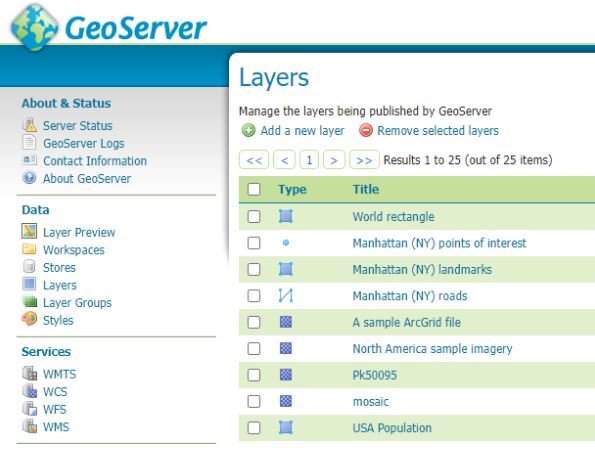
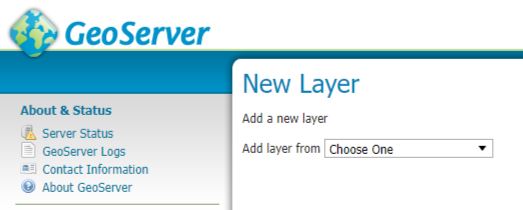
    Select Layers within the Data section of the menu (usually to the left of the geoserver dashboard) then hit Add a new layer

    You should get the following windows

    From the drop down select the store which references your SQL server. This will reveal all the tables and views in the database and you scroll through them to the table or view you wish to publish and in the column marked Action will be publish you can hit the Publish highlighted text (I’ve done that here already so under Action our table is marked as Publish again and there is a tick in the column titled Published.

    We can now quickly test to see if things look like they are working by going to Layer Preview.

    Look to the left hand side and select Layer Preview

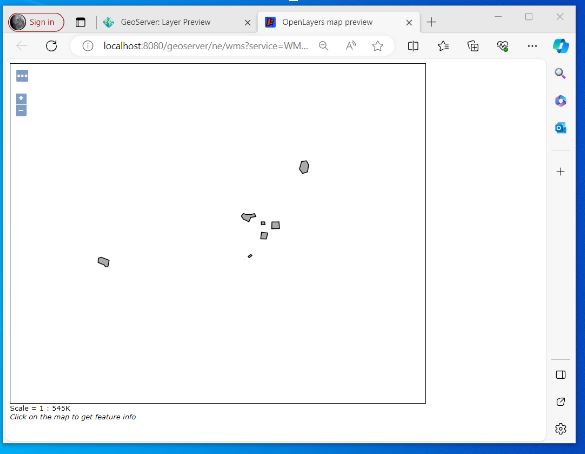
    Scroll down through the list and identify the layer that you have just added. I now select the open layers option

    A new browser tab will open and if you have successfully configured the SQL Server you should be presented with your layer – without any background

    10) I don’t go into it here but next I will try and write up my notes on QGIS and Geoserver setup – On my laptop I managed to set up a WFS to my SQL Azure instance through Geoserver where the layer was added to a project and I was able to edit information in my SQL Azure database through QGIS and were displayed correctly against a basemap in the right place!!

    –/END/–

    WordPress and OceanWP(theme) – Default config for blank Blog

    WordPress is excellent but setup through the admin menu system seems to me unintuitive and a standard configuration can be really difficult to replicate. I constantly wrestle to get sites how I like them. I resolved to document a standard configuration with WordPress and the theme OceanWP (free version) to speed things up.

    What are my preferences on good design? A wide section for text and obvious and intuitive search option with menu that can be setup dynamically to add new posts to menu under their respective category without continually needing to alter the Menu design.

    It should be noted that I don’t use the OceanWP theme for this site – which is a historical thing.

    I’ve used OceanWP theme (Free version) for some time its a good free popular WordPress theme.
    You can read more about Oceanwp here
    My shared hosting provider is InMotion I have found them to be excellent particularly their online support which is 24/7 link here

    Firstly install a default WordPress website. My provider uses softalicious through cPanel your preferred web management hosting platform may vary. I won’t document this stage

    Next install the OceanWP Theme and add Plugins.

    Next I add my preferred plugins, some of which come with shared hosting WordPress installation;

  • Akismet (default with my shared hosting wordpress installer (inmotion))
  • Broken Link Checker
  • Jetpack (again default with my shared hosting wordpress installer (inmotion))
  • Login logo
  • Nginx Helper (default)
  • Password Protected (if enabled will require a password for the entire site)
  • Post Types Order
  • Total Upkeep (I use premium as it allows for improved backups)
  • Current Year, Symbols and IP Shortcode (allows addition of copyright symbol with dynamic year)
  • .

    Next Default configuration of OceanWP WordPress theme using the above plugins

    Settings / General
    – alter site title and tagline

    Settings / Reading / Search engine visibility
    Set as appropriate either tick yes to encourage or clear to discourage
    – Discourage engine visibility
    This is also where you show blog posts as either Full Text or just an Excerpt. If you are on Full text there is little point in having the Read more element in the blog element positioning section.

    Settings / Permalinks
    Apparently this helps with SEO
    – Postname

    Settings/ Discussion

    Appearance/Customize/Widgets/Default Sidebar
    This is where you can add elements and alter the order of elements in the sidebar. I find the admin design clunky and unintuitive but I eventually discovered how to do it, use the edit icon and three vertical buttons to add and subtract elements (search is not added and removed from the sidebar here for example).

    Appearance / Menus
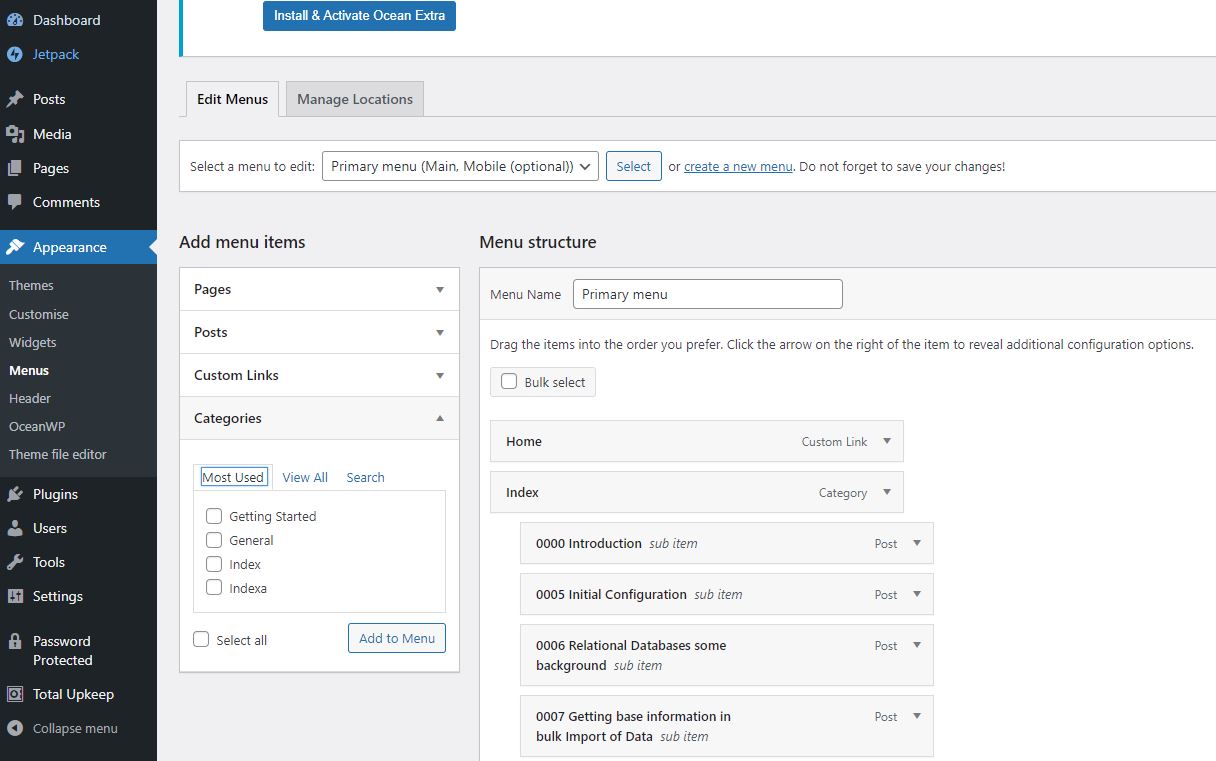
    I set up a menu called Primary Menu and add Home and Index to it as follows. Note that Home is a Custom Link and Index is a Category Link. Note if Home is not available you can create it and then add it.. the url link will just be the default domain.

    Appearance / Widgets

    You can highlight recent comments and delete the entire block – I also add the category list to the side bar

    Appearance / Customise / General Options
    – Layout Style – Separate

    Appearance / Customise / Top Bar / General
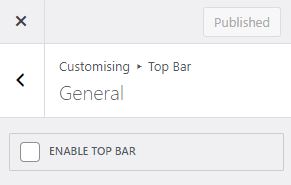
    Turn off Top bar by ensuring the ENABLE TOP BAR tick box is blank

    Appearance / Customise / Menus
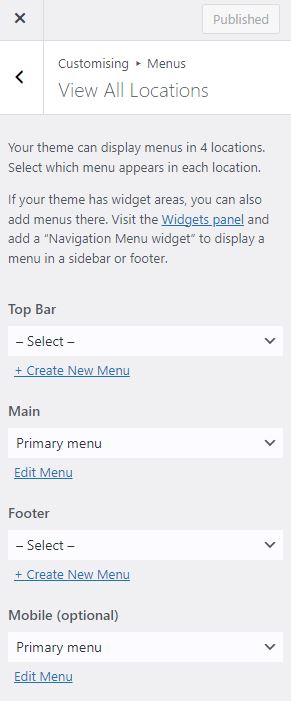
    Here I am ensuring the menus are not repeated. In OceanWP there are four places where you can place menus. I turn off Top Bar and I don’t like the Menu being in the footer so I leave both at the default blank -Select-

    Appearance / Customise / Blog
    We are given two options here – Blog which is the overall and Single Posts. I will normally remove the sidepanel for the single posts and I am still considering whether I should remove the side panel for the full list of posts, either way you do both here.

    Appearance / Customise / Header / General
    I haven’t experimented with all the different options but one that seems to work is Minimal so these are the settings

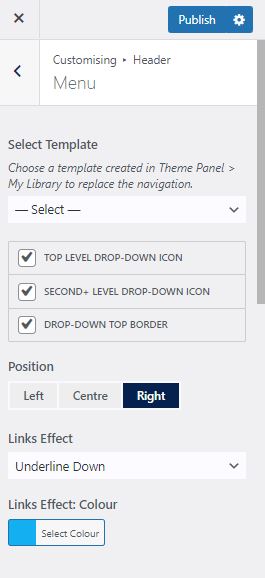
    Appearance / Customise / Header / Menu
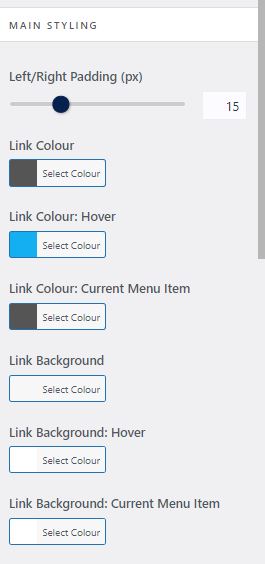
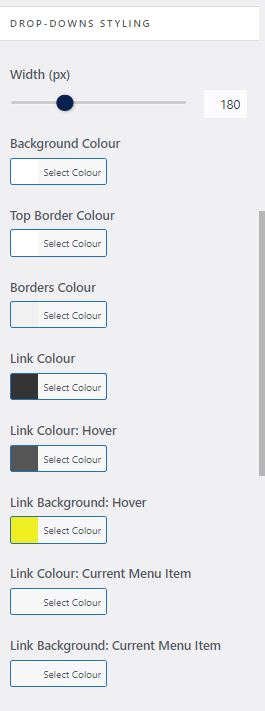
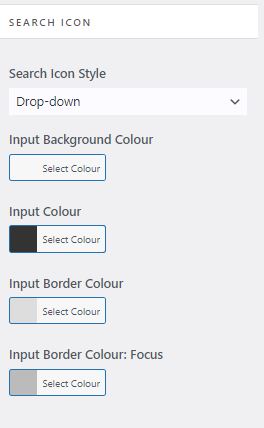
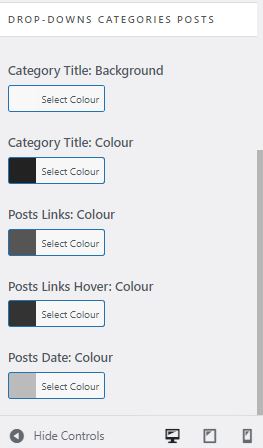
    Again there are a lot of options here and not all seem to work or seem to be intuitive so I have settled on the following

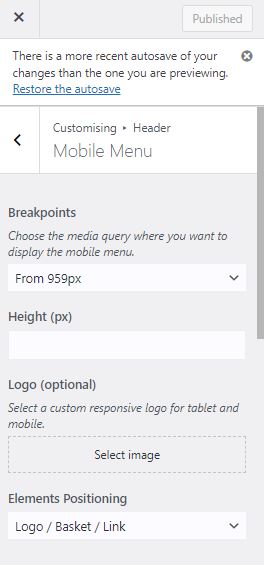
    Appearance / Customise / Header / Mobile Menu
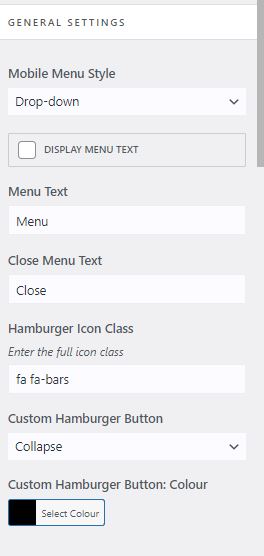
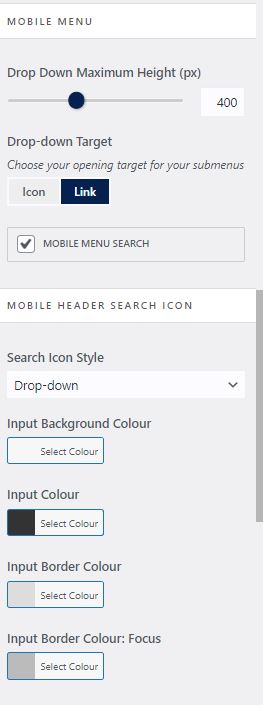
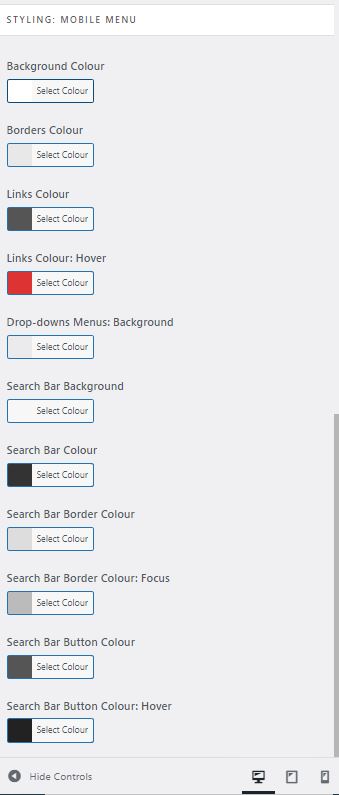
    Again a lot of options but here are a set that I am happy with and work. It should be noted see the drop down Elements Positioning it likes to have the Logo at the front otherwise the magnifying glass can disappear. Note if you change it there is sometime lag on display this might be related to your hosting provider and caching (not sure)

    Appearance / Customise / General Options / Theme Icons
    I like to set to Font Awesome

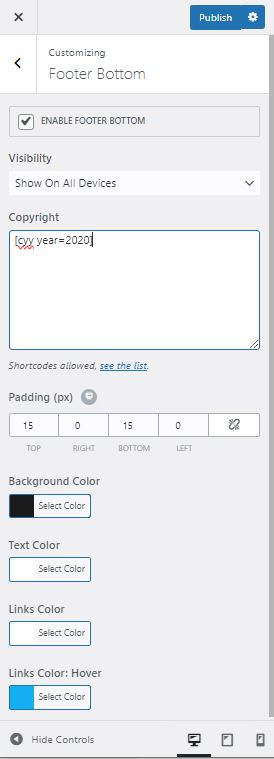
    Appearance / Customise / Footer Bottom
    A nice touch to ensure that copyright is Set – here we use the shortcode from the plugin

    Appearance / Customise / General Options / Scroll to Top
    If you haven’t installed a Sticky Header this can be a reasonable alternative OceanWP specific

    Next lets make sure the search box is above content on mobile devices I like this as it makes it really obvious to users on mobiles about how to use the search facility. The search facility to my mind being one of the most important things in a wordpress site. I also like infinite scroll.

    I’ve pretty much documented everything here – I haven’t touched the logo which is how you get the icon on a site which is also something you are going to do. I will come back to this post and add that when I am doing that in anger for a demonstration site. Remember if you are reading this that these options are relevant to WordPress with the Free theme of OceanWP installed at October 2023.

    MS Azure – Web App Service – Notes on creating a staging web front end on an existing Web App Service

    At some point in developing sites for clients you will may want a satellite site feeding off the main database but with prototype features on it. Considering that certain levels of web app service come with free staging sites you may as well use these rather than either the free service which may be less well provisioned or a separate paid site that you will have to pay additional money for. The number of slots available will depend on the service you are on.

    Beginners guide to setting up a staging slot

    Once you have the site up and running you operate it in the same way as a normal service and so you can get the publishing details from the Get Publish Profile.

    SQL Azure – Using Azure Automation and Runbooks to Schedule an Azure SQL Stored Procedure

    UPDATE January 2024 – I have moved away from Runbooks for scheduling Azure SQL stored procedures towards using logic apps but keep this here as its always good to have alternative methods of completing the same task. Link to Logic Apps Setup

    Original Post
    Its vital to be able to run stored procedures on a schedule it can be extremely important for doing daily housekeeping.

    This site was where I learned how to do this.
    How to Schedule an Azure SQL Database’s Stored Procedure

    Runbooks sit in Azure Automation and a Runbook consists of a script that performs a task.

    Runbooks can be written in Python or Powershell. See the last part of this post for an important additional issue.

    "Data Source=01server.database.windows.net;Initial Catalog=database;Integrated Security=False;User ID=01userid;Password=JK12jl423;Connect Timeout=60;Encrypt=False;TrustServerCertificate=False"
    
    # Instantiate the connection to the SQL Database
    $sqlConnection = new-object System.Data.SqlClient.SqlConnection
    $sqlConnection.ConnectionString = "Data Source=servername.database.windows.net;Initial Catalog=database;Integrated Security=False;User ID=userid;Password=password;Connect Timeout=60;Encrypt=False;TrustServerCertificate=False"
    
    $sqlConnection.Open()
    Write-Output "Azure SQL database connection opened"
    
    # Define the SQL command to run
    $sqlCommand = new-object System.Data.SqlClient.SqlCommand
    $sqlCommand.CommandTimeout = 120
    $sqlCommand.Connection = $sqlConnection
    
    Write-Output "Issuing command to run stored procedure"
    
    # Execute the SQL command
    $sqlCommand.CommandText= 'exec [dbo].[storedProcedure]'
    $result = $sqlCommand.ExecuteNonQuery()
    Write-Output "Stored procedure execution completed"
    
    # Close the SQL connection
    $sqlConnection.Close()
    
    Write-Output "Run completed"
    

    Honestly the hardest part is getting the code setting up the scheduling after that is relatively easy.

    WARNING : Runbooks have dynamic IPs so although you can set grant access to an IP your runbook will only run for a certain period before it stops working unless you either have a Hybrid Runbook Worker setup OR you allow Azure services and resources to access this server (which isn’t recommended) The next post I will do is my initial notes on how to configure a Hybrid Runbook Worker.

    Simple Bat File to open multiple Web Pages in One Browser Window with alternate Tabs

    Simple but can be useful

    Useful if you are wanting to open multiple tabs in a browser window at the same time

    @echo off
    start "Simple Search" "https://planning.westlothian.gov.uk/publicaccess/search.do?action=simple&searchType=Application"
    start "Google Maps " "https://www.google.co.uk/maps/@55.8625775,-3.6759593,17z"
    start "WLC Spade" ;
    start "idoxEDRMS Login" "http://cc-dmsapp-01:8080/IDOXSoftware/secure/IG_Main?url="

    Run Web Applications in Application Mode : Google Chrome

    Turns out the Chrome browser has implemented a really nice display option specifically for websites that have aspects of an application which allows you to remove the clutter at the top of your browser window and makes a website appear in an application like window.

    Go to the web page you are interesting in accessing via an application. In my case rounduptheusualsuspects.org

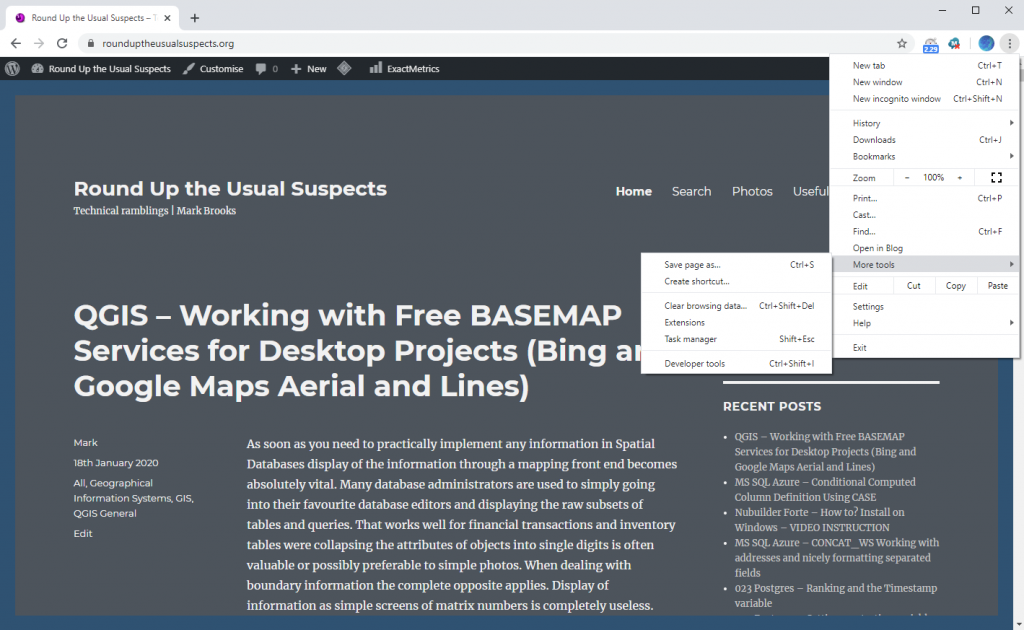
    In the top right corner of the web browser next to the address bar you should see three vertical dots – select it to get the drop down menu and then select More Tools and then Create Shortcut.

    You should now see the following dialog – ensure the Open as Window is ticked and then hit the Create Button. You can alter its name if you wish.

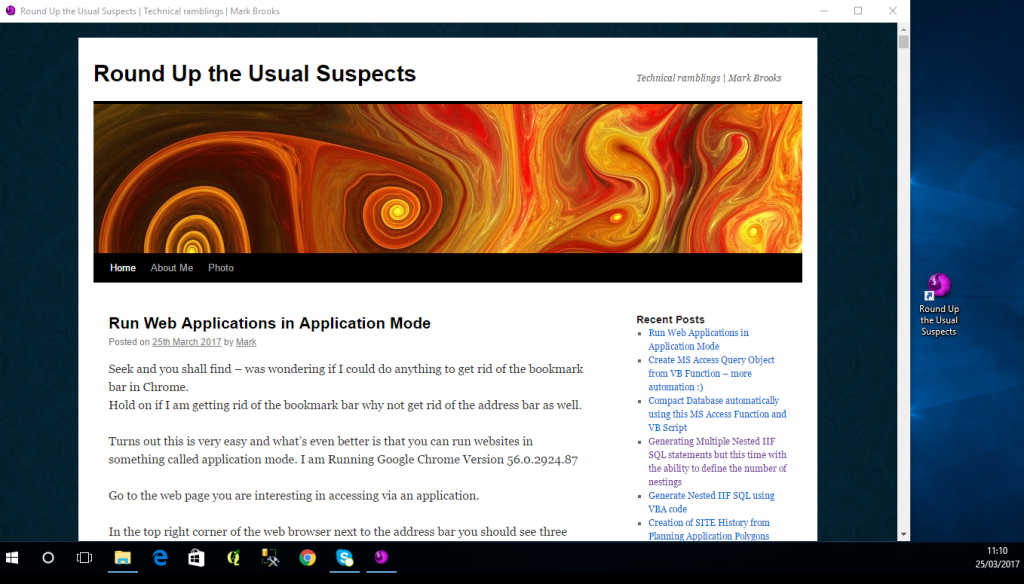
    Now you get a nice icon on your desktop related to the site and what’s more when you open it up there is no address bar and within the taskbar you get the correct icon for the website see below example.

    Compact Database automatically using this MS Access Function and VB Script

    If like me you sometimes need to run multiple SQL statements in MS Access on a regular basis maybe at a particular time some of which are deletes, you will need to find a way to automate regular compacts. Here’s some code scavenged from the interweb that will allow you to do this.

    Firstly create the following function in your target MS Access database.

    Public Function CompactDatabase()
          Dim vStatusBar As Variant
          DoCmd.SetWarnings False
                
              If FileLen(CurrentDb.Name) > 2000000 Then
                  Application.SetOption ("Auto Compact"), 1
                  Application.SetOption "Show Status Bar", True
                  vStatusBar = SysCmd(acSysCmdSetStatus, "The application will be compacted on close during compaction please do not interrupt")
              Else
                  Application.SetOption ("Auto Compact"), 0
              End If
                    
    End Function
    

    Next open up notepad paste in the following code save it as a txt file and then in explorer edit the suffix to vbs. Then simply double click on the file within explorer to run it. You should see the access database you have identified in the VB script open and then immediately close at which point it carries out the compact. The eagle eyed will have spotted that the above function doesn’t actually perform a compact. All it does is set the compact on close option to True within Access settings. The VB Script then instructs the database to close and Access compacts the database on exit.

    set oAccess = createobject("Access.Application")
    
    oAccess.OpenCurrentDatabase "C:Path\TargetDatabaseyouwantCompacted.mdb"
    oAccess.visible = true
    wscript.sleep 1000
    oAccess.Run "CompactDatabase"
    oAccess.closecurrentdatabase
    
    set oAccess = nothing

    A VB script such as this could be used to remotely run any MS Access function or functions – simply substitute the “CompactDatabase” parameter (or add further run commands) with the name(s) of the function(s) in the database you wish to trigger and then run the VB Script. Be warned the speed at which functions and commands within functions run may vary when called from a vbscript so you may have to use some experimentation to input things like pauses and waits if you start to get very imaginative with the functions run.

    VBS – Pieces of code

    Shutdown computer

    Option Explicit
    Dim oShell
    Set oShell = Wscript.CreateObject("Wscript.Shell")
    oShell.Run "SHUTDOWN -T 60 -S" 'wait 60 seconds before shutting down

    Trigger speech

    Option Explicit 
    Dim speechobject
    set speechobject=createobject("sapi.spvoice")
    speechobject.speak "Your system is setup and ready for your day"

    Delay for Seconds (10)

    Option Explicit
    Dim dteWait
    dteWait = DateAdd("s", 10, Now())
    Do Until (Now() > dteWait)
    Loop

    Sleep Function for Delay – Count in Milliseconds (5 mins below)

    WScript.Sleep 5*60*1000

    Using Task Scheduler and Visual Basic Scripts to automate pretty much anything Win 7

    This is hardly ground breaking but windows Task Scheduler can be used to run VBS scripts on a variety of events to automate repetitive and boring tasks. Backups for example or refreshing caches on web browsers before users come in.

    Hit Window button

    Type “Task Scheduler”

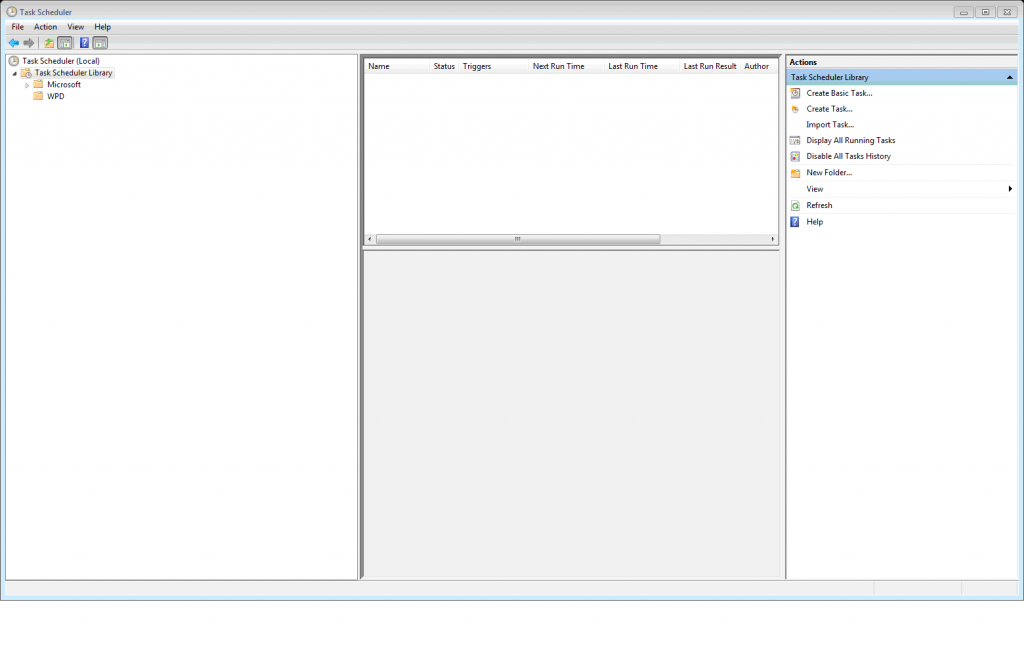
    Press return you should get the following screen.

    Schedule1

    Make sure Task Schedule Library is selected in the tree on the left then within Actions sub window on the right click Create

    Schedule2

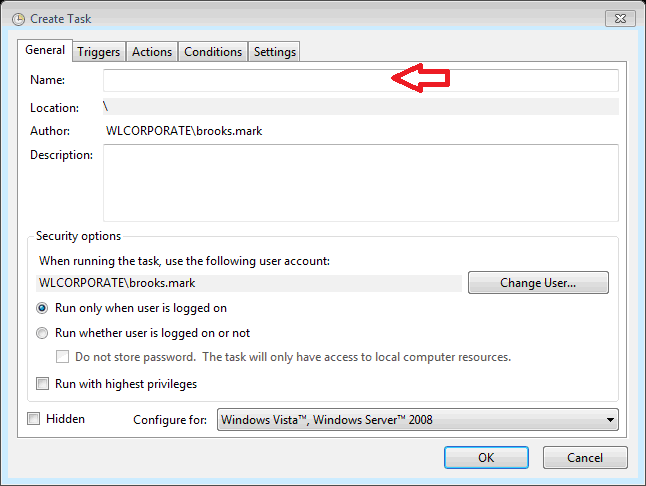
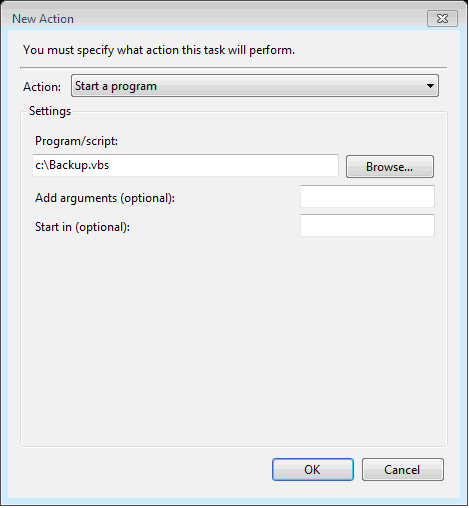
    Give the Task a name in the area above marked with a red arrow and then go to the actions Tab where you can use the New… button to navigate to the vbs file you wish to run.

    Schedule3

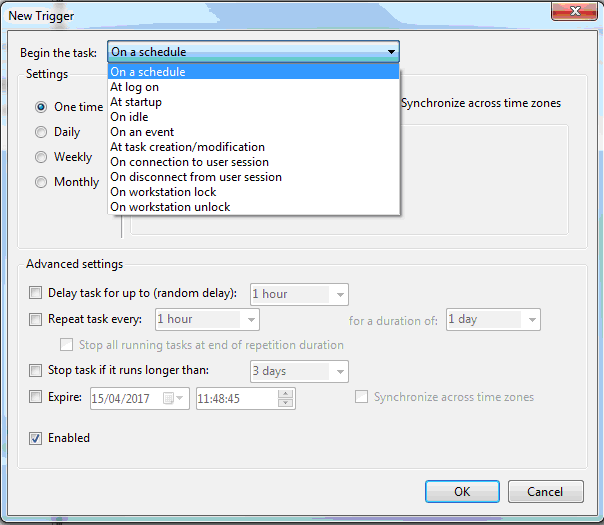
    Next use the browse button OR if you know the path and file name simply type in the path to your visual basic script you would like to run. Here I have put in an imaginary backup script. Next go to the Trigger tab and again hit the New… tab

    The Begin Task selection list gives a good indication of when you want to trigger whatever tasks.

    Schedule4

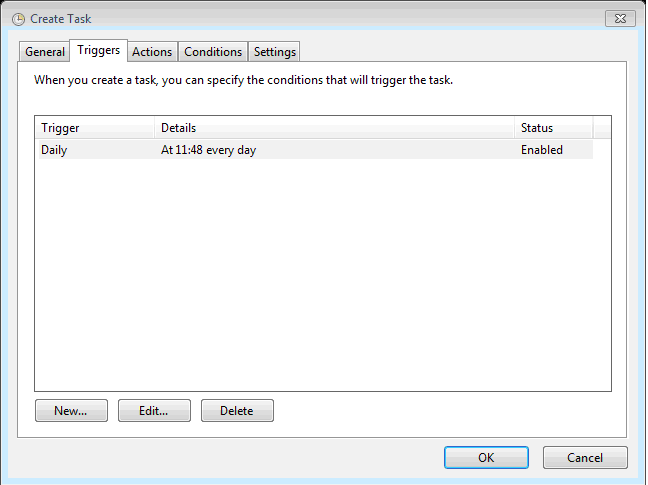
    If we continue with the theme and run a vbs script to do a backup at 11:48 everyday

    Schedule5

    Setting up a Blank SQL Server Spatially enabled Table using Microsoft SQL Server Management Studio 2008R2 Express and displaying it in QGIS 2.8.1

    Programs used;

    1- SQL Server 2008R2 Express
    2- SQL Server Management Studio 2008R2 Express
    3- QGIS

    The example uses UK national grids coordinates to create a Triangle Polygon in a SQL Server Table

    I’ve previously written that while we’ve had spatially enabled SQL Server for over 5 years I constantly come across line of business applications that although using SQL Server have not and do not intend to spatially enable the application. This is undoubtedly because of the difficulty in re-designing legacy systems actively in use and because the benefits although significant are not generally requested by all but the most knowledgable of colleagues.

    While I understand this legacy system reasoning spatially enabled databases are the future so its just a matter of when and not if an application will require alteration. Understanding it in this context makes it really a requirement to start seriously planning for its inclusion.

    Developerers creating new applications however should always consider spatially enabling relevant tables from the start even if it is not specked by the client/colleague. It being so much easier to spend a couple of minutes future proofing the schema of a new born database rather than hours trying to retrofit a live in production back end.

    Firstly it’s important to understand what a geodatabase in SQL Server actually is.
    Really it is a normal database which has one table that has a field that has a geometry or geography value type. In this example I will use desktop QGIS 2.8.1 to display the resulting geometry but any other digital mapping package that can link to SQL Server could be used. SQL Server also has a very rudimentary Mapping Display but you will need something better if you want to manipulate boundaries visually.

    Many digital mapping products have plugins that will create Geodatabases and tables however I haven’t seen one for QGIS. I really wanted to be able to create spatial SQL tables on my own without recourse to paid tools directly in SQL Server Management Studio. So here’s my method of creating blank polygon table whose geometry is ready to be read and edited in QGIS or any other digital mapping system just using SQL Server Management Studio Express 08R2.

    Steps
    1. Create a new Table
    2. Ensure the table has an identity Key that increments
    3. Create a geometry column
    4. Write a query that updates the geometry column

    UPDATE T001Sites SET Coordinates=geometry::STGeomFromText(‘POLYGON((301804 675762,295789 663732,309581 664870,301804 675762))’,27700)

    You will note that there are four coordinates here (each coordinate being a pair of numbers )
    The first coordinate and last are the same this is required by SQL to ensure that the polygon is closed.

    The 27700 number is the Spatial Reference System Identifier (SRID) – it is a unique value used to unambiguosly identify projecttion. 27700 is the unique identifier for the United Kingdom National Grid and represents the coordinates my example refer to. The spatial reference identification system is defined by the European Petroleum Survey Group (EPSG) standard which is a set of standards developmed for cartography surveying etc and owned by the Oil and Gas Producers Group list here; http://www.epsg-registry.org/

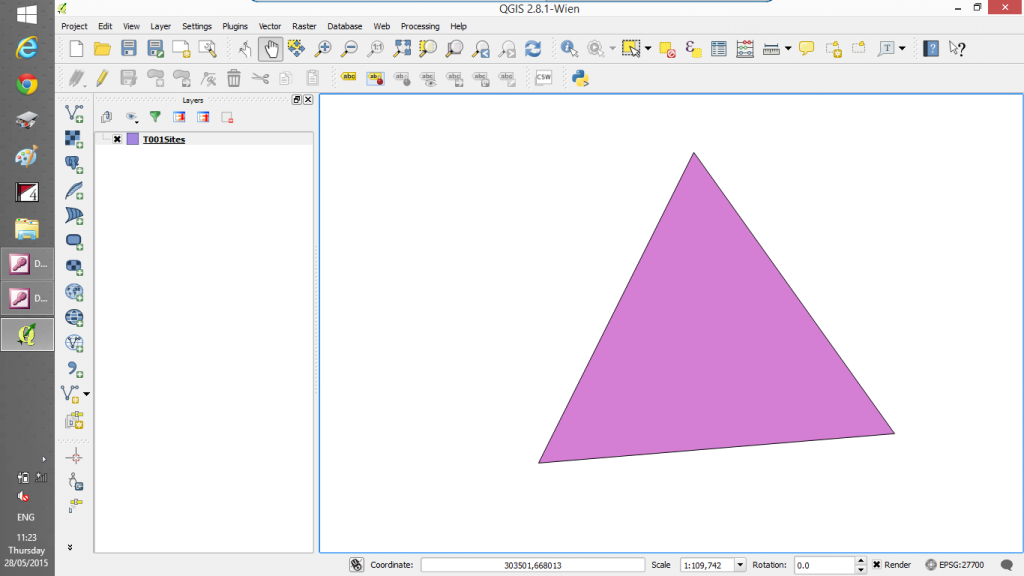
    The above coordinates display a triangle in West Lothian near Edinburgh

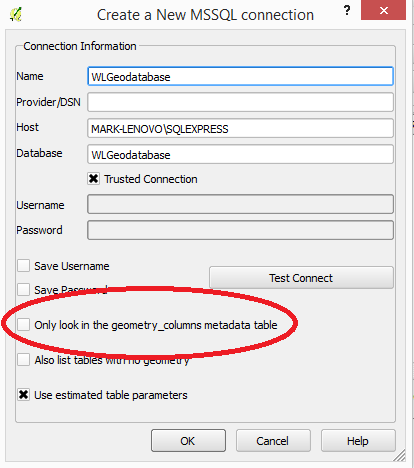
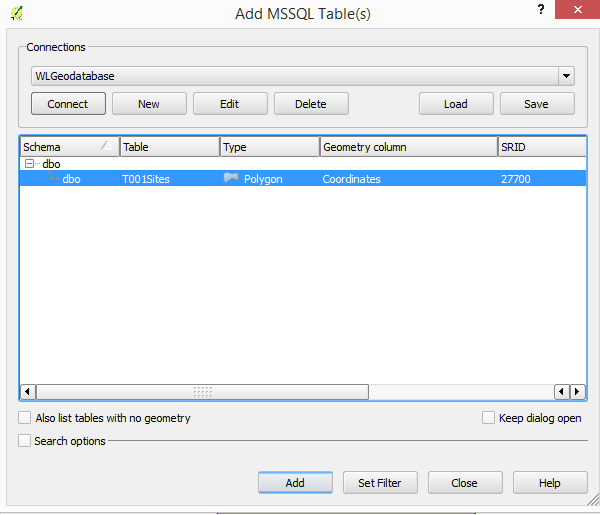
    5. Set up the connection to SQL Server Instance

    Ensure the box marked “Only look in the geometry_columns metadata table” checkbox is unchecked. By default this is checked and if the geometry_columns table does not exist you will get an error message.

    QGIS-SSMS-Connection

    6. Display the table and edit as appropriate.

    Select the table then hit the Add button

    QGIS-SSMS-TableReadyforDisplay

    And here is the SQL Server table in QGIS ready to be added to or edited.
    QGISshowingSQLServerPolygon

    Administering a Web Application some thoughts

    In the last couple of years I have started administering a bought in Web Application from an outside vendor. I have found this really quite educational. I will not reveal the name of the product the vendor seems neither better nor worse than other vendors and many of the issues I am experiencing I see repeated with other admins of other web applications.

    The software consists of various pieces of middleware linking SQL Server and the .Net and Javascript files. It uses a fairly standard Microsoft Stack to deliver a single page application. The big selling point was that that it was widely available through browsers pretty much anywhere on the web.

    We have had it up and running in anger for a couple of years now and I have about 75 users all internal.

    The vendor has created a new version and we now need to update. In discussion with the company they tell me that I should not be doing this myself and it is standard practice to get them in to upgrade the version. We already use it more as a stack technology to build our own applications I would want to continue this in the future. They have indicated that it will cost money to get them in to upgrade the software. This is triggering alarm bells because the existing configuration is very complicated, errors are quite regular and error messages tend to be pretty cryptic or non existent. I also like doing setup myself as it teaches me the ins and outs and speeds my learning up for systems which have non-trivial configuration.
    A project board has been set up senior management are on board and well its grown legs arms and tails.

    We have not widely publicised the application to the general public and they do not access the application at present.

    The application itself requires significant amounts of configuration to set up correctly and parameters tend to be static and buried deep in very large HTML files. All this leads me to conclude that configuration in the new version is likely to be just as awkward. The company’s help desk is very good and there is extensive documentation but the sheer obscurity and quantity of configuration parameters makes the documentation the size of a phone directory, difficult and opaque.

    Here’s some questions I should remind myself of when looking at New Web Applications in the future.
    Are staff really so distributed that you require wide distribution?
    Is it an internal or external distribution? – If not external do you really need a web enabled application.
    Do you have internal expertise that is interested in developing applications?
    With Web Applications or Local applications the backend database technology could well be the same. Internal local area development is likely to be far more flexible / cheap / quick and could motivate staff additionally it can be far more rich in its scope. It would be possible for instance to develop rich interface internally and a minimal interface externally using something like Lightswitch. This would take advantage of the strengths of both development environments.

    There is a big push towards web applications I just think IT managers need to carefully consider their positions these applications tend not to be cheap and have a number of disadvantages that seem to have been pushed out of sight.

    Start up VBS

    OPTION EXPLICIT
     
    Dim WshShell
    Dim counter
    Dim shell
    Dim Outlook
    Dim objWord
    Dim objshell
     
    'Flash keyboard to show code is being hit
     
    Set WshShell = CreateObject( "WScript.Shell" )
    counter = 0
    While counter < 18
                    WshShell.SendKeys "{NUMLOCK}"
                    WScript.Sleep 200
                    WshShell.SendKeys "{NUMLOCK}"
                    WshShell.SendKeys "{CAPSLOCK}"
                    WScript.Sleep 200
                    WshShell.SendKeys "{CAPSLOCK}"
                    WshShell.SendKeys "{SCROLLLOCK}"
                    WScript.Sleep 200
                    WshShell.SendKeys "{SCROLLLOCK}"
                    WshShell.SendKeys "{CAPSLOCK}"
                    WScript.Sleep 200
                    WshShell.SendKeys "{CAPSLOCK}"
                    WshShell.SendKeys "{CAPSLOCK}"
                    counter = counter + 1
    WEnd
     
    'It is not possible to poll the state of the keyboard using VBS but strangely if you use vb through word therefore it is necessary to open word turn caps lock check on the status and if caps locks is on turn them off
     
    Set objShell = CreateObject("WScript.Shell")
    Set objWord = CreateObject( "Word.Application" )
     
    if objWord.CapsLock <> 0 then
       ' turn capslock off
       objShell.SendKeys "{capslock}"
     
    end if
     
    if objWord.NumLock = 0 then
    'turn numlock on
    objShell.SendKeys "{numlock}"
     
    end if
     
    'This line required to delay Windows long enough to allow the computer to open word - if it trys to quite word before fully open you will get an error depending on your machine speed may be better to use the actual seconds
    WScript.Sleep(100)
    objWord.Quit
     
    'Startup MS Outlook
     
    CONST PATH_TO_OUTLOOK = """C:\Program Files (x86)\Microsoft Office\Office14\OUTLOOK.EXE"""
    CONST SHOW_NORMAL = 3
    CONST MINIMIZE = 1
     
    SET shell = WScript.CreateObject("WScript.Shell")
     
    ' Open Outlook
    shell.Run PATH_TO_OUTLOOK, 2
     
    ON ERROR RESUME NEXT
     
    ' Grab a handle to the Outlook Application and minimize
    SET outlook = WScript.CreateObject("Outlook.Application")
    WScript.Sleep(100)
    outlook.ActiveExplorer.WindowState = SHOW_NORMAL
     
    ' Loop on error to account for slow startup in which case the
    ' process and/or the main Outlook window is not available
    WHILE Err.Number <> 0
      Err.Clear
      WScript.Sleep(100)
      SET outlook = NOTHING
      SET outlook = WScript.CreateObject("Outlook.Application")
    WEND
     
    ON ERROR GOTO 0
     
    SET outlook = NOTHING
    SET shell = NOTHING

    The Handover – where the dragons lie

    woman-see-dragons-everywhere-2

    The handover – often someone figures out that something needs to be done – maybe they have realised an important omission or maybe there is a problem that only comes to light in a process when you start designing.

    For whatever reason you can’t do the work yourself and you need to hand the work to someone else. This I consider to be a dangerous task the threat of information loss is immense. Here are some points I try to ensure to minimise this ever present risk.

    Give it to an identifiable person – I always find it curious how top management consider it important that they know each other and feel comfortable in each others presence they carefully pick their colleagues and treat them with respect by ensuring accurate names are used and generally constantly talking to each other often informally and flexibly. However I have seen systems implemented by management which actively discourage these same forms of informal communication and actually discourage personal responsibility.

    Give that person tasked responsibility for the whole task and allow them the flexibility to tackle it how they see fit. People adjust processes so that they are more productive and will use their personal skills in the workplace often when they were not hired on that basis. A regular example of this is probably individuals who can speak multiple languages. I have seen several situations where a customer from another nation arrives and someone in a team happens to speak their language in a flexible environment that person often gets involved in that task simply because good communication is the first step in tackling a problem. I was in the Premier Inn in London and I was pleased to note that the staff all had badges on them noting not just their names but the flags relating to languages they could speak. It was nice to see waiters with multiple flags on them. Gave you just a small bit of background on the person and encouraged customers of particular nationalities to seek out correct staff.

    Give it to someone who is familiar with the domain (scope of work) complicated tasks need not just technical skill but domain specific skill. Most people know how a booking systems works as nearly everyone is familiar with booking things online. But would you expect a general programmer to be familiar with the process of registering births marriages and deaths or submitting tax returns for instance. If someone doesn’t have domain specific skills give them extra time.

    Close physical proximity is a bonus – so called water cooler conversations are often about work even if it may stray into what might be considered gossip. For some even then gossip may inform you of particular tender subjects that allow you to better consider the respect of your colleagues and better conduct yourself in conversation to get the optimum of work between individuals. It also allows for constant review of process and answer of questions when they arise. I prefer in e-mails to ask single questions at a time. I find that if you store up questions in a massive e-mail the first two questions are asked and the others are just omitted. As far as I can tell this is a human trait. Its my experience that when I sit close to individuals I ask questions when they arise which when answered usually completely negate the need for further questions. This uses comparative advantage which is always a bonus.

    Concentrate on the outcomes not the technology that they are using especially if there are no costs to something let them use what they want. Databases are databases – spreadsheets are spreadsheets – they prefer the dvorak keyboard to qwerty keyboard good for them. For some spreadsheets are better for them than databases others will always choose databases – Does it really matter. I have seen some really excellent spreadsheets for tasks that I would have preferred to use databases. You could argue one over the other for particular tasks and maybe even prove that one was better than the other on somekind of mathematical basis. But would SQL Server really be better for your granny than a spreadsheet. NO.

    Ensure that the individual will have a continual link to the system post development – he should recognise that the stability and the continuation of the system is as important as simply pushing something out the door.

    At least initially continually check up on the individual and ensure that things are progressing as intended. This requires time at the beginning but you should be able to wind it down after that.

    Handovers are fraught with danger don’t make them be fraught with danger for you.

    International Domain Names

    I was helping to set up a domain for a friend the other day and I wondered whether they would like a domain in Cyrillics. Led to the question was that even possible.

    I try to be aware and present but things pass me by sometimes. Particularly because I don’t really watch television. I have already posted about Cyrillics not being supported in some visual basic editors well turns out Cyrillics were not supported for URLs until 6th of May 2010.

    It would be interesting to see the take up of Cyrillic URLs I note that the Cyrillic domain of Yandex url яндекс.рф re-directs to a latin version

    One interesting url is the Russian President
    президент.рф

    Some quick research has revealed that DNS convention is old (no real surprise there) and only supports the 26 Latin characters A through Z numbers and the dash. When a non-latin based URL is placed in the address line the alphabet is re-encoded to a system called Punycode which is a way of representing a domain name with a non-DNS character set within the DNS character set. These domains are called International Domain Names (IDNs) If you wish to display IDNs properly within the address bar you need to go to Chrome settings and select the appropriate language relating to the character set of the IDN the url should appear correct otherwise you get a strange punycode translation that might be mistaken some weird non-base ten numerate system.

    Doubtless Yandex did not consider this attractive as many peoples first reaction to that kind of URL would be to think that they had been re-directed to a dodgy website.

    Access Connection Strings – Link

    Some notes on using SQL Server connection strings both using the default ODBC client drivers and also the native SQL Server driver.

    Juan Soto of Access Experts explains connection strings from MS Access to SQL Server

    Additionally I am hearing that it is better to use the SQL Server Native Client ODBC driver than the default SQL Server driver as a recent security update on SQL Server has caused issue with some applications using the default SQL driver.

    Juan Soto of Access Experts explains issues with November 2014 SQL Server update for MS Access applications

    Dealing with Dates can still catch you out

    The other day I was dealing with dates and I found a cracking little gotcha that might just be catching a few people out.

    When is 07/11/14 not 07/11/14

    When one is 17 November 2014 and one is 17 November 1914

    I’ve been dealing with legal dates and I needed to set dates some 25 years in the future for payments of moneys. That’s fine just typing in dates I’ve been putting dates in which turn out to be a century in the past. This led me to investigate.

    Within windows we get very used to typing in dates by using 6 digits – 01/01/14 or 09/05/15 – most users computers would recognise these dates as 1st of January 2014 and 9th September 2015. What many users may not consider , myself included , is that the interpretation of the year in this scenario is relative. That is relative to a century. We happen to be in the 21st century but if you type in 99 most computers will interpret the year as 1999 and not 2099. Fine but at what time does it change the century. Well turns out there is a configuration setting.

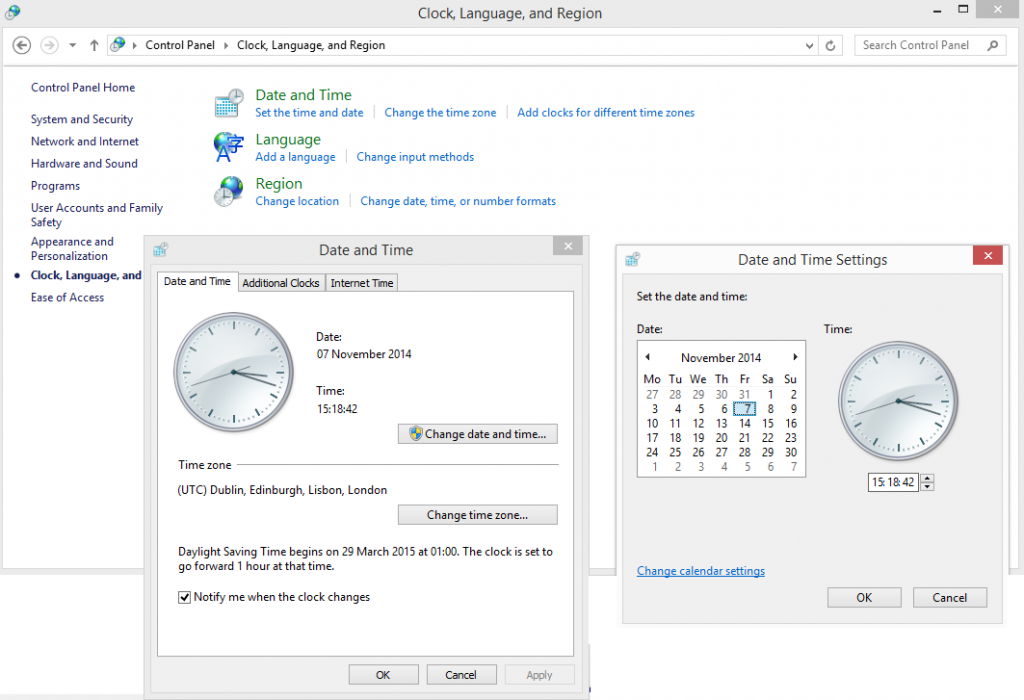
    Here’s how you get to the configuration settings in Win 8.1

    Control Panel
    Clock, language and Region
    Set the date and time…
    Change date and time

    Should get you to the following;

    Win8ControlPanelDateTime

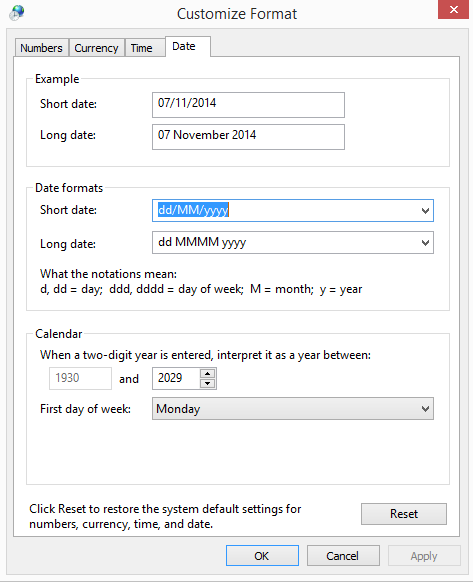
    Then hit Change calendar settings;

    Win8CustomizeDateFormat

    The danger is of course that users will type in 07/11/30 thinking this will be 2030 when the two digit interpretation configuration will interpret it as 7 November 1930. How it interprets this comes down to the above setting. I believe at present this is the default setting.

    Its one to watch out for and doubtless it may be catching some organisations out.

    Graphics vs Text

    khmerconSo today it is a bit slow for me so I answered a question from a lad in Phnom Phen in Stack Overflow. He was looking for support for Khmer in MS Access 2013, the official language of Cambodia. He has a database but unfortunately he can’t get records to sort alphabetically for Khmer text. I’m not sure I found a solution I made some suggestions. I’m always really interested in questions like that because a solution for him would be the kind of thing that would be useful to anyone able to write Khmer which is presumably millions. I had a look at the alphabet – wow – computer fonts seem to do a terrible job of displaying it reducing it to the point where at a similar scale to other fonts I need a magnifying glass to distinguish differing letters. I guess you just have to choose larger font sizes but it was tiny at the scales I was seeing examples. It made me wonder how much cultures with difficult or tricky languages are disadvantaged in day to day commerce. Obviously to me their alphabet is only pictures.

    But then in reality that is only what all alphabets are.

    I always think on this when people say we need more pictures and icons in the UI

    Caspol.exe

    Never heard of it?

    I hadn’t either – it is however a small exe that stands for Code Access Security Policy Tool which enables users and administrators to modify security policy for the client machine to .NET framework.

    This tool is automatically installed with .NET frameork.
    The following alters privileges of websites to allow them access to the .net framework on the client machine.

    The following is the full parameters associated with a .bat file that passes parameters to caspol.exe

    C:\WINDOWS\Microsoft.NET\Framework\v4.0.30319\caspol -m -ag 1 -url http://servername/* FullTrust
    C:\Windows\Microsoft.NET\Framework64\v4.0.30319\caspol -m -ag 1 -url http://servername/* FullTrust
    C:\WINDOWS\Microsoft.NET\Framework\v2.0.50727\caspol -m -ag 1 -url http://servername/* FullTrust
    C:\Windows\Microsoft.NET\Framework64\v2.0.50727\caspol -m -ag 1 -url http://servername/* FullTrust

    40 Useful Facts to Know about a System

    40

    A list of points I should remember to ask when doing ongoing system development, total re-design or external purchase.

    For alternative systems rank both existing and new and compare.
    Collection of facts is as objective as I could make it – interpretations and consideration as ever is subjective.

    I have my own self built project software that records most of these points. The users and user roles is particularly useful my home baked pm software is integrated into my contacts which means if individuals titles and contact details change then the details below are automatically updated.

    1. Name of system
    2. Version number
    3. General Description of the system (written)
    4. Date of Creation
    5. Name of Creator along with contact details
    6. Name of Administrator along with contact details (If different from Creator)
    7. Name of the person responsible for backing up the system
    8. Backup description
    9.Names of existing users – should include administrators and creator
    (Name – Organisation Position – e-mail – contact no – approx time used per day – Method of access – Role in system – Description of tasks carried out – Machine tag numbers if required)
    10.Names of potential future users
    (Name – Organisation Position – e-mail – contact no – approx time used per day – Method of access – Role in system – Description of tasks carried out – Machine tag numbers if required)
    11. Operating system runs on (Windows / Linux / Mac / Wine) If Linux please indicate distro
    12. Backend Database type (SQL Server, Oracle, MS Access, Filemaker Pro, Omnis, Fox Pro, DB2, MySQL, PostGres, PostGIS, VoltDB, MongoDB, NoSQL)
    13. – unc name of database server(s)
    14. – unc name of web server(s)
    15. – Important directories on particular servers
    16. – name of backend database
    17. Has the application been designed specifically to allow for geo referencing ( This is not a question as to whether the back end is spatially enabled ) – (Yes / No)
    18. Front End technologies – list
    19. Main programming languages
    20. Is this a client facing system (Yes / No)
    21. Could it be a client facing system (Yes / No)
    22. Do individuals presently access this from mobile phones (Yes / No)
    23. Do individuals presently access this from tablet devices (Yes / No)
    24. Is the information available to the general public if they make a freedom of information request. ( Yes / No )
    25. Please indicate the information in the system that would not be distributed even if someone requested it. [Description]
    26. Is there a statutory requirement to keep this information ( Yes / No)
    27. Was the system originally internally or externally created (Internal / External)
    28. Capital cost of original construction (if relevant)
    29. Estimated annual revenue cost of system ( not interested in wages of individuals only interested in actual costs paid to outside bodies )
    30. Can we get a table structure of the system complete with all field names and field types. (Yes / No) – Please attach if yes
    31. Is the process unique to the organisation( Yes / No )
    32. How often is the design of the system altered ( As and when required, Changes are batched and pushed through periodically, Only in exceptional circumstances, Never)
    33. Who can request changes to the system ( Anyone , only management , there is a working group of disparate users who request changes to an outside company , pretty much no one)
    34. If that is an outside company makes the changes how often is that done (monthly, yearly, very rarely, never)
    35. Are users presently happy with the system ( Yes / No )
    36. Are management presently happy with the system ( Yes / No )
    37. Any obvious other systems it could be combined with (No – Yes please list)
    38. How is performance (Very good, Good, Adequate, Poor, Very Poor)
    39. Can you list other organisations that use the same software (No, list of organisations)
    40. Lastly where do you consider the application to be strong and where weak and do you have any specific proposals that could significantly improve your interaction with the system. [description]