So I was getting this in an InMotion install.
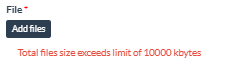
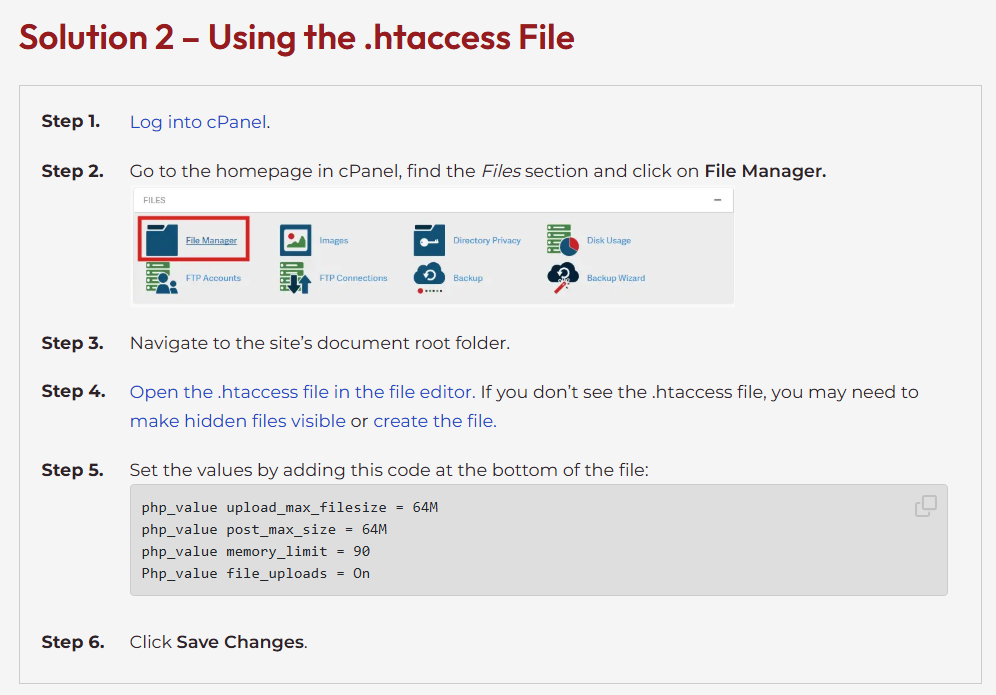
How to increase the PHP Max Upload Size in cPanel
Technical ramblings | Mark Brooks

In Postgres when an administrator creates a database in the background Postgres is copying a template database.
As default the new database is a copy of a database that is created at install called template1. This database is usually hidden and even if you are logged in as the Postgres superuser this database is not listed when you search on the server for all available database.
Normally an administrator that is limited to dbcreator rights does NOT have rights to install extensions. This is particularly an issue when dealing with geography administrators that need to create databases with PostGIS and pgrouting extensions but you don’t want to elevate these administrators to superusers.
Superuser administrators can however install these extensions on the template database which means that when an administrator with dbcreator rights logins in and runs the create database command the new database created will inherit the extensions postgis and pgrouting (and any other extensions you add to template1).
Steps to Alter template1:
Connect to the PostgreSQL Instance as a Superuser:
Use a superuser account (e.g., postgres) to connect to the PostgreSQL instance.
Allow template1 to be modified:
By default, the template databases are marked as “databases not allowed for connection.” You need to change this setting temporarily.
ALTER DATABASE template1 IS_TEMPLATE = false;
Connect to template1:
Now, connect to the template1 database.
\c template1
Install the PostGIS and pgRouting Extensions in template1:
Once connected to template1, install the extensions:
CREATE EXTENSION postgis;
CREATE EXTENSION pgrouting;
Restore template1 to be a template database:
After installing the extensions, you need to restore template1 as a template:
ALTER DATABASE template1 IS_TEMPLATE = true;
Prevent Modifications to template1 (Optional):
To prevent accidental changes to template1 in the future, you can revoke connection permissions:
REVOKE CONNECT ON DATABASE template1 FROM public;
Future Databases Will Inherit PostGIS and pgRouting:
Now, whenever a new database is created using the template1 template, it will automatically inherit the PostGIS and pgRouting extensions:
CREATE DATABASE new_database_name;
— This new database will have PostGIS and pgRouting installed.
Caution:
Modifying the default template1 means all databases created in the future will have the extensions, which might not be ideal if you don’t want PostGIS or pgRouting in every database. You could alternatively create a custom template and specify it when creating spatial databases.
Example of creating a custom template:
CREATE DATABASE template_postgis TEMPLATE template1;
\c template_postgis
CREATE EXTENSION postgis;
CREATE EXTENSION pgrouting;
ALTER DATABASE template_postgis IS_TEMPLATE = true;
This way, you can create new spatial databases by specifying this custom template:
CREATE DATABASE spatial_db TEMPLATE template_postgis;
This approach provides more control over which databases include the extensions.
Geoserver has this really great feature whereby admins are able to create views that are held with the configuration of the Geoserver but separate from the database. This allows admins the ability to create views WITHOUT the need to have database admin rights on the server. This is particularly useful where you have an onsite vendor database that you would not otherwise be allowed to write views in but nonetheless you require some way to store spatially enabled views .
Quick setup guide how to do this.
Firstly go to layers and hit
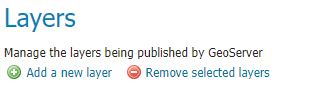
Select the Store that you are interested in
Next you should see text and just hit it.
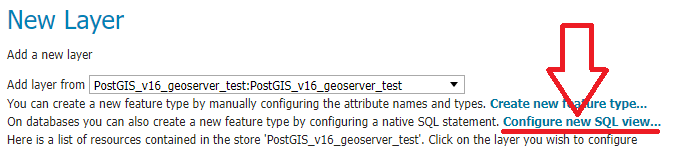
Then there will be a place where you can put the SQL Statement in.

For primary keys it is now the recommendation to use identity during table creation.
Apparently it explicitly conveys the purpose of the column and aligns with SQL standards thus it is important to use when possible rather than the former serial command. In theory this should be more portable as well.
Depending on what source you read you may or may not need the following extension to create UUIDs – I needed it but I am told it should be in the main library.
CREATE EXTENSION IF NOT EXISTS pgcrypto WITH SCHEMA public;
So here is standard code for creating a table with three columns
CREATE TABLE t001example
(
pkid bigint GENERATED ALWAYS AS IDENTITY PRIMARY KEY,
genuuid uuid DEFAULT gen_random_uuid(),
sitename varchar(500)
);
And these are example values


Good self service Web Hosting Management software is just a game changer for Dev Ops work.
Every year I learn a bit more and every year they probably improve it a bit more. I am really very far off the cutting edge so I can’t speak to cutting edge improvements of the whole platform but I can talk to the options that I am continually learning.
.
AND NOW……
Being able to quickly manage the update PHP versions is just amazing…
cPanel:
Log into cPanel
.
Yes its that easy
Things I want next
Front end cPanel at InMotion backend SQL Server in Azure
Front end cPanel at InMotion backend Postgres Server in Azure
Postgres backends in cPanel
cPanel rocks
and so does PHP and PHPRunner
and AI when it can learn to spell and count!
(yes the picture annoys me as well)
Computing tries hard to obfuscate the device that is actually running the software that you are using. That is particularly the case with cloud computing and its particularly the case with web enabled software. Are you logging into the software that manages the database? or are you logging into the database itself?
Irrespective software gets installed on an individual machine and it is often important to know the name of that machine as that software might have its own username and password requirement and you need to know the username/password combination for the particular installation you are trying to access.
This is often confusing for database servers – increasingly I am trying to remember a broad map of what computers are where and what servers are where so I can at least reference them accurately.
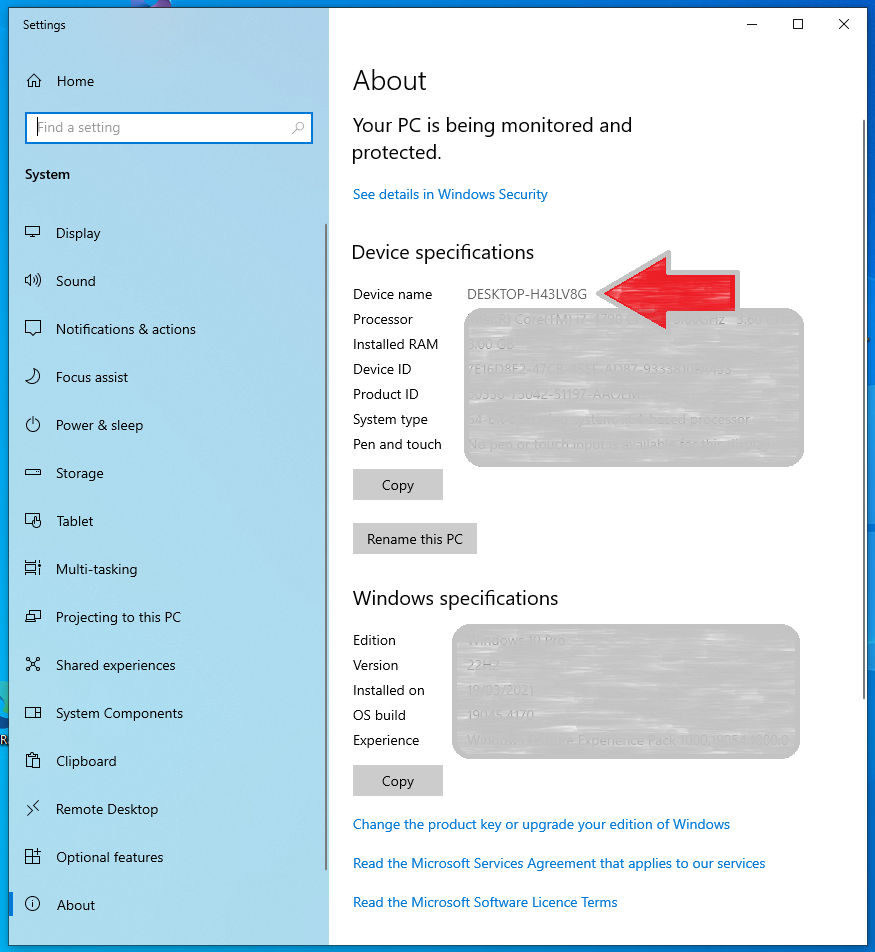
Two ways to find the DEVICE NAME on a windows machine (there are others)
In the Windows Search bar type
ABOUT
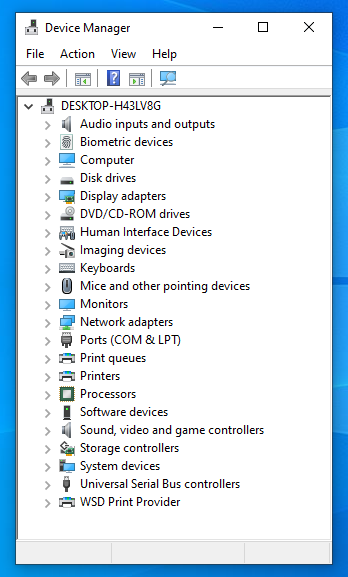
or in the Windows Search bar type
DEVICE MANAGER
About will give you this
Device Manager will give you this
Note you can get to that About screen through file explorer by right clicking on this PC and selecting Properties – but it is slower than just typing about in the Windows Search box.
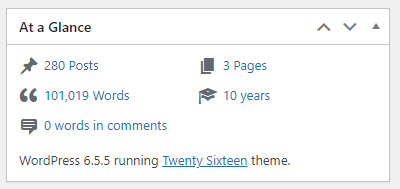
I knew I was coming up for 10 years(February 2024) writing on my site and I was curious to see what the entire body consisted of. There’s a handy wordcount plugin that will summarise everything.
“Dashboard Wordcount” – and here’s my stats for this site..


This post is a brief description of my findings on setting up Geoserver from scratch and some particular points on setting it up for an Oracle connection. I hope it will prove useful for others.
INSTALLATION
GeoServer with ORACLE database connection support
Geoserver Postgres (PostGIS) connection support comes with the default installation. This is NOT the case for Oracle or SQL Server therefore for enterprise purposes it is a requirement to install Geoserver WITH Oracle and SQL Server extensions if you wish to support these database connections.
I’ve done a post on Geoserver on windows installation link here that talks specifically about SQL Server. I will not go into a lot of detail about installation here. See below for links to the geoserver docker image I didn’t install the geoserver I describe here but I can confirm that we have been successful in including Oracle as a plugin to our Geoserver installation and we are able to connect.
Official Geoserver Docker Image GITHUB
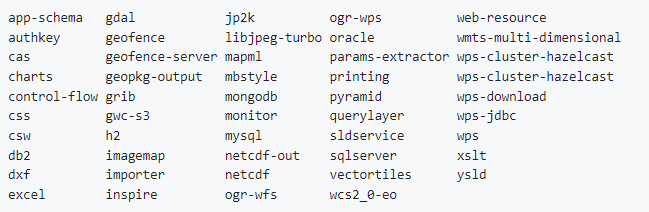
Below is a recent (Feb 2024) list of Docker parameters available at install including Oracle and SQL Server please seek advice on the use of Docker for installation if you are not familiar with it already.
GENERAL SETUP
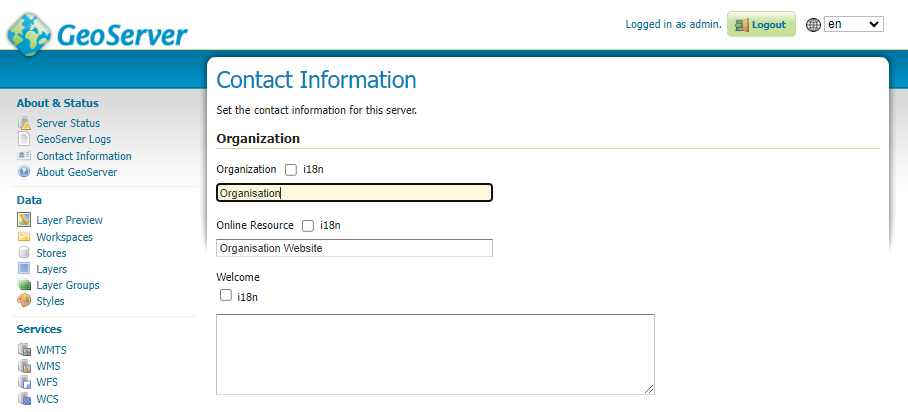
Contact Information – General Setup
On the Welcome screen there is a line that reads For more information visit {organization} to change this from the initial meaningless variable setting go to Contact Information and fill out your organisation.
Difference between Save and Apply – General point

In geoserver admin there are a lot of pages where there is a Save and an Apply button. Most users initially at least find this confusing.
In GeoServer, the terms “Save” and “Apply” serve different purposes:
Save:
When you click “Save”, it permanently stores the changes you’ve made to the configuration. These changes are saved in the GeoServer configuration files. , “Save” ensures that your modifications persist even after restarting GeoServer or rebooting the system. It’s like committing your changes to a version control system—it makes them permanent.
Apply:
“Apply”, on the other hand, is more immediate. When you click “Apply”, it takes the current configuration (including any unsaved changes) and applies it dynamically. The applied changes take effect immediately without requiring a restart or permanent storage. Think of it as a temporary adjustment that affects the running instance of GeoServer but doesn’t alter the saved configuration. In summary, “Save” makes changes permanent, while “Apply” applies them immediately without saving them to the configuration files
![]()
The first thing you will want to do is determine if you can actually connect to your ORACLE database.
ORACLE required parameters for database connection. Before you continue make sure you have the following
ORACLE host name
Port ORACLE database (default 1521)
database name
user – case sensitive
password – case sensitive
Geoserver installed with Oracle extension
It is good idea to get your DBA to setup a read only user if you are connecting to a database that is part of a vendor supplied product as you really should not be editing the database through anything except the vendor’s UI and Geoserver can be setup to allow edit of data. Geoserver has powerful security configuration included but conflicting settings can arise that may alter the intended security levels making it safer to enforce read only least privilege at the database level.
ORACLE and Postgres – some SQL Differences
Please be aware Oracle databases are by default case sensitive but may convert SQL Strings to upper case when passed to Oracle. I believe this complies strictly with the SQL Standard.
Postgres classifies tables, columns views and other database objects as Identifiers. SQL Identifiers must begin with a letter. If possible avoid including special characters in the naming of identifiers because although postgres may support them special characters are not allowed in the SQL Standard so their use might render applications less portable. Additional identifiers and keyword must begin with a letter. Keywords are defined as items such as SELECT / UPDATE / CREATE etc.. The SQL Standard says that databases should not define a key word that contains a digit or starts or ends with an underscore so identifiers could be something like t001users should be safe against possible conflict with future extensions of the standard. In postgres the maximum identifier length is 63 bytes. Additionally Postgres also folds unquoted names to lower case but some postgres management UIs allow for the naming of identifiers with varied case.
UPSHOT for Geoserver (and anything else for that matter)
If you are having difficulty referencing tables or views in any enterprise database – experiment with the case sensitivity in the query. There might be some folding of object names when passed to the server.
This characteristic should be born in mind when using SQL Views in Geoserver.
ORACLE Store setup to get the most out of Geoserver
Login to Geoserver admin panel using your admin account
On the left hand side under Data hit Stores
Assuming you have successfully installed Geoserver with the Oracle extension you should be presented with the following dialog and in particular the items highlighted below.

Oracle NG uses a standard Oracle driver (ignore the other options this article will not explain them)
Select Oracle NG
Use the default settings for most things but IMPORTANTLY ensure Expose Primary Keys is ticked

NOTE from our brief testing we found that exposing primary keys seemed to be one factor that improved stability in our Oracle connection when dealing with QGIS.
QGIS WFS set up to improve Oracle Connection Stability
It is recommended that you have a copy of QGIS to test setup to things like WFS
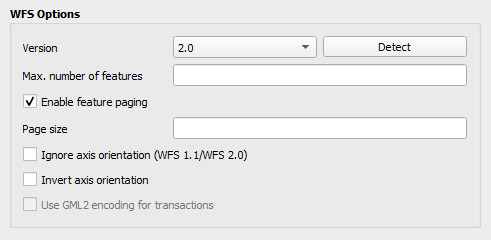
When we first started displaying specifically the Oracle spatially enabled table in QGIS via WFS service we found that the layer would initially display but if we were to leave the project and go back in for a period of time the layer would not be visible. This seemed to be temporary and after an unpredictable amount of time the layer would reappear. The attribute table continued to be viewable but polygons were not visible.
We fixed this by ensuring Expose Primary Key (see Geoserver layer configuration) was ticked and within QGIS within the WFS Connection Configuration ensure within the WFS options section that the version is set to match the linked WFS Service. This might not be necessary in all QGIS versions.
LAYER Config
Useful background information (partly written by co-pilot)

Enabled and Advertised parameters – Layer Config
In GeoServer, the Enabled and Advertised checkboxes play distinct roles in layer configuration:
Enabled:
When a layer is enabled, it means that the layer is available for requests (such as WMS GetMap or WMS GetFeature). If a layer is not enabled, it won’t be accessible for any kind of request. However, it will still appear in the configuration (and in the REST config). Essentially, enabling a layer makes it operational and ready to serve data.
Advertised:
By default, a layer is advertised. An advertised layer is included in the GetCapabilities request and appears in the layer preview. However, if you uncheck the Advertised checkbox, the layer will still be available for data access requests (like WMS), but it won’t appear in any capabilities documents or previews. In other words, non-advertised layers remain functional but are not explicitly listed in service metadata. Remember, enabling a layer makes it operational, while advertising it determines whether it appears in service capabilities and previews
Name and Title parameters – Layer Config
Name:
The Name corresponds to the identifier used to reference the layer in WMS (Web Map Service) requests. It is primarily used for computer interaction and serves as an internal reference default name is usually the name of the table or the name of the referenced view. When creating a new layer for an already-published resource, the Name must be unique to avoid conflicts. Essentially, it’s the technical name associated with the layer.
Title:
The Title provides a human-readable description that briefly identifies the layer to clients. Unlike the Name, which is for computers, the Title is meant for humans to read. It helps users understand the purpose or content of the layer. For example, if you have a layer representing a map of the USA, you might set the Title to “This is a map of USA.” Remember, while the Name is essential for system functionality, the Title enhances user experience by providing meaningful context about the layer1
Security – the Name does not need to be the table or view name you are referencing. This string appears in the URL which may be viewable to the user – you may wish to obfuscate this by changing the name
i18n – Internalization – Layer Config
Internationalization (i18n):
GeoServer supports returning a GetCapabilities document (used for describing available services and layers) in various languages. The i18n functionality is available for the following services:
WMS 1.1 and 1.3
WFS 2.0
WCS 2.0
The i18n editor allows you to provide translations for the title and abstract of various components:
Layers configuration page
Layergroups configuration page
WMS, WFS, and WCS service configuration pages
Additionally, for Styles, there’s a separate i18n configuration (see i18N in SLD).By default, the i18n editor is disabled and can be enabled via the i18n checkbox.
GetCapabilities Document Language:
The language of the GetCapabilities document can be selected using the AcceptLanguages request parameter.GeoServer’s response varies based on the following rules:
Internationalized elements include titles, abstracts, and keywords.If a single language code is specified (e.g., AcceptLanguages=en), GeoServer tries to return content in that language.If multiple language codes are specified (e.g., AcceptLanguages=en,fr), GeoServer attempts to return content in one of the specified languages.
Coordinate Reference Systems – Declared SRS and SRS handling – Layer Config
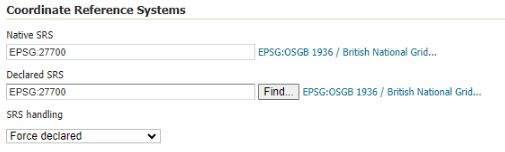
If you are in the UK ensure that Declared SRS is set to 27700
SRS Handling
In GeoServer, the SRS handling setting plays a crucial role in how coordinate reference systems (CRS) are managed. Let’s explore its significance:
Declared SRS:
The Declared SRS specifies the coordinate system that GeoServer publishes to clients. It represents the CRS that clients should use when interacting with the layer. Essentially, it’s the officially declared CRS associated with the layer.
SRS Handling:
The SRS Handling option determines how GeoServer should handle projection transformations when the declared CRS and the native CRS of the data differ. Here are the possible values for SRS Handling:
Force declared (default): In this mode, GeoServer forces the declared SRS upon the data, overwriting the native CRS if necessary.
Other options (not mentioned in the snippet):
Reproject native to declared: GeoServer performs a reprojection from the native CRS to the declared CRS.
Reproject declared to native: GeoServer reprojects from the declared CRS to the native CRS.
None: No reprojection is performed; the data remains in its native CRS.
In summary, the SRS handling setting ensures that data is presented consistently to clients, regardless of the underlying native CRS. It’s a critical aspect of maintaining accurate spatial information in GeoServer1.
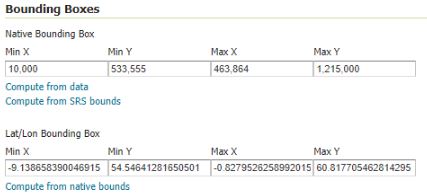
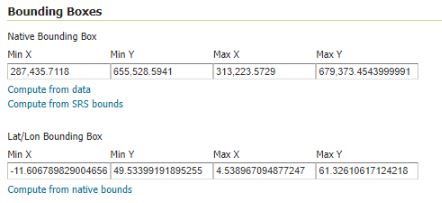
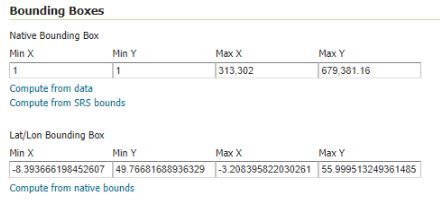
Bounding Box recommendations – Layer Config
Scotland
Min X = 010000
Min Y = 533000
Max X = 464000
Max Y = 1215000
West Lothian
Min X = 287000
Min Y = 655000
Max X = 314000
Max Y = 678000
UK
Workspace setup and visibility in WFS
Workspaces can allow for editing and not editing of information although to date I seem to be struggling to isolate layers and workspaces to allow them to be edited or not edited. One thing that is important in our present system is to Enable the settings in the Basic info – without this the layers within the workspace were not showing up in the WFS
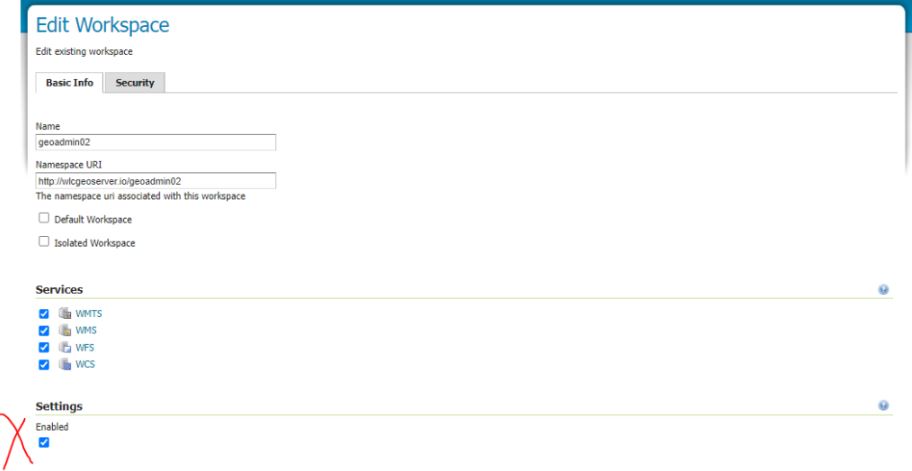
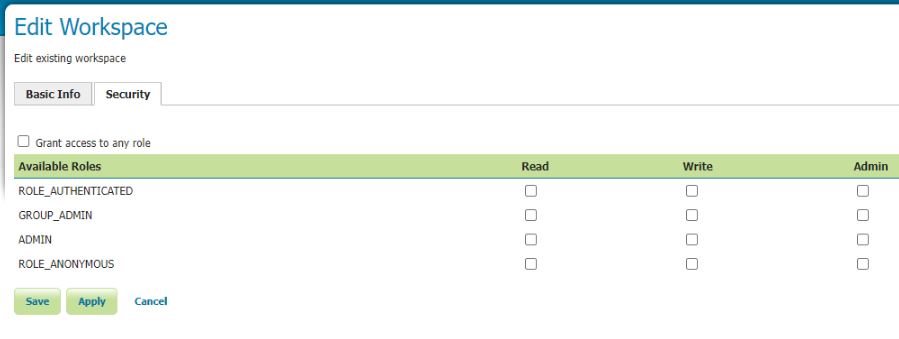
Restrictions on Layers : Important Note
Important – Workspace Security settings override Layer Security Settings
If you need to have different layer security settings within one Workspace you will need to turn off all Workspace security settings e.g see below.


Once you have your data in an Enterprise Grade database sharing that information becomes important. Some vendors, in particular Digital mapping SAAS vendors want you to transfer your data into their clouds but for a lot of authorities that is categorically impossible for large segments of their data. For example about 3/4 of UK planning authorities run on software built by a company called IDOX Group plc which holds its data in Oracle this cannot be moved. For Geographical data here’s where Geoserver comes in.
From the website
GeoServer is an open source server for sharing geospatial data.
Designed for interoperability, it publishes data from any major spatial data source using open standards.
GeoServer implements industry standard OGC protocols such as Web Feature Service (WFS), Web Map Service (WMS), and Web Coverage Service (WCS). Additional formats and publication options are available as extensions including Web Processing Service (WPS), and Web Map Tile Service (WMTS).
Another way of putting it Geoserver allows programs that display and manipulate geographic information to display and edit that data while keeping it safe and secure and located in enterprise databases. It can connect to SQL Server / Postgresql and I am told Oracle which are the main relational databases used by Local authorities today so once setup and configured it could be used to compare and contrast information in one location from variable datastores. Datastores that for historical reasons cannot be moved. Here I concentrate on SQL Server because we have a particular issue with new systems needing to connect to SQL Server but it would be great if we could get it working with Oracle as well.
The following are my notes on installation and configuration of Geoserver on Windows linking to SQL Server and in this case a remote(not on the same computer) SQL Azure instance I believe any remote SQL Server instance would be similar. This post is a detailed explanation of the installation of Geoserver locally on a laptop but I believe installation would be exactly the same on a Windows Server machine albeit additional steps would be required to publish to the web either internally or externally.
Its all configuration so remember your host names / IP numbers / ports / usernames / passwords / database, table and column names
To start this tutorial please ensure the following resources are available;
–
WorkFlow Synopsis Overview
1)Download and install Java runtime engine (as above importantly here I use 11)
2)Download and install Geoserver (2.24.1 in this case)
3)Test that the Geoserver Admin dashboard is up and working
4)Download and configure Geoserver Extension for SQL Server library (SQL Azure example)
5)Good idea to setup a login specifically to your SQL Azure instance with least privilege – Your SQL Server instance with geodatabases may already have suitable logins. So steps 5 and 6 can be skipped
6)Good idea to create an example table with Geodatabase in SQL Azure – will be used as a test connection table – NOTE if you already have a SQL Server with geodatabases you could use that instead.
7)White list IP within the SQL Azure instance firewall rules to Geoserver computer
8)Opening Geoserver and setting the ‘Store’ to reference your SQL Azure database using the login setup in step 5.
9)Adding a new layer from the Store made in point 8 and seeing if you can Preview the layer – Ideally you should have a table that has some features in it. Setting the WMS and WFS up in Geoserver with sufficient rights to allow editing (if WFS setup)
10)I don’t explain it in my post below but the next step would be to test in QGIS to see if you can setup a project in QGIS which can pull from Geoserver against a basemap and you check that the Polygons are actually where you want them to be.
Workflow Detailed
1)Download the install Java Runtime via JDK
There are some complications here
Initially I tried to use the Java Runtime engine 17 and went through the complete Geoserver installation but on testing I was getting a Java error when trying to view layers. After a short google I came across a stack overflow thread that indicated that geoserver support for JDE 17 was experimental and I should use Java Runtime engine 11. Deinstallation of 17 and installation of 11 solved this.
Additionally there is the issue of where you obtain the Java Runtime installation from – there is the Adoptium location and then there is Oracle location. Oracle are making moves to charge for use of their Java Runtime engine so it is important that you use Adoptium resource to reduce costs.
Later I will list the url to the JDK download for Java Runtime engine but it is important to realise that Adoptium is a safe source, well supported and noted as open source.
https://adoptium.net/en-GB/members/
so
Google Search for Adoptium
https://adoptium.net/en-GB/
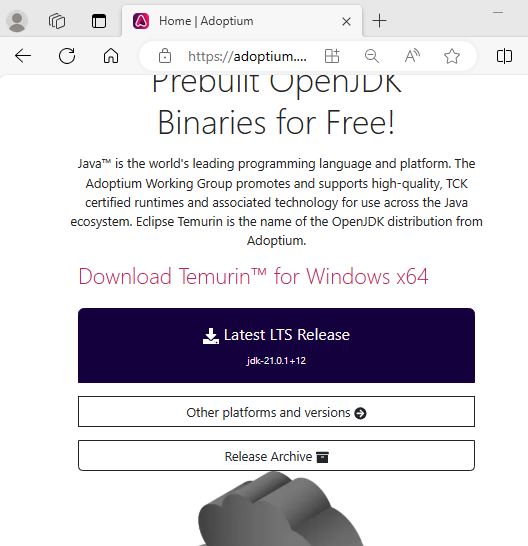
Navigate to other platforms and versions and target windows 64 bit JDK and 11 LTS version and download the .msi.
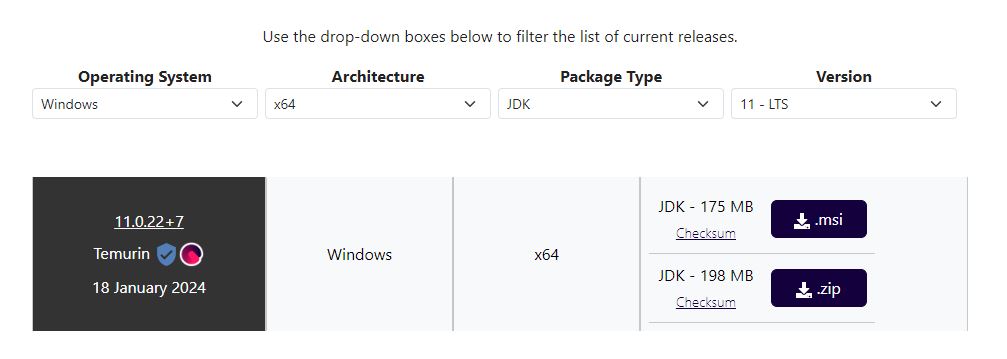
After a short delay you will be shown the msi which will be in your downloads folder
Double click on it to install.
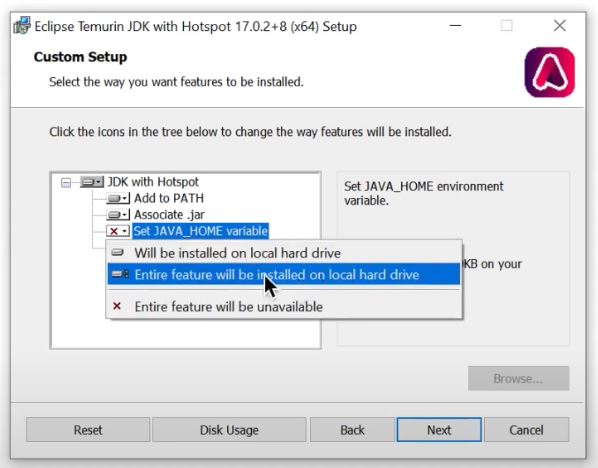
Now the only thing that is tricky here is to setup the java home directory as follows
Video Installing Adoptium JDK on Windows
In particular note this section
2) Download and install Geoserver
Go to the official Geoserver web page and follow the links to download the windows installer
Here I use the windows version of Geoserver version 2.41.1 obtained January 2024 from the following url
Geoserver Official Website
See download button and then go to Windows Installer

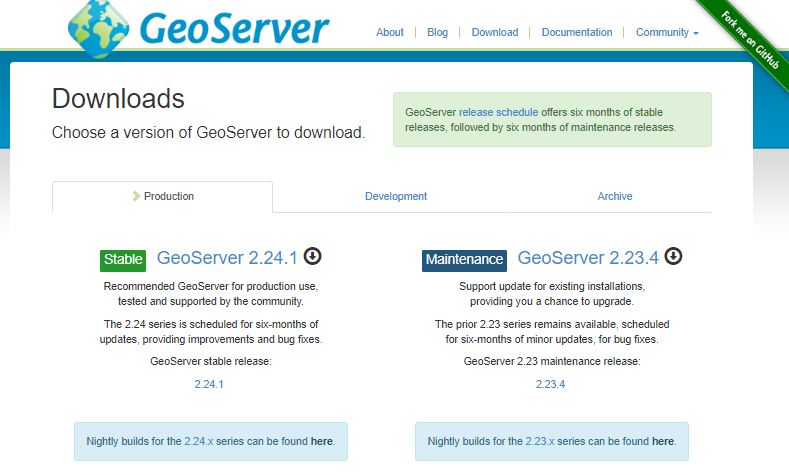
I chose the left option and then I chose the Windows Installer option
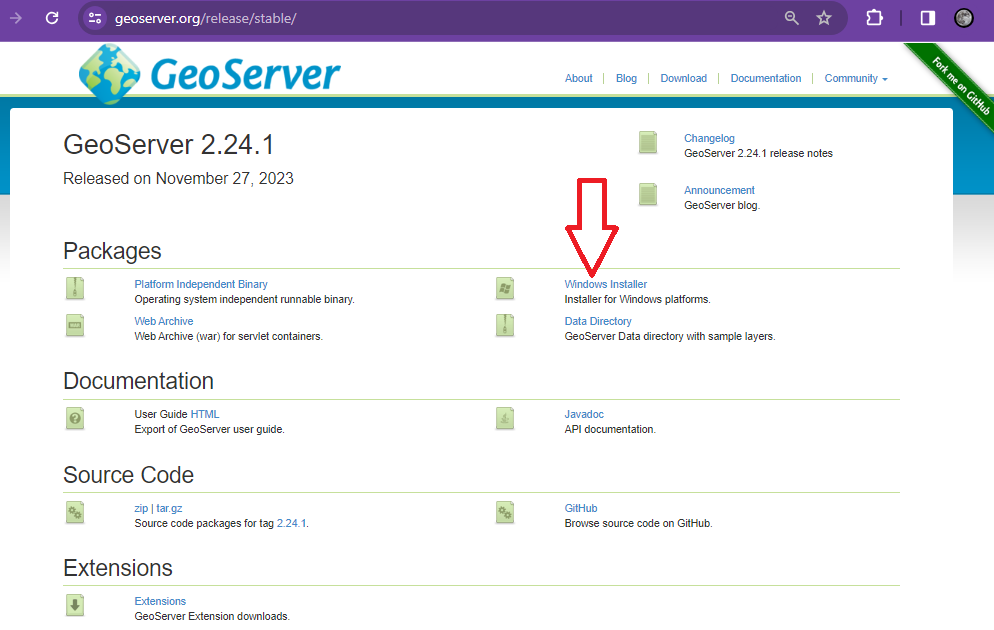
This will download Geoserver-2.24.1-winsetup.exe to your download directory and you can then start the geoserver installation process
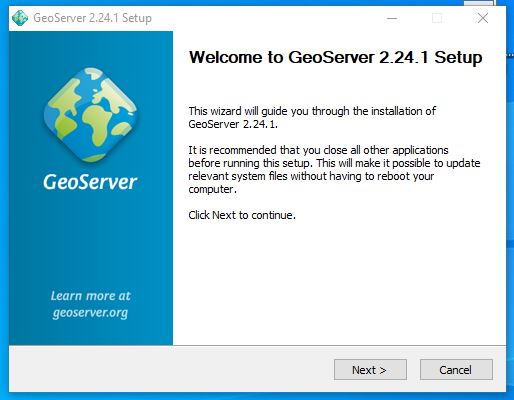
Next open up the executable and follow the instructions
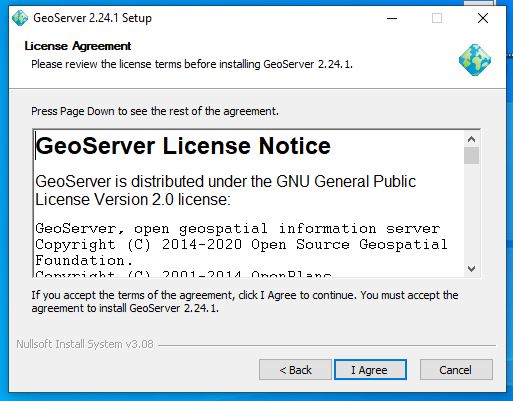
Next agree the licence
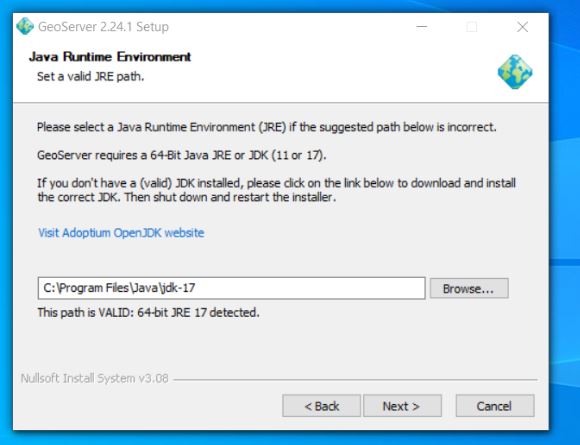
Next we reference the java library installed in the previous step – if you have set the java_home variable correctly it should automatically find JRE 11 for you and it will place it within the path reference below. I don’t have a screenshot of the JRE 11 reference here as on my first installation I referenced the Oracle 17 JRE – (note I went back de-installed geoserver installed JRE 11 and then reinstalled geoserver to counter the proprietary Oracle runtime library and importantly to fix the issue that I was facing of geoserver not being compatible with JRE 17
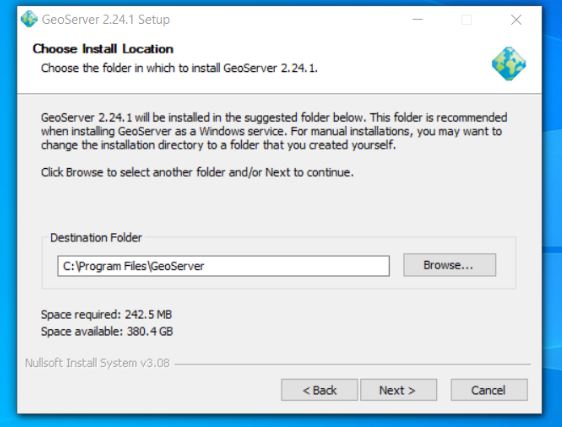
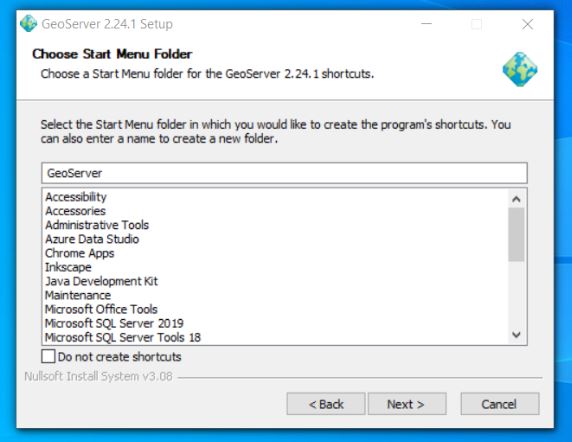
The rest of the install from here is standard for a windows install

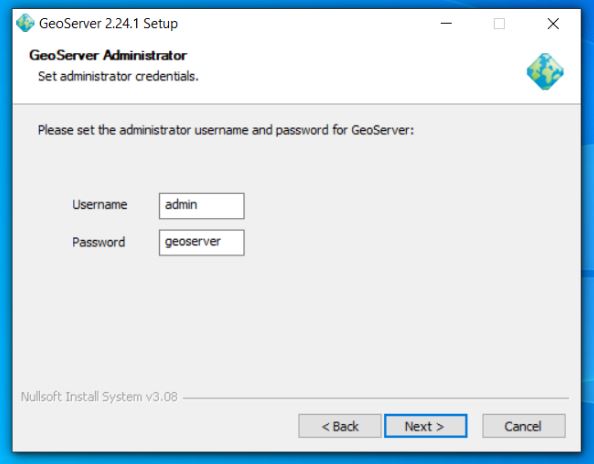
Next setup the default admin password – defaults are admin / geoserver
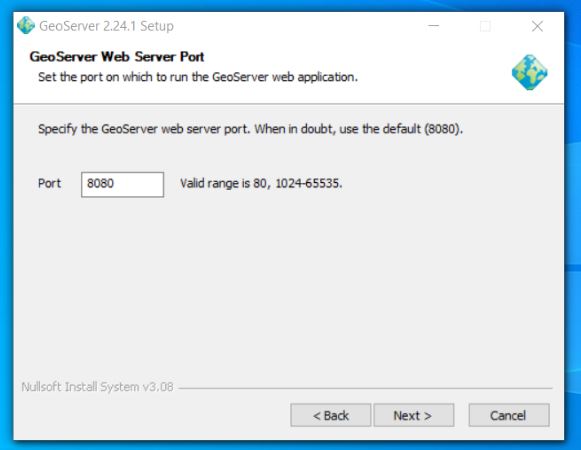
Set up port geoserver runs on – default is 8080
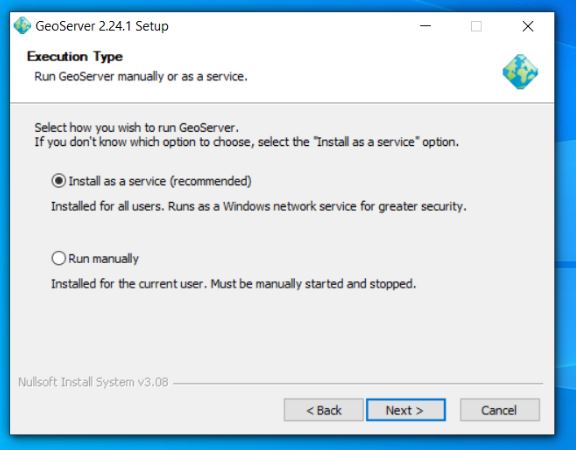
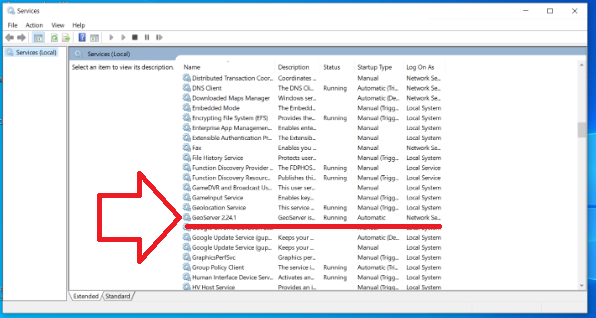
Next choose the execution type I like to install geoserver as a service
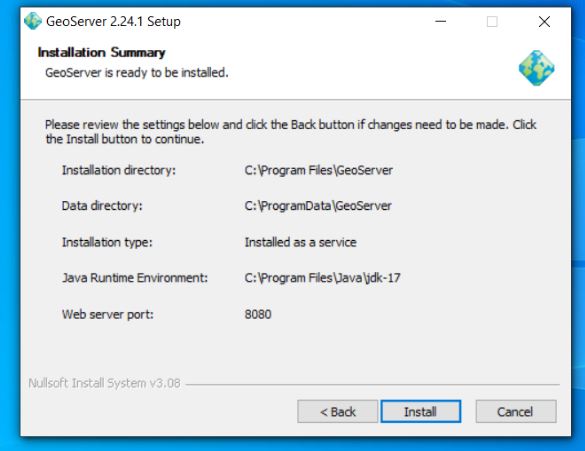
Confirm your preferences and then trigger install
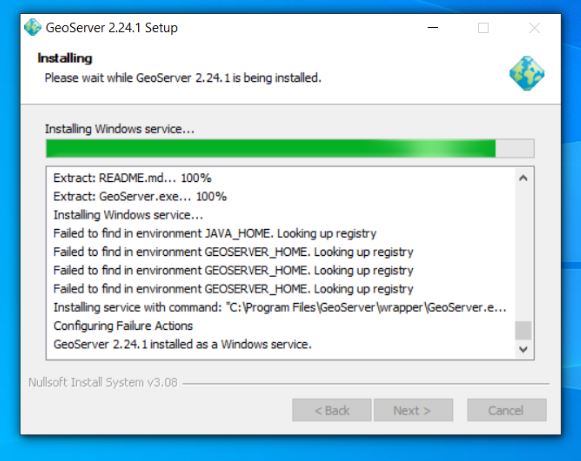
Now you should see geoserver on your local machine as a service which you will need to ensure is running to access properly
3) Test that Geoserver Admin dashboard is up and working at least locally
If you have used the same settings as me open a browser and navigate to the following url
https://localhost:8080/geoserver/web
Login with the username and password which is usually admin / geoserver
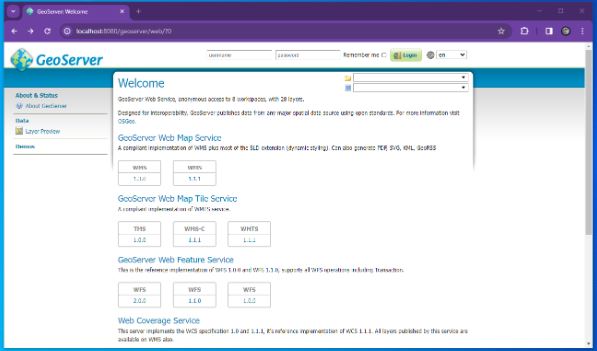
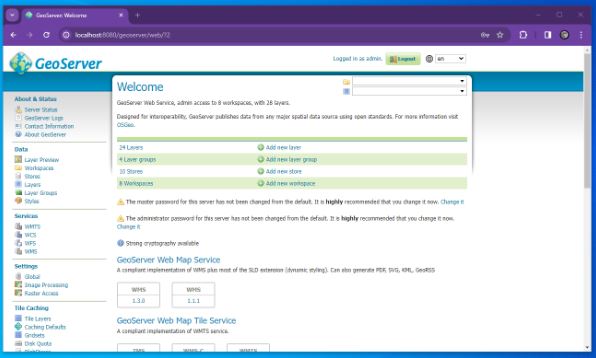
At which point you should see something similar to the following
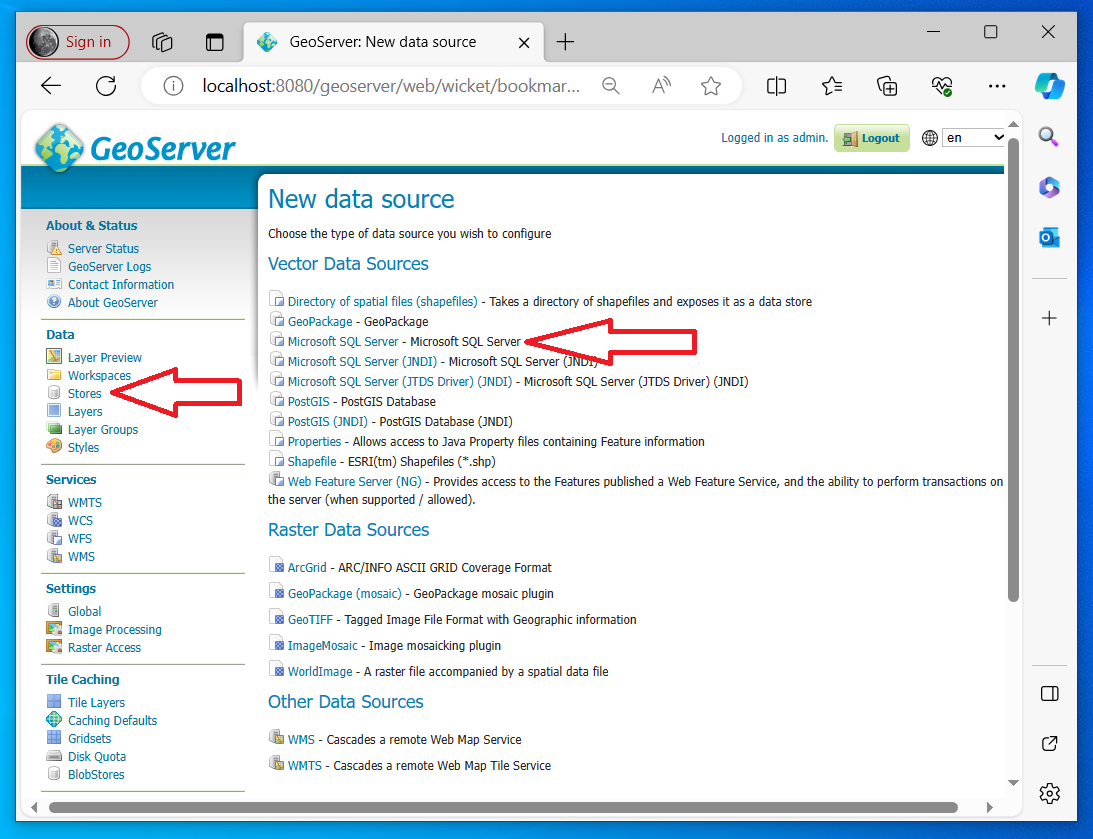
4) Download and configure Geoserver Extension for SQL Server
At install Geoserver comes with the ability to connect to Postgres but NOT SQL Server so we must install/configure plugin extension to enable Geoserver SQL Server connections.
Here we go back to the geoserver.org website and go to download but this time instead of choosing the windows installer we look to the Extensions section and choose SQL Server
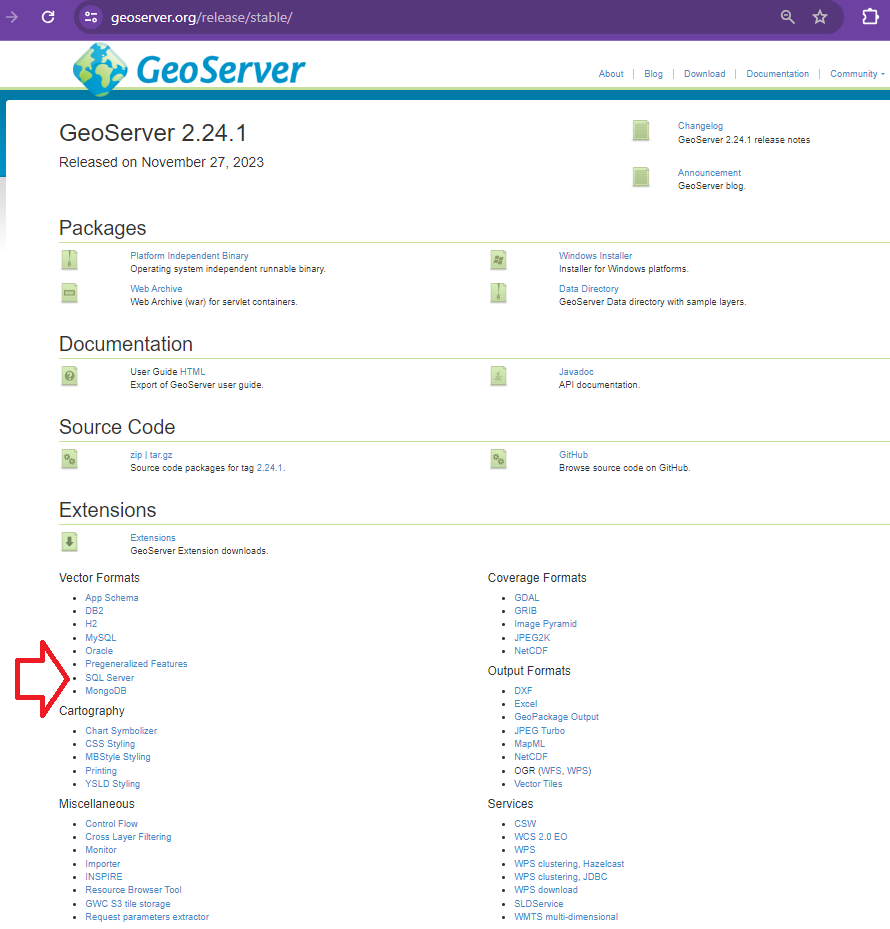
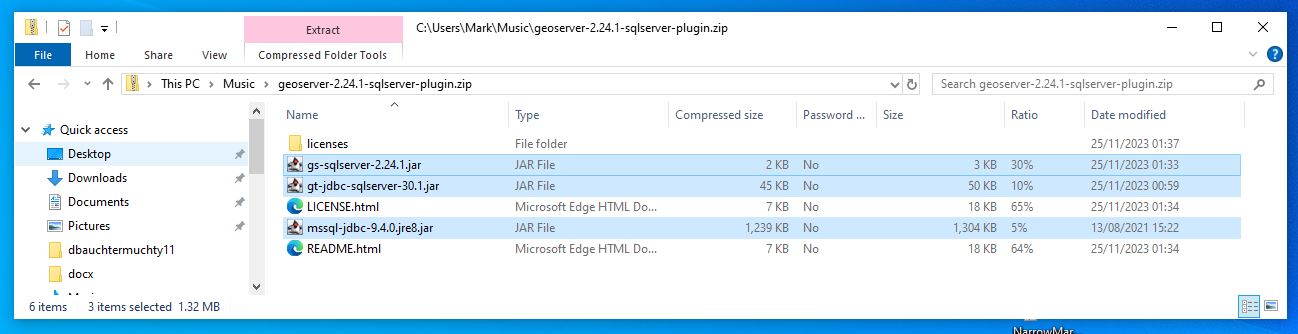
This should download geoserver-sqlserver extension plugin
Next copy all files with the jar suffix into the following directory
C/program files/GeoServer/webapps/geoserver/WEb-Inf/Lib
Next restart the geoserver and go back to the local host and sign in
http://localhost:8080/geoserver/web/?0
We are now very close to linking to SQL Server prior to that we must whitelist our geoserver so that your SQL Server instances will accept connections from your geoserver. Steps 5 and 6 are more about creating a user and ensuring you have a geodatabase with a georeferenced table skip to 7 if you want to read about white listing in SQL Azure or you have an alternative database that you could use with requirements already set up.
5) Next its a good idea to create a user with least privilege this will be used to set up the link so go to SSMS
Least privilege User Login Setup SQL Server
Here allow the amount of access you wish users to have remembering the principles of least privilege
6) Lets create an example table with geometry that we will be connecting
When I first tried connecting to SQL Server (SQL Azure in my case) I didn’t have any georeferenced tables so I created one and added a few records. If you have a database already with tables with geometry or geography you might not need to do this step.
So open SSMS and navigate to your database and use the following TSQL to create a table here I call it t064
SET ANSI_NULLS ON
GO

SET QUOTED_IDENTIFIER ON
GO

CREATE TABLE [dbo].[t064](
[PKID] [int] IDENTITY(1,1) NOT NULL,
[geomcol] [geometry] NULL,
[sitename] [varchar](30) NULL,
PRIMARY KEY CLUSTERED
(
[PKID] ASC
)WITH (STATISTICS_NORECOMPUTE = OFF, IGNORE_DUP_KEY = OFF, OPTIMIZE_FOR_SEQUENTIAL_KEY = OFF) ON [PRIMARY]
) ON [PRIMARY] TEXTIMAGE_ON [PRIMARY]
GO
This is a really simple table with three columns and you might want to link to it through QGIS and just create a few records – I would try and use a default projection of 27700 if you are UK based. I might come back with an example table with records..
If you want to link to this table for testing then you should try and input at least one record here. I added records using QGIS and I hope to come back to this post and update it to be more specific
7) White List the IP within your SQL Server or SQL Azure instance.
Setting IP White List in SQL Azure
8) Opening Geoserver and setting the ‘Store’ to reference your SQL Azure database using the login setup in step 5
Navigate to the local host url for Geoserver namely
http://localhost:8080/geoserver/web/?0
Go to store and then you should see the following page
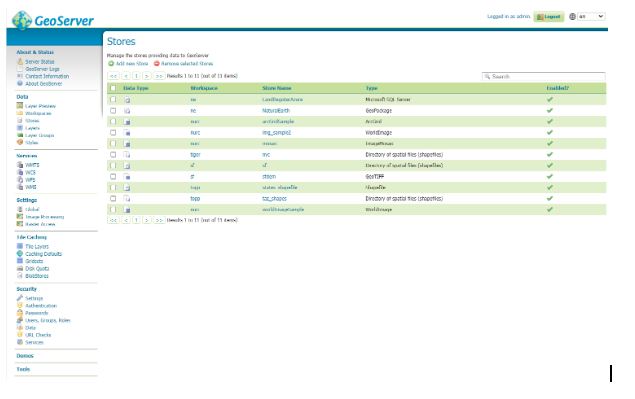
Hit the Add New Store green plus button in the top left corner you will be presented with the following screen
Fill out as many details as you can
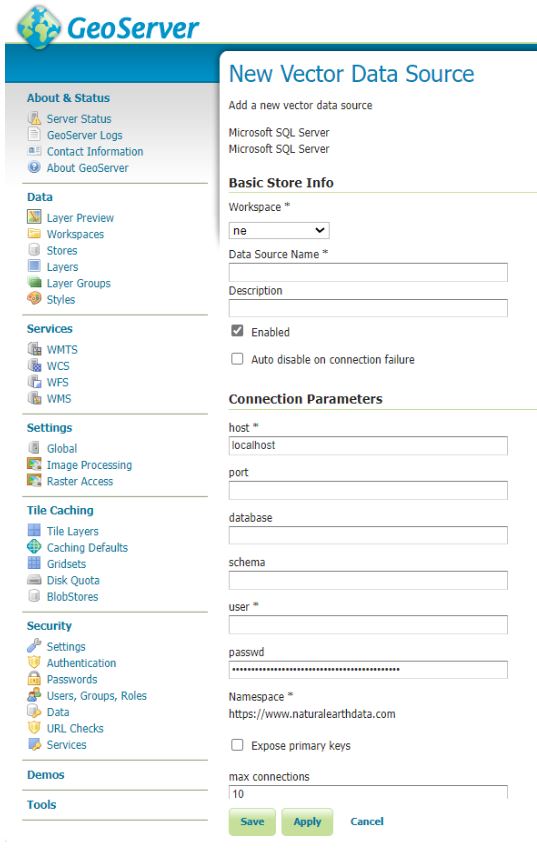
For SQL Azure this is likely to be similar to the following
Host = namevariable.database.windows.net (normally unique to instance in SQL Azure)
Port = 1433 (sql azure default)
Schema = dbo (sql azure default is dbo but your database maybe bespoke)
User = uservariable (remember least privilege is a good idea)
Passwd = passwordvariable (should be unique to your database)
Save and Apply and then your new connection should appear in your store
Here’s an example…. (see top line)
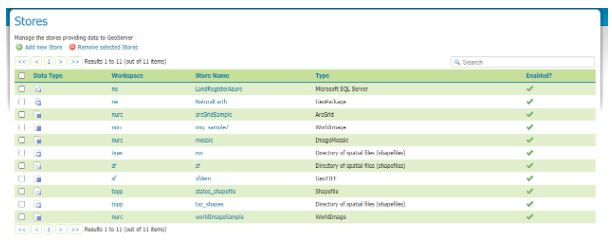
For the purposes of this tutorial I setup a login with db_owner rights to the database LandRegisterAzure your mileage will vary.
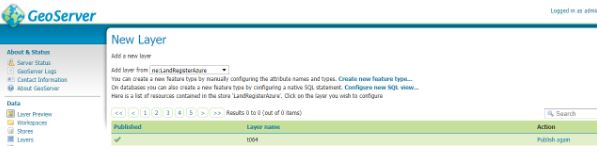
9) Next we add the layer which references the SQL Server
Select Layers within the Data section of the menu (usually to the left of the geoserver dashboard) then hit Add a new layer
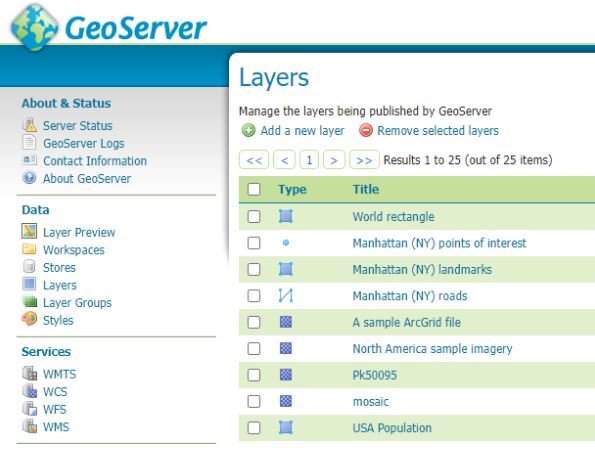
You should get the following windows
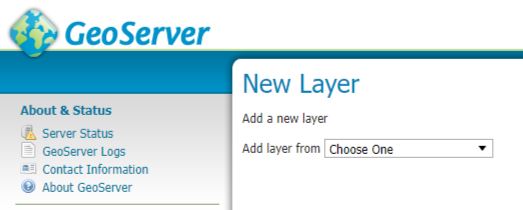
From the drop down select the store which references your SQL server. This will reveal all the tables and views in the database and you scroll through them to the table or view you wish to publish and in the column marked Action will be publish you can hit the Publish highlighted text (I’ve done that here already so under Action our table is marked as Publish again and there is a tick in the column titled Published.
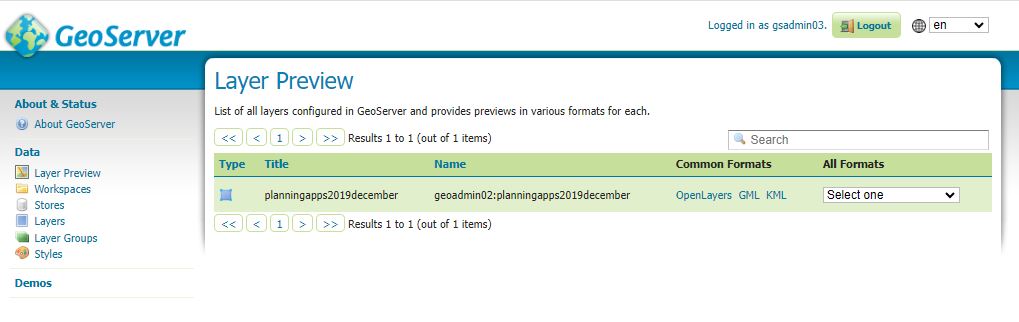
We can now quickly test to see if things look like they are working by going to Layer Preview.
Look to the left hand side and select Layer Preview
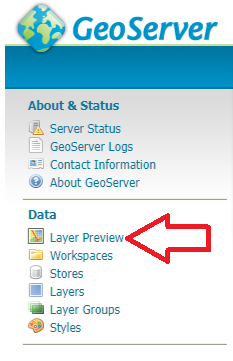
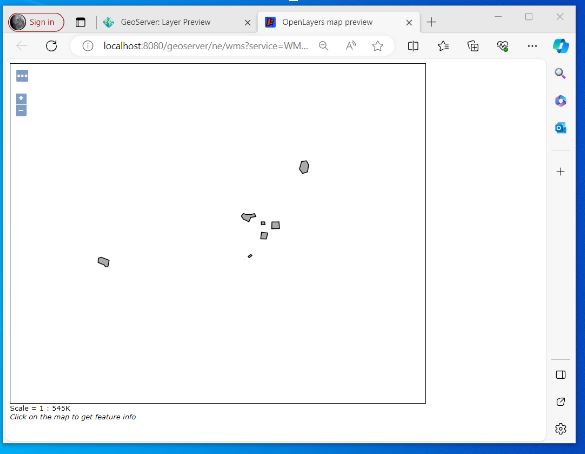
Scroll down through the list and identify the layer that you have just added. I now select the open layers option

A new browser tab will open and if you have successfully configured the SQL Server you should be presented with your layer – without any background
10) I don’t go into it here but next I will try and write up my notes on QGIS and Geoserver setup – On my laptop I managed to set up a WFS to my SQL Azure instance through Geoserver where the layer was added to a project and I was able to edit information in my SQL Azure database through QGIS and were displayed correctly against a basemap in the right place!!
–/END/–

Planning in the UK has for a long time suffered from a classic siloing of data by authority resulting in slow and varied analysis of information. Authorities relied on talented motivated individuals with particular interests and skills to develop bespoke solutions that assisted in the development of things like housing land audits , population forecasts , capital planning and local plan development which while often impressive individually struggled to transfer between authorities.
The continual improvement of digital tools has dramatically improved standardisation of the attributes of particular spatial data sets and database technology originally developed for accounting systems and flight control systems is starting to be applied to the amalgamation and analysis of planning related information. Within the UK different regions are progressing along this path at different rates. Scotland now has a body the Improvement Service who has a specific remit to collect spatial planning data which they do at something call the Spatial Data Hub.
The Spatial data hub at 08 January 2024 had 59 datasets listed at Scotland coverage level. Including
Planning application boundaries
School Catchment Areas
Housing Land Supply
Vacant and Derelict Land
Employment Land
The improvement service has been building these datasets for a number of years now however last year they expanded general access to much of the information and I have since been experimenting with it to see what can be achieved.
Very useful when coupled with OceanWP and Code Block Pro – Beautiful Syntax Highlighting
.newwidth {
        width: 600px;
        max-width: 100%; /* This prevents it from exceeding the screen width */
        margin: 0 auto; /* This centers the block horizontally */
        text-align: center; /* This centers the content within the block */
    }
The below trigger monitors a table called t001Table4Monitoring and four particular fields / 3 date fields and one integer field. It monitors the trigger table and compares new values to old values using simple subtraction. As a comparison between null and a value will always return null we need to catch situations were a field is changed from null or to null hence the ISNULL section. The record has a bit field that is updated to True if change is detected.
This code was created with the help of GPT-4
CREATE TRIGGER [dbo].[trg_Update_t001Table4Monitoring]
ON [dbo].[t001Table4Monitoring]
AFTER UPDATE
AS
BEGIN
    IF UPDATE(Date01Monitor) OR UPDATE(Date02Monitor) OR UPDATE(Date03Monitor) OR UPDATE(IntegerMonitor)
    BEGIN
        -- Get old and new values
        DECLARE @old_Date01Monitor DATE, @new_Date01Monitor DATE;
        DECLARE @old_Date02Monitor DATE, @new_Date02Monitor DATE;
        DECLARE @old_Date03Monitor DATE, @new_Date03Monitor DATE;
        DECLARE @old_IntegerMonitor INT, @new_IntegerMonitor INT;

        SELECT @old_Date01Monitor = Date01Monitor, @old_Date02Monitor = Date02Monitor, @old_Date03Monitor = Date03Monitor, @old_IntegerMonitor = IntegerMonitor FROM deleted;
        SELECT @new_Date01Monitor = Date01Monitor, @new_Date02Monitor = Date02Monitor, @new_Date03Monitor = Date03Monitor, @new_IntegerMonitor = IntegerMonitor FROM inserted;

        -- Check if values have changed
        IF (ISNULL(@old_Date01Monitor, '1900-01-01') <> ISNULL(@new_Date01Monitor, '1900-01-01')) OR
           (ISNULL(@old_Date02Monitor, '1900-01-01') <> ISNULL(@new_Date02Monitor, '1900-01-01')) OR
           (ISNULL(@old_Date03Monitor, '1900-01-01') <> ISNULL(@new_Date03Monitor, '1900-01-01')) OR
           (ISNULL(@old_IntegerMonitor, 0) <> ISNULL(@new_IntegerMonitor, 0))
        BEGIN
            UPDATE dbo.t001Table4Monitoring
            SET RecordChanged = 1
            FROM dbo.t001Table4Monitoring t
            INNER JOIN inserted i ON t.pkid = i.pkid
        END
    END
END;
Here I create a main table which can be used to translate times into a UTC value using a function I store here. It should be noted that if you have a field with variable type set to datetime and you set the default to GetDate() – the server will create a UTC value on record creation but time is set on the server and with SQL Azure you don’t have an option to change it.
CREATE TABLE [dbo].[MainTable](
	[pkid] [int] IDENTITY(1,1) NOT NULL,
	[storeddatetime] [datetime] NULL,
	[timezonename] [nvarchar](128) NULL
PRIMARY KEY CLUSTERED
(
	[pkid] ASC
)WITH (PAD_INDEX = OFF, STATISTICS_NORECOMPUTE = OFF, IGNORE_DUP_KEY = OFF, ALLOW_ROW_LOCKS = ON, ALLOW_PAGE_LOCKS = ON) ON [PRIMARY]
) ON [PRIMARY]
GO

ALTER TABLE [dbo].[MainTable] ADD  CONSTRAINT [DF_MainTable_storeddatetime]  DEFAULT (getdate()) FOR [storeddatetime]
GO
Next we create a timezone table
CREATE TABLE [dbo].[TimeZoneTable](
	[pkid] [int] IDENTITY(1,1) NOT NULL,
	[timezonename] [nvarchar](128) NULL,
PRIMARY KEY CLUSTERED
(
	[pkid] ASC
)WITH (PAD_INDEX = OFF, STATISTICS_NORECOMPUTE = OFF, IGNORE_DUP_KEY = OFF, ALLOW_ROW_LOCKS = ON, ALLOW_PAGE_LOCKS = ON) ON [PRIMARY]
) ON [PRIMARY]
GO
And we can populate this from sys.time_zone_info table.
INSERT INTO TimeZoneTable (timezonename)
SELECT name FROM sys.time_zone_info;
We can create a function to convert this datetime value knowing the timezone into UTC is as follows
CREATE FUNCTION dbo.fn_ConvertToUTC (@localDatetime DATETIME, @timeZone NVARCHAR(128))
RETURNS DATETIME
AS
BEGIN
    DECLARE @utcDatetime DATETIME;
    SET @utcDatetime = @localDatetime AT TIME ZONE @timeZone AT TIME ZONE 'UTC';
    RETURN @utcDatetime;
END;
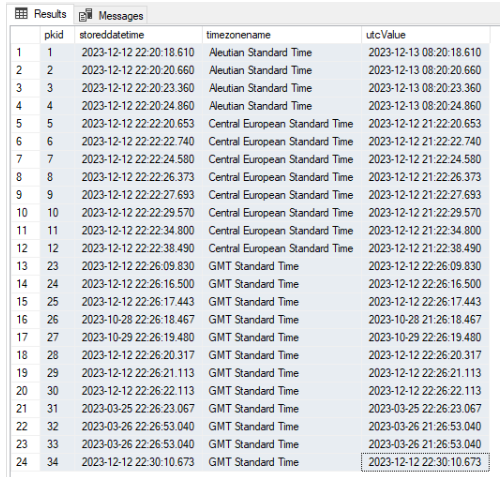
Now runnig the following query on some example data we get the following
SELECT
    pkid,
    storeddatetime,
    timezonename,
    dbo.fn_ConvertToUTC(storeddatetime, timezonename) AS utcValue
FROM
    MainTable;
And here is a function that will convert to local time from utc
CREATE FUNCTION dbo.fn_ConvertToLocal (@utcDatetime DATETIME, @timeZone NVARCHAR(128))
RETURNS DATETIME
AS
BEGIN
    DECLARE @localDatetime DATETIME;
    SET @localDatetime = @utcDatetime AT TIME ZONE 'UTC' AT TIME ZONE @timeZone;
    RETURN @localDatetime;
END;
Javascript option
The getTimezoneOffset() method of the Date object in JavaScript calculates the difference, in minutes, between the local time zone and the UTC time zone 1. The method returns a positive value if the local time zone is behind UTC, and a negative value if the local time zone is ahead of UTC 1.
The method works by subtracting the local time zone offset from UTC time. For example, if the local time zone is 5 hours behind UTC, then the method will return 300 (5 * 60) 2

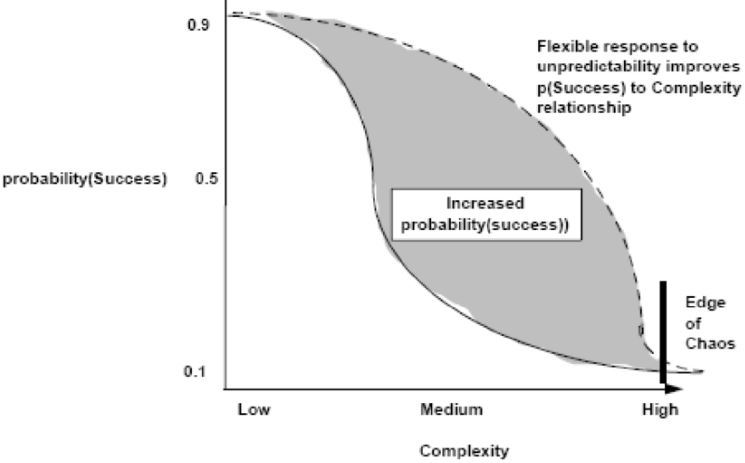
I don’t do that many strategic posts these days (compared with my first posts) but this is really a reminder to myself to always seek out the simplest solution especially when configuring systems and writing code. Less is generally always better. The above post was a DALL E production and the below graph is the simpler one which QED actually makes sense. I would suggest that the line moves to the right with improved education of staff / time / money and number of staff but eventually productivity dramatically drops with complexity no matter how much money , time or people.
Encoding – The alphabet used to write the words (what characters are allowed, how they’re stored)
Collation – The rules for sorting the words (dictionary order, accents, case handling)
1. PostgreSQL
Encoding (DB-wide)
Always:
ENCODING ‘UTF8’
This comfortably supports English + Cyrillic + pretty much everything else.
Collation + case-insensitive behaviour
PostgreSQL is the awkward one here:
Locale-based collations like en_GB.UTF-8 are NOT case-insensitive.
Case-insensitive behaviour is usually done with:
ICU collations (if ICU is enabled), or
The citext extension, or
Functional indexes on LOWER(column).
You have two realistic “good compromise” options:
Option A – Use ICU collation (if your Postgres build supports ICU)
Check if ICU is available:
SELECT * FROM pg_collation WHERE provider = ‘i’;
If you see rows, you can create a Unicode, case-insensitive collation like:
CREATE COLLATION multilingual_ci (
provider = icu,
locale = ‘und-u-kc’, — ‘und’ = undetermined language, ‘kc’ = case-folding
deterministic = false — allows true case-insensitive comparisons
);
Then:
CREATE TABLE example (
name text COLLATE multilingual_ci
);
Result:
UTF-8 storage
ICU Unicode rules (good for mixed English + Cyrillic)
Case-insensitive comparisons + ORDER BY
Option B – Use citext (works everywhere, even without ICU)
CREATE EXTENSION IF NOT EXISTS citext;
CREATE TABLE example (
name citext
);
citext behaves like text but comparisons are case-insensitive under the current collation.
Works fine for English + Cyrillic as long as the DB is ENCODING ‘UTF8’.
Recommended combo for you (simple + reliable):
Encoding: UTF8
Collation: OS default UTF-8 locale (e.g. en_GB.UTF-8)
Use citext for case-insensitive columns
2. MariaDB
MariaDB is much easier here: _ci collations are already case-insensitive.
Character set
Use full Unicode:
CHARACTER SET utf8mb4
Collation
Recommended:
COLLATE utf8mb4_unicode_ci
This gives you:
Unicode (English + Cyrillic fully supported)
Case-insensitive comparisons and sorting
Better multilingual behaviour than utf8mb4_general_ci
Typical DB creation:
CREATE DATABASE myapp
CHARACTER SET utf8mb4
COLLATE utf8mb4_unicode_ci;
Any VARCHAR/TEXT columns inherit that and are case-insensitive for both English and Cyrillic.
3. SQL Server
SQL Server: look for collations with:
_CI → case-insensitive
_AS → accent-sensitive (you probably want this)
_SC → supports supplementary characters (nice to have)
You’ll be using Unicode types (NVARCHAR, NCHAR) anyway.
Recommended collation
A very solid, widely used choice:
Latin1_General_100_CI_AS_SC
Why?
Latin1_General Windows collation supports Unicode, so it covers Cyrillic too
100 = newer collation version (better Unicode support)
CI = case-insensitive
AS = accent-sensitive (usually what you want for names, etc.)
SC = supplementary characters (emoji etc.)
Example:
CREATE DATABASE MyApp
COLLATE Latin1_General_100_CI_AS_SC;
GO
CREATE TABLE dbo.Example (
Name NVARCHAR(200) COLLATE Latin1_General_100_CI_AS_SC
);
That will sort and compare strings in a case-insensitive way, for English and Cyrillic alike.
Quick cheat-sheet
Engine Encoding / Charset Collation / Type Case-insensitive? Good for English + Cyrillic?
PostgreSQL ENCODING ‘UTF8’ ICU multilingual_ci (und-u-kc) or citext type ✅ (with ICU or citext) ✅ Yes
MariaDB utf8mb4 utf8mb4_unicode_ci ✅ _ci = CI ✅ Yes
SQL Server (Unicode types) Latin1_General_100_CI_AS_SC ✅ _CI = CI ✅ Yes
I was having issues displaying polygons stored in SQL Server Express locally within a QGIS 3.28 project.
After having quizzed unsuccessfully GPT 4.0 I found the answer on good old Stack Overflow.
As part of your SQL Server Express installation you should have installed SQL Server Configuration Manager. Open this administration package and navigate to your instance to show the following;
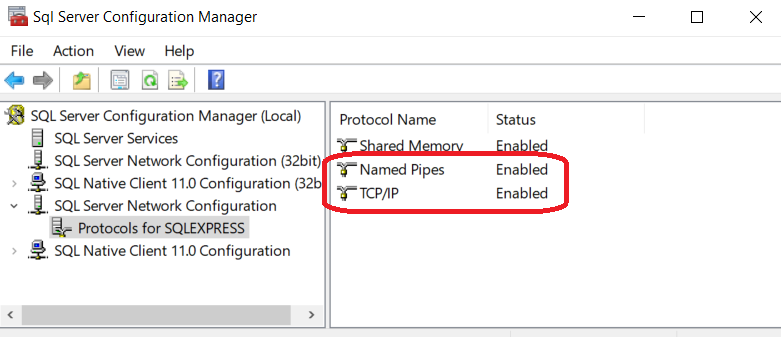
Make sure both Named Pipes and TCP/IP are enabled.
That fixed it for me
Important note the host connection string IS case sensitive and sometimes when you use the properties from within SSMS to look at the hostname it capitalise things so watch out! That caught me out for half an hour!!
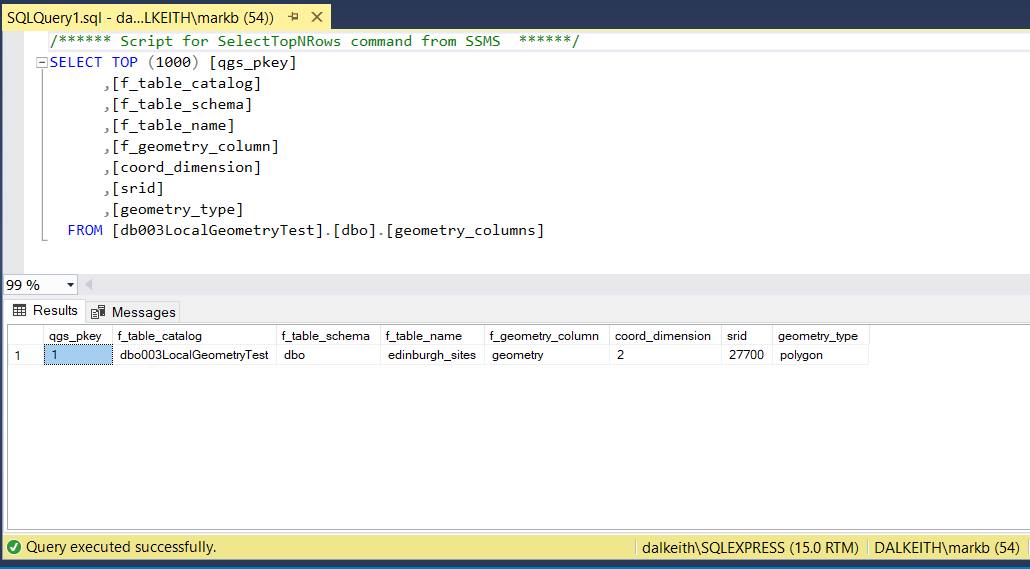
And here is my definition of the geometry table
CREATE TABLE [dbo].[geometry_columns](
[pkid] [int] IDENTITY(1,1) NOT NULL,
[f_table_catalog] [varchar](50) NULL,
[f_table_schema] [varchar](50) NULL,
[f_table_name] [varchar](100) NULL,
[f_geometry_column] [varchar](50) NULL,
[coord_dimension] [int] NULL,
[srid] [int] NULL,
[geometry_type] [varchar](50) NULL,
PRIMARY KEY CLUSTERED
(
[pkid] ASC
)WITH (PAD_INDEX = OFF, STATISTICS_NORECOMPUTE = OFF, IGNORE_DUP_KEY = OFF, ALLOW_ROW_LOCKS = ON, ALLOW_PAGE_LOCKS = ON, OPTIMIZE_FOR_SEQUENTIAL_KEY = OFF) ON [PRIMARY]
) ON [PRIMARY]
GO
Javascript is very powerful and will easily calculate all sorts of interesting things for you dynamically. In PHPRunner I use the popup windows for nearly every table or view form so I wanted it to work with these.
But with PHPRunner we want to store these in the database. I had a devilish time finding a way of referencing the field with which to copy any Javascript value into. After some lengthy discussion with ChatGPT 4 (via Bing) it suggested that I might try and use the CSS Selector.
I then discovered that I couldn’t seem to identify the name of the CSS Selector.
What I discovered is that I could not see a static CSS Selector reference for any of the fields except those that I had altered the formatting on for example changing the font to Roboto Mono.
So first step choose your target field and then alter it using the PHP page designer and then publish.
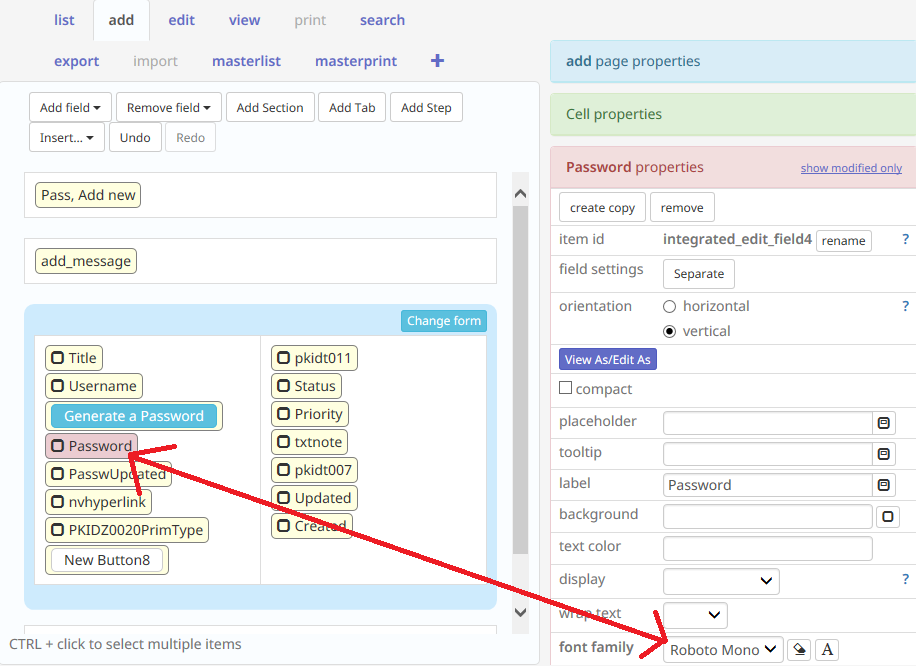
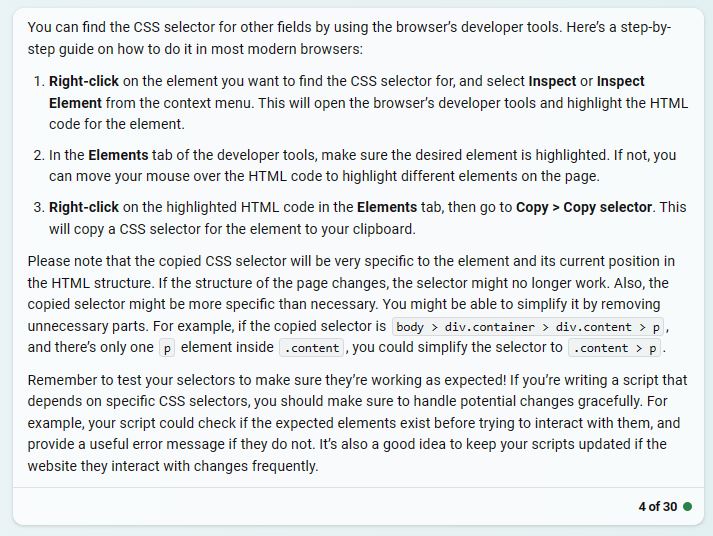
What I discovered was after that I could use the inspect item to identify the CSS Selector
On the published application navigate to the form and the field you wish to target for entry right click and select inspect.
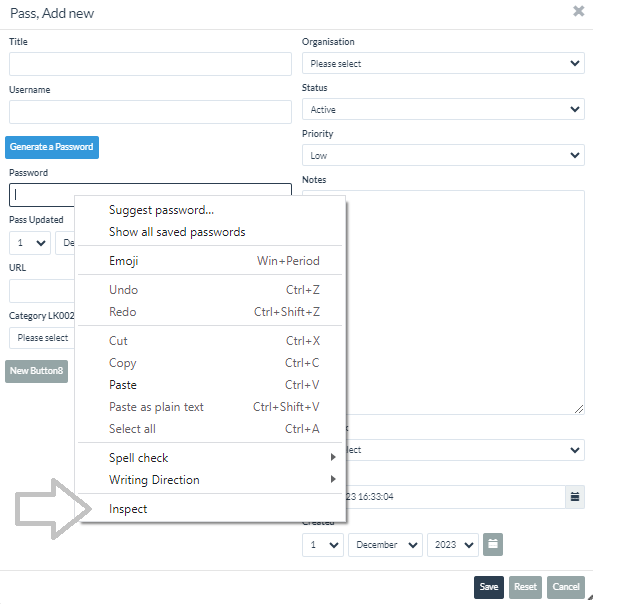
Look to the DevTools window (in chrome and you should see in bold the css names of your field
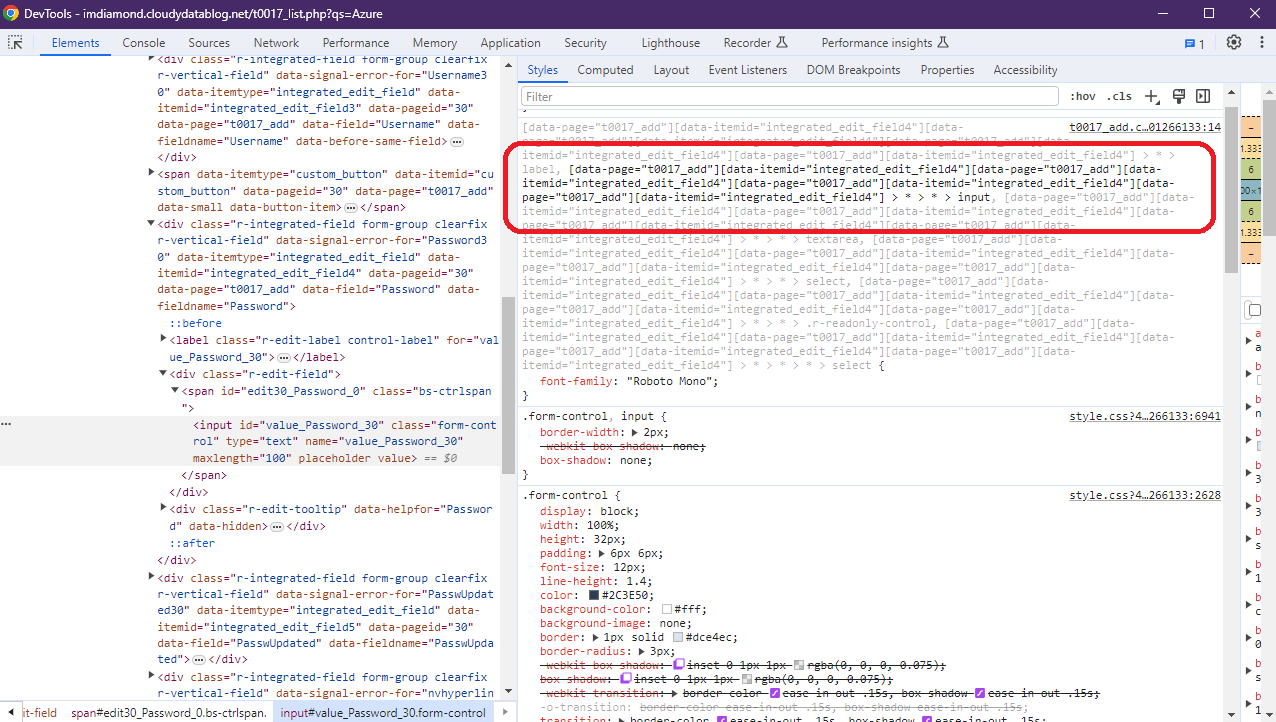
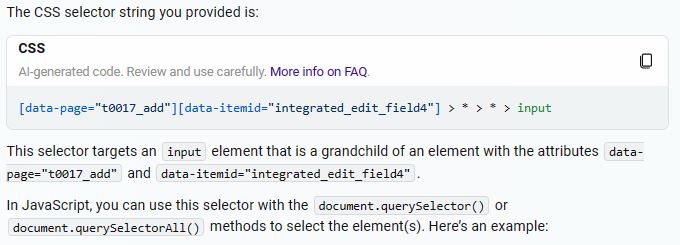
You can then ask ChatGPT the following
Can you parse the input css selector I need from the following string that can be used by javascipt to be passed a value
[data-page="t0017_add"][data-itemid="integrated_edit_field4"][data-page="t0017_add"][data-itemid="integrated_edit_field4"][data-page="t0017_add"][data-itemid="integrated_edit_field4"][data-page="t0017_add"][data-itemid="integrated_edit_field4"] > * > * > input
An element is a part of a webpage. In XML and HTML, an element may contain a data item or a chunk of text or an image, or perhaps nothing. A typical element includes an opening tag with some attributes, enclosed text content, and a closing tag. Elements and tags are not the same things.
More on elements is available here
This can now be used behind a button and away we go… see below
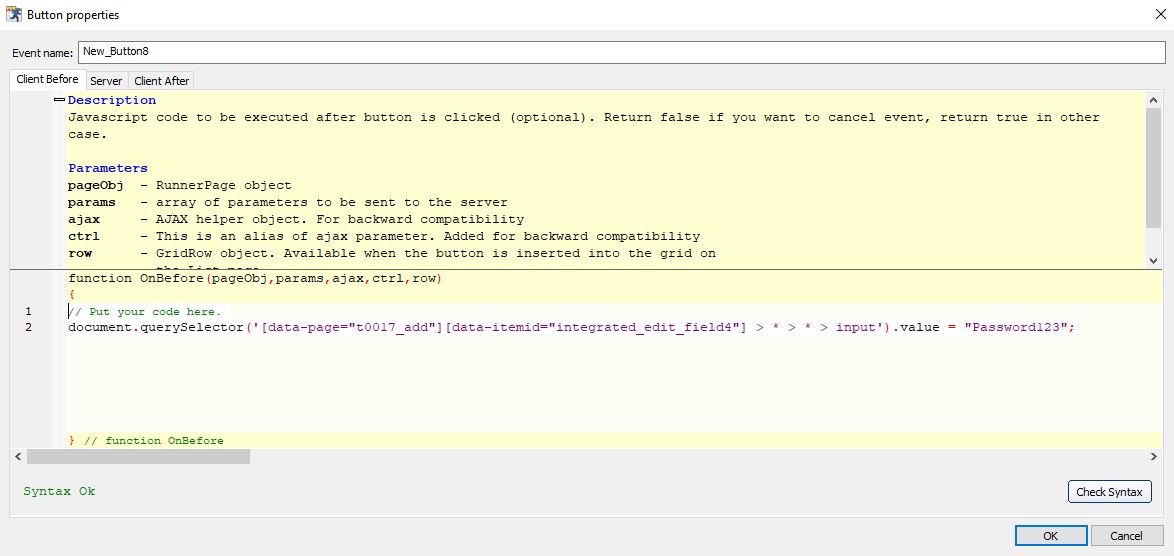
document.querySelector('[data-page="t0017_add"][data-itemid="integrated_edit_field4"] > * > * > input').value = "Password123";
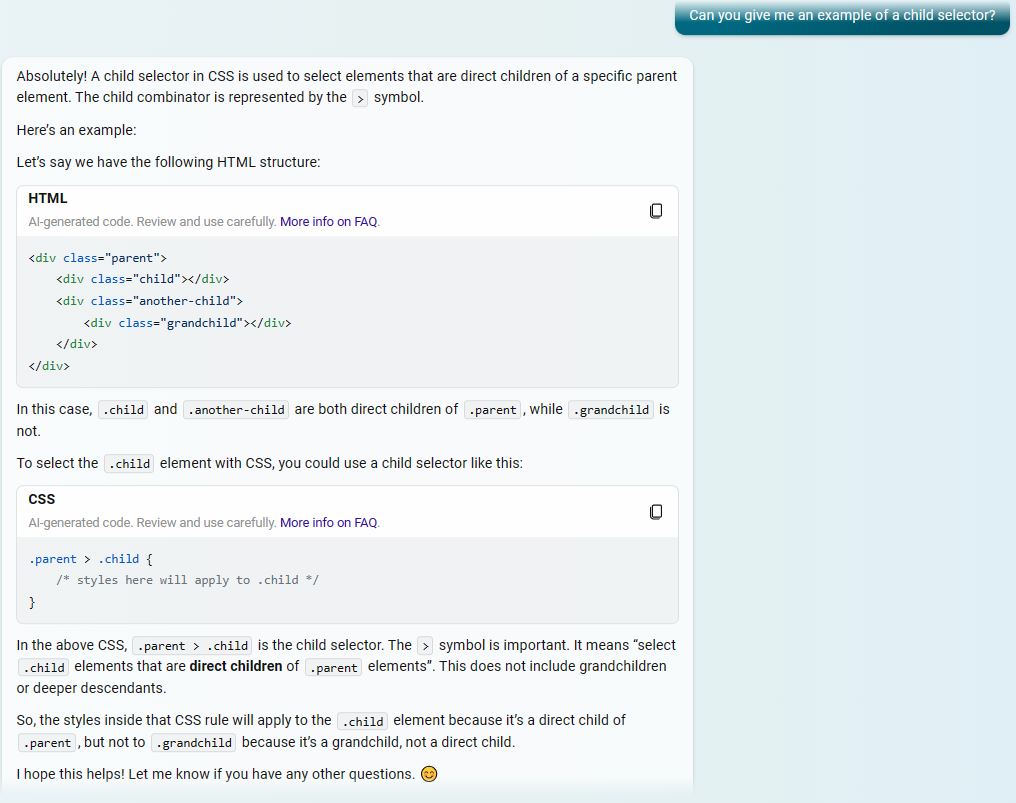
And here are some notes on finding CSS Selectors by ChatGPT4 I am still investigating CSS Selectors there seems to be a black art to understanding their structure and how they can be useful
I also asked chatGPT about child selectors in CSS. In my discussions with chatGPT I have discovered that spaces are important and symbols are important in naming and of course Javascript is case sensitive. The dynamic nature of CSS Selectors and their very specific naming conventions combined with spaces potentially being characters really means you need to be on your toes when you use them.
Create Users
Firstly ensure you are logged in as administrator ONLY the system administrator can set up users and roles and the default geoserver username/password of the administrator is admin/geoserver
The sa login has additional menus as here
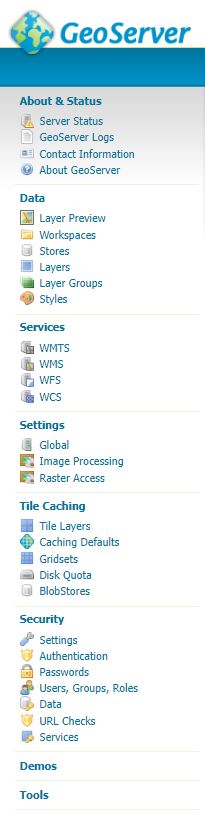
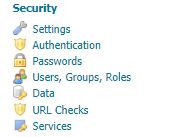
Go to the Security menu on left towards the bottom and find line marked – Users/Groups/Roles
Go to the Roles tab
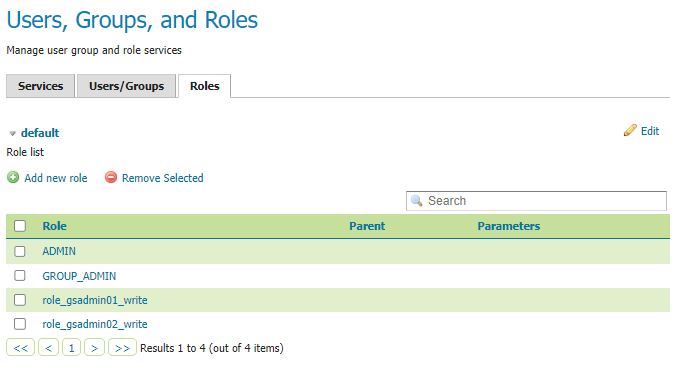
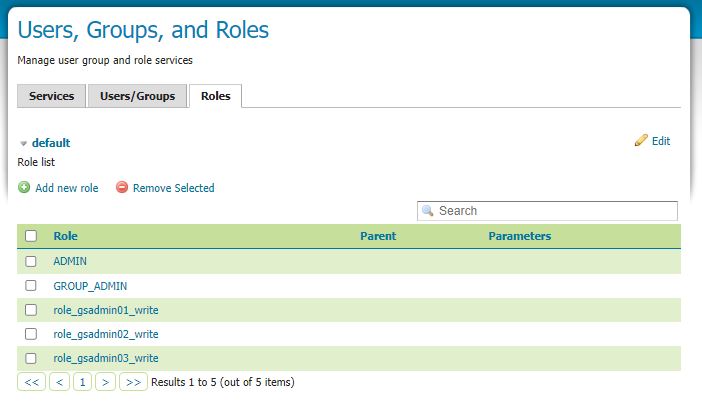
Look to the green circle with white cross and add new role and complete as appropriate
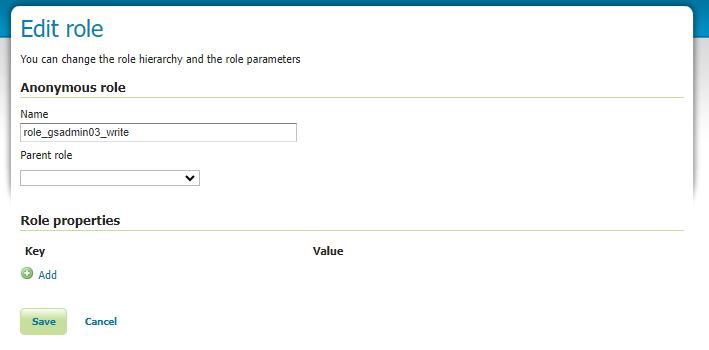
Note once you have created the role you will not be able to edit the name of that role so you have to delete the role and then create a role with a different name if you don’t want the old role name to continue.
Next we create the users
Go to the Users/Groups tab
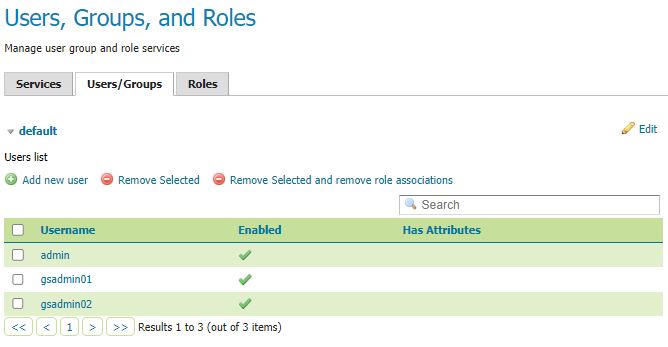
Look to the green circle with white cross and add new user and within the Roles taken section ensure you move the role you created from the left box to the right see grey above.
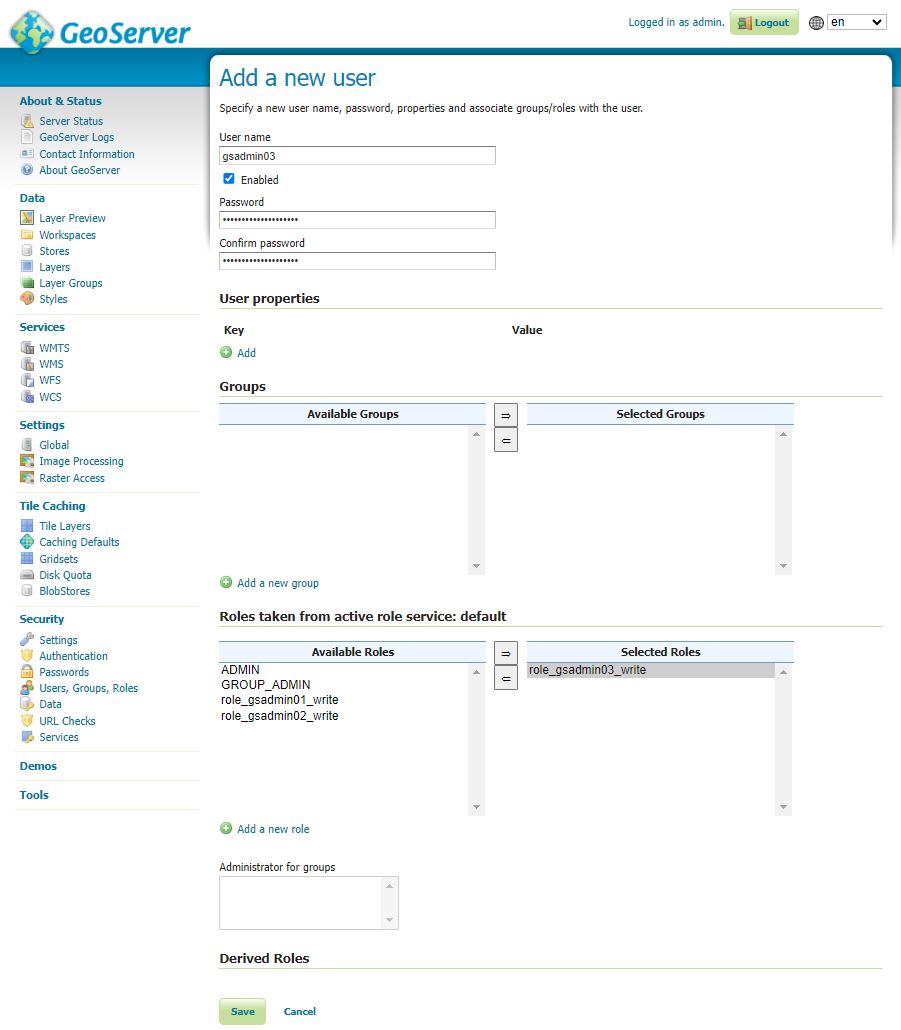
The new username should now appear in the User list

You grant admin privileges to the workspaces through the Workspace section as follows
Within the edit workspace section go to security
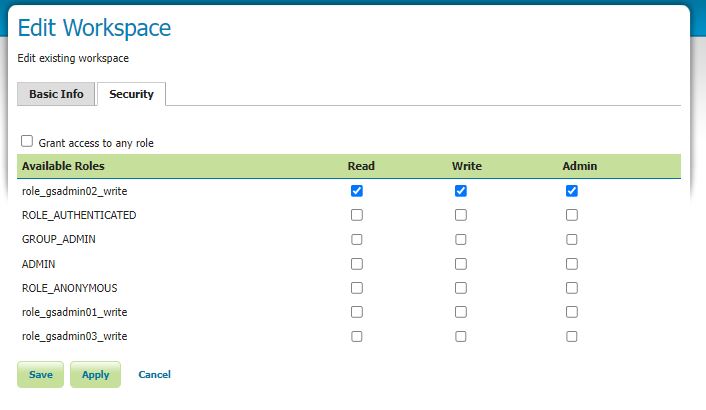
And give admin rights to the role you wish to link to the workspace
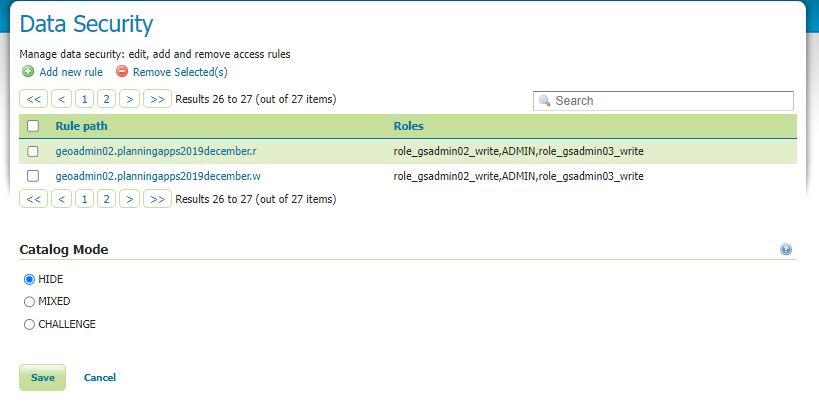
Note that you still won’t see anything until you go into layer edit and edit the security as follows.
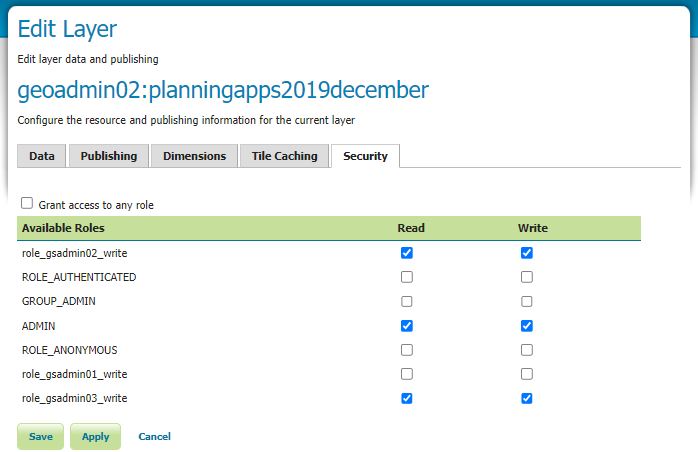
Within the Security section you can also see the roles added
I have written previously about triggering stored procedures in MS SQL Azure through a PHP Runner generated web front end. This is a vanilla explanation which includes sweet alerts to indicate users updating them on the progress of longer running stored procedures. It also locks the front end preventing users from rushing procedures until the queries have had time to complete.
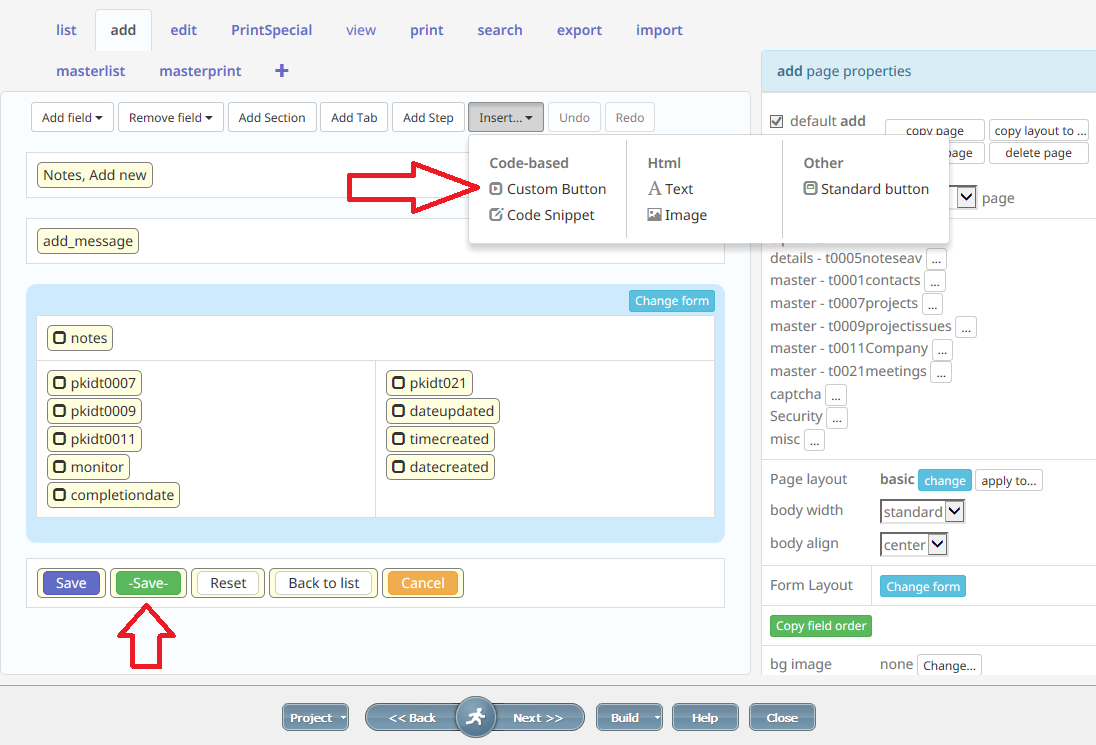
Firstly navigate to the table you wish to run the stored procedure from in this example it is table T032Email List Screen
Insert a Custom Button here I call it Transform
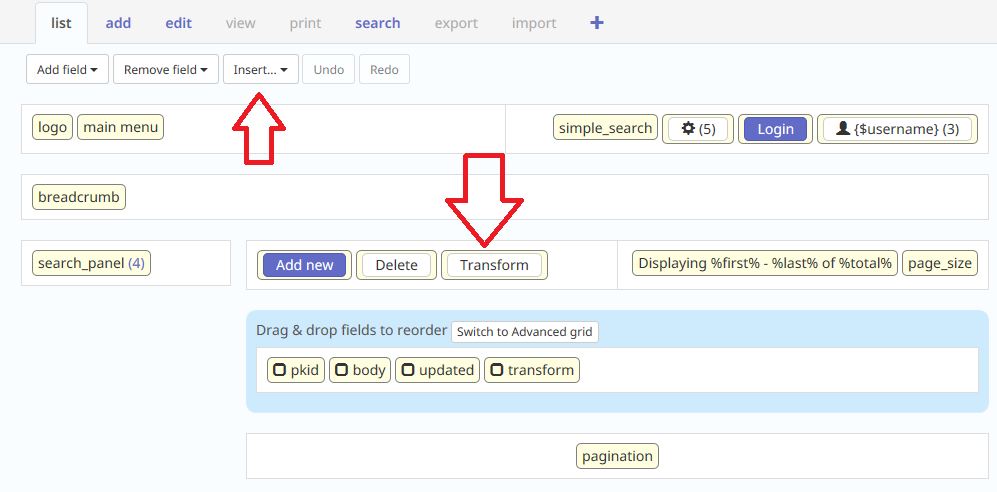
Next select the button and look to the right for the Edit Button Code button.
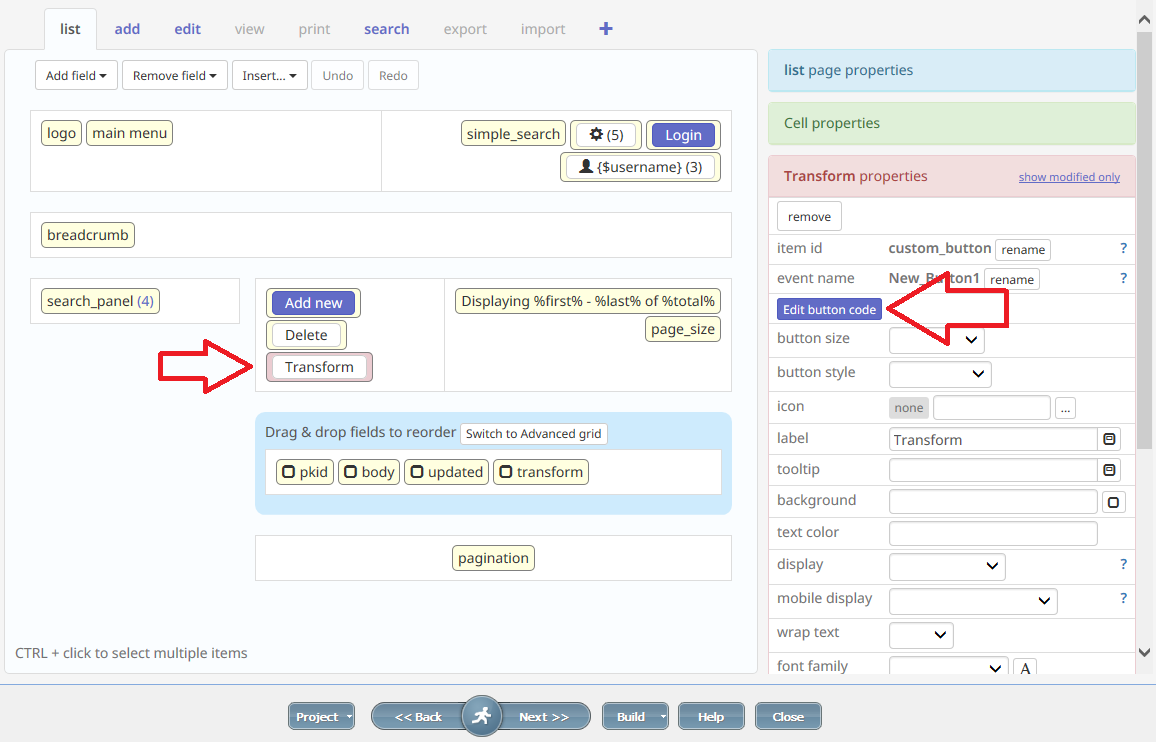
You will be presented with the Buttons properties window dialog with three tabs
1=Client Before
2=Server
3=Client After
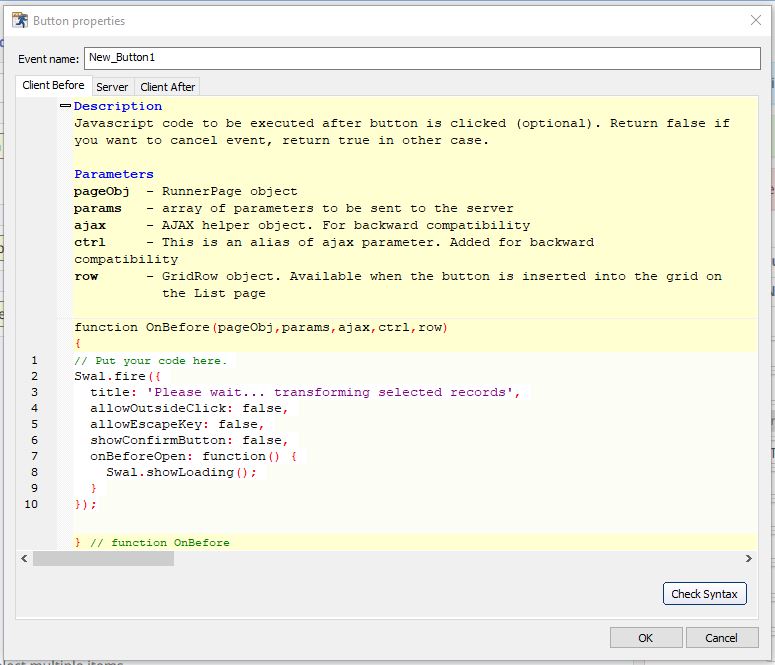
1) In the Client Before place the following code
Swal.fire({
  icon:"info",
  title: 'Please wait... transforming selected records',
  allowOutsideClick: false,
  allowEscapeKey: false,
  showConfirmButton: false
});
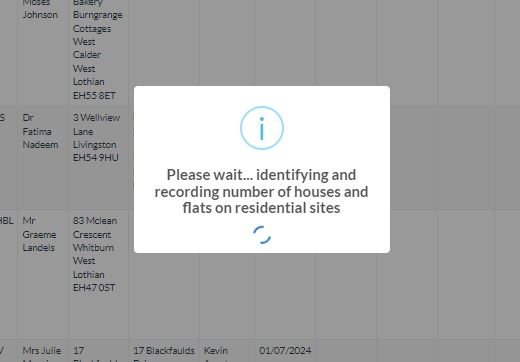
If you would like to include a loading circle then you could use the following code.
Swal.fire({
  icon:"info",
  title: 'Please wait... identifying and recording number of houses and flats on residential sites',
  allowOutsideClick: false,
  allowEscapeKey: false,
  showConfirmButton: false,
  didOpen: function () {
  Swal.showLoading()
  //you can put here an AJAX request simulated with setTimeout or what you want...
  }
});
2) On the Server trigger the stored procedure – swap out your stored procedure name.
DB::Exec("EXEC dbo.transformemail");
and on the 3) Client After notify the user once everything has been completed
  Swal.fire({
    icon: "success",
    allowOutsideClick: false,
    allowEscapeKey: false,
    title: "Records Transformed",
    showConfirmButton: false,
    timer: 2000
  });
setTimeout("window.t032emailPage.reload({a:'reload'})", 2000);

In PHPRunner as of version 10.51 the sweet alert javascript library is included in PHPRunner generated web applications.
How can we add code to a project to make bespoke adjustments?
Firstly navigate to the form you wish to add a special sweet alert to and insert a Custom Button.
Next navigate to the Events tab in PHPRunner and expand the table or view to which you added the additional button.
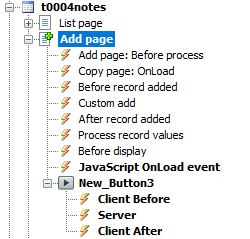
Behind the Javascipt OnLoad event add the following code
$('a[id^="saveButton"]').hide(); // Hide button "Save"
And on the Client Before Event of the new button add the following code
Swal.fire({
icon: "success",
title: "Saved",
showConfirmButton: false,
timer: 1000
});
$('a[id^="saveButton"]').click();
return false;
So what does the code do
Javascript OnLoad Event – Hides the real save button
On Click – Triggers the sweet alert success routine and once that is complete triggers the hidden savebutton code.
And more examples and inspiration
And also if you find the Sweet Alert modal size too small add this to your page css:
.swal2-popup { font-size: 1.6rem !important; }
Most of this was from the following Xlinesoft User forum Thread
Thread