I’ve written about this in a previous post. I had a client that has customers all over the world and I wanted to align and enforce validation of the correct countrys as stock and product may need to be posted. Its unusual to have an attribute that is both finite and universal between systems – The list is taken from the international recognized ISOcode standard.(November 2020)
I use this as a lookup field in addresses for people
/****** Object:  Table [dbo].[t039country]    Script Date: 29/11/2020 11:41:58 ******/
SET ANSI_NULLS ON
GO
SET QUOTED_IDENTIFIER ON
GO
CREATE TABLE [dbo].[t039country](
	[pkid] [int] IDENTITY(1,1) NOT NULL,
	[isocode] [nvarchar](3) NULL,
	[country] [nvarchar](50) NULL,
	[include] [bit] NULL,
 CONSTRAINT [PK_t039country] PRIMARY KEY CLUSTERED
(
	[pkid] ASC
)WITH (STATISTICS_NORECOMPUTE = OFF, IGNORE_DUP_KEY = OFF) ON [PRIMARY]
) ON [PRIMARY]
GO
SET IDENTITY_INSERT [dbo].[t039country] ON

INSERT [dbo].[t039country] ([pkid], [isocode], [country], [include]) VALUES (1, N'AD', N'Andorra', NULL)
INSERT [dbo].[t039country] ([pkid], [isocode], [country], [include]) VALUES (2, N'AE', N'United Arab Emirates', NULL)
INSERT [dbo].[t039country] ([pkid], [isocode], [country], [include]) VALUES (3, N'AF', N'Afghanistan', NULL)
INSERT [dbo].[t039country] ([pkid], [isocode], [country], [include]) VALUES (4, N'AG', N'Antigua and Barbuda', NULL)
INSERT [dbo].[t039country] ([pkid], [isocode], [country], [include]) VALUES (5, N'AI', N'Anguilla', NULL)
INSERT [dbo].[t039country] ([pkid], [isocode], [country], [include]) VALUES (6, N'AL', N'Albania', NULL)
INSERT [dbo].[t039country] ([pkid], [isocode], [country], [include]) VALUES (7, N'AM', N'Armenia', NULL)
INSERT [dbo].[t039country] ([pkid], [isocode], [country], [include]) VALUES (8, N'AO', N'Angola', NULL)
INSERT [dbo].[t039country] ([pkid], [isocode], [country], [include]) VALUES (9, N'AQ', N'Antarctica', NULL)
INSERT [dbo].[t039country] ([pkid], [isocode], [country], [include]) VALUES (10, N'AR', N'Argentina', 1)
INSERT [dbo].[t039country] ([pkid], [isocode], [country], [include]) VALUES (11, N'AT', N'Austria', 1)
INSERT [dbo].[t039country] ([pkid], [isocode], [country], [include]) VALUES (12, N'AU', N'Australia', 1)
INSERT [dbo].[t039country] ([pkid], [isocode], [country], [include]) VALUES (13, N'AW', N'Aruba', NULL)
INSERT [dbo].[t039country] ([pkid], [isocode], [country], [include]) VALUES (14, N'AX', N'Aland Islands', NULL)
INSERT [dbo].[t039country] ([pkid], [isocode], [country], [include]) VALUES (15, N'AZ', N'Azerbaijan', NULL)
INSERT [dbo].[t039country] ([pkid], [isocode], [country], [include]) VALUES (16, N'BA', N'Bosnia and Herzegovina', NULL)
INSERT [dbo].[t039country] ([pkid], [isocode], [country], [include]) VALUES (17, N'BB', N'Barbados', NULL)
INSERT [dbo].[t039country] ([pkid], [isocode], [country], [include]) VALUES (18, N'BD', N'Bangladesh', NULL)
INSERT [dbo].[t039country] ([pkid], [isocode], [country], [include]) VALUES (19, N'BE', N'Belgium', 1)
INSERT [dbo].[t039country] ([pkid], [isocode], [country], [include]) VALUES (20, N'BF', N'Burkina Faso', NULL)
INSERT [dbo].[t039country] ([pkid], [isocode], [country], [include]) VALUES (21, N'BG', N'Bulgaria', 1)
INSERT [dbo].[t039country] ([pkid], [isocode], [country], [include]) VALUES (22, N'BH', N'Bahrain', NULL)
INSERT [dbo].[t039country] ([pkid], [isocode], [country], [include]) VALUES (23, N'BI', N'Burundi', NULL)
INSERT [dbo].[t039country] ([pkid], [isocode], [country], [include]) VALUES (24, N'BJ', N'Benin', NULL)
INSERT [dbo].[t039country] ([pkid], [isocode], [country], [include]) VALUES (25, N'BL', N'Saint Barts', NULL)
INSERT [dbo].[t039country] ([pkid], [isocode], [country], [include]) VALUES (26, N'BM', N'Bermuda', NULL)
INSERT [dbo].[t039country] ([pkid], [isocode], [country], [include]) VALUES (27, N'BN', N'Brunei Darussalam', NULL)
INSERT [dbo].[t039country] ([pkid], [isocode], [country], [include]) VALUES (28, N'BO', N'Bolivia Plurinational State of', NULL)
INSERT [dbo].[t039country] ([pkid], [isocode], [country], [include]) VALUES (29, N'BQ', N'Bonaire Sint Eustatius and Saba', NULL)
INSERT [dbo].[t039country] ([pkid], [isocode], [country], [include]) VALUES (30, N'BR', N'Brazil', NULL)
INSERT [dbo].[t039country] ([pkid], [isocode], [country], [include]) VALUES (31, N'BS', N'Bahamas', NULL)
INSERT [dbo].[t039country] ([pkid], [isocode], [country], [include]) VALUES (32, N'BT', N'Bhutan', NULL)
INSERT [dbo].[t039country] ([pkid], [isocode], [country], [include]) VALUES (33, N'BV', N'Bouvet Island', NULL)
INSERT [dbo].[t039country] ([pkid], [isocode], [country], [include]) VALUES (34, N'BW', N'Botswana', NULL)
INSERT [dbo].[t039country] ([pkid], [isocode], [country], [include]) VALUES (35, N'BY', N'Belarus', 1)
INSERT [dbo].[t039country] ([pkid], [isocode], [country], [include]) VALUES (36, N'BZ', N'Belize', NULL)
INSERT [dbo].[t039country] ([pkid], [isocode], [country], [include]) VALUES (37, N'CA', N'Canada', 1)
INSERT [dbo].[t039country] ([pkid], [isocode], [country], [include]) VALUES (38, N'CC', N'Cocos (Keeling) Islands', NULL)
INSERT [dbo].[t039country] ([pkid], [isocode], [country], [include]) VALUES (39, N'CD', N'Congo the Democratic Republic of the', NULL)
INSERT [dbo].[t039country] ([pkid], [isocode], [country], [include]) VALUES (40, N'CF', N'Central African Republic', NULL)
INSERT [dbo].[t039country] ([pkid], [isocode], [country], [include]) VALUES (41, N'CG', N'Congo', NULL)
INSERT [dbo].[t039country] ([pkid], [isocode], [country], [include]) VALUES (42, N'CH', N'Switzerland', 1)
INSERT [dbo].[t039country] ([pkid], [isocode], [country], [include]) VALUES (43, N'CI', N'Cote dIvoire', NULL)
INSERT [dbo].[t039country] ([pkid], [isocode], [country], [include]) VALUES (44, N'CK', N'Cook Islands', NULL)
INSERT [dbo].[t039country] ([pkid], [isocode], [country], [include]) VALUES (45, N'CL', N'Chile', 1)
INSERT [dbo].[t039country] ([pkid], [isocode], [country], [include]) VALUES (46, N'CM', N'Cameroon', NULL)
INSERT [dbo].[t039country] ([pkid], [isocode], [country], [include]) VALUES (47, N'CN', N'China', 1)
INSERT [dbo].[t039country] ([pkid], [isocode], [country], [include]) VALUES (48, N'CO', N'Colombia', NULL)
INSERT [dbo].[t039country] ([pkid], [isocode], [country], [include]) VALUES (49, N'CR', N'Costa Rica', NULL)
INSERT [dbo].[t039country] ([pkid], [isocode], [country], [include]) VALUES (50, N'CU', N'Cuba', NULL)
INSERT [dbo].[t039country] ([pkid], [isocode], [country], [include]) VALUES (51, N'CV', N'Cape Verde', NULL)
INSERT [dbo].[t039country] ([pkid], [isocode], [country], [include]) VALUES (52, N'CW', N'Curacao', NULL)
INSERT [dbo].[t039country] ([pkid], [isocode], [country], [include]) VALUES (53, N'CX', N'Christmas Island', NULL)
INSERT [dbo].[t039country] ([pkid], [isocode], [country], [include]) VALUES (54, N'CY', N'Cyprus', NULL)
INSERT [dbo].[t039country] ([pkid], [isocode], [country], [include]) VALUES (55, N'CZ', N'Czech Republic', 1)
INSERT [dbo].[t039country] ([pkid], [isocode], [country], [include]) VALUES (56, N'DE', N'Germany', 1)
INSERT [dbo].[t039country] ([pkid], [isocode], [country], [include]) VALUES (57, N'DJ', N'Djibouti', NULL)
INSERT [dbo].[t039country] ([pkid], [isocode], [country], [include]) VALUES (58, N'DK', N'Denmark', 1)
INSERT [dbo].[t039country] ([pkid], [isocode], [country], [include]) VALUES (59, N'DM', N'Dominica', NULL)
INSERT [dbo].[t039country] ([pkid], [isocode], [country], [include]) VALUES (60, N'DO', N'Dominican Republic', NULL)
INSERT [dbo].[t039country] ([pkid], [isocode], [country], [include]) VALUES (61, N'DZ', N'Algeria', NULL)
INSERT [dbo].[t039country] ([pkid], [isocode], [country], [include]) VALUES (62, N'EC', N'Ecuador', NULL)
INSERT [dbo].[t039country] ([pkid], [isocode], [country], [include]) VALUES (63, N'EE', N'Estonia', 1)
INSERT [dbo].[t039country] ([pkid], [isocode], [country], [include]) VALUES (64, N'EG', N'Egypt', NULL)
INSERT [dbo].[t039country] ([pkid], [isocode], [country], [include]) VALUES (65, N'EH', N'Western Sahara', NULL)
INSERT [dbo].[t039country] ([pkid], [isocode], [country], [include]) VALUES (66, N'ER', N'Eritrea', NULL)
INSERT [dbo].[t039country] ([pkid], [isocode], [country], [include]) VALUES (67, N'ES', N'Spain', 1)
INSERT [dbo].[t039country] ([pkid], [isocode], [country], [include]) VALUES (68, N'ET', N'Ethiopia', NULL)
INSERT [dbo].[t039country] ([pkid], [isocode], [country], [include]) VALUES (69, N'FI', N'Finland', 1)
INSERT [dbo].[t039country] ([pkid], [isocode], [country], [include]) VALUES (70, N'FJ', N'Fiji', NULL)
INSERT [dbo].[t039country] ([pkid], [isocode], [country], [include]) VALUES (71, N'FK', N'Falkland Islands (Malvinas)', NULL)
INSERT [dbo].[t039country] ([pkid], [isocode], [country], [include]) VALUES (72, N'FO', N'Faroe Islands', NULL)
INSERT [dbo].[t039country] ([pkid], [isocode], [country], [include]) VALUES (73, N'FR', N'France', 1)
INSERT [dbo].[t039country] ([pkid], [isocode], [country], [include]) VALUES (74, N'GA', N'Gabon', NULL)
INSERT [dbo].[t039country] ([pkid], [isocode], [country], [include]) VALUES (75, N'GB', N'United Kingdom', 1)
INSERT [dbo].[t039country] ([pkid], [isocode], [country], [include]) VALUES (76, N'GB', N'United Kingdom Northern Ireland', 1)
INSERT [dbo].[t039country] ([pkid], [isocode], [country], [include]) VALUES (77, N'GD', N'Grenada', NULL)
INSERT [dbo].[t039country] ([pkid], [isocode], [country], [include]) VALUES (78, N'GE', N'Georgia', NULL)
INSERT [dbo].[t039country] ([pkid], [isocode], [country], [include]) VALUES (79, N'GF', N'French Guiana', NULL)
INSERT [dbo].[t039country] ([pkid], [isocode], [country], [include]) VALUES (80, N'GG', N'Guernsey', 1)
INSERT [dbo].[t039country] ([pkid], [isocode], [country], [include]) VALUES (81, N'GH', N'Ghana', NULL)
INSERT [dbo].[t039country] ([pkid], [isocode], [country], [include]) VALUES (82, N'GI', N'Gibraltar', 1)
INSERT [dbo].[t039country] ([pkid], [isocode], [country], [include]) VALUES (83, N'GL', N'Greenland', 1)
INSERT [dbo].[t039country] ([pkid], [isocode], [country], [include]) VALUES (84, N'GM', N'Gambia', NULL)
INSERT [dbo].[t039country] ([pkid], [isocode], [country], [include]) VALUES (85, N'GN', N'Guinea', NULL)
INSERT [dbo].[t039country] ([pkid], [isocode], [country], [include]) VALUES (86, N'GP', N'Guadeloupe', NULL)
INSERT [dbo].[t039country] ([pkid], [isocode], [country], [include]) VALUES (87, N'GQ', N'Equatorial Guinea', NULL)
INSERT [dbo].[t039country] ([pkid], [isocode], [country], [include]) VALUES (88, N'GR', N'Greece', 1)
INSERT [dbo].[t039country] ([pkid], [isocode], [country], [include]) VALUES (89, N'GS', N'South Georgia and the South Sandwich Islands', NULL)
INSERT [dbo].[t039country] ([pkid], [isocode], [country], [include]) VALUES (90, N'GT', N'Guatemala', NULL)
INSERT [dbo].[t039country] ([pkid], [isocode], [country], [include]) VALUES (91, N'GW', N'Guinea-Bissau', NULL)
INSERT [dbo].[t039country] ([pkid], [isocode], [country], [include]) VALUES (92, N'GY', N'Guyana', NULL)
INSERT [dbo].[t039country] ([pkid], [isocode], [country], [include]) VALUES (93, N'HK', N'Hong Kong S.A.R. China', 1)
INSERT [dbo].[t039country] ([pkid], [isocode], [country], [include]) VALUES (94, N'HM', N'Heard Island and McDonald Islands', NULL)
INSERT [dbo].[t039country] ([pkid], [isocode], [country], [include]) VALUES (95, N'HN', N'Honduras', NULL)
INSERT [dbo].[t039country] ([pkid], [isocode], [country], [include]) VALUES (96, N'HR', N'Croatia', 1)
INSERT [dbo].[t039country] ([pkid], [isocode], [country], [include]) VALUES (97, N'HT', N'Haiti', NULL)
INSERT [dbo].[t039country] ([pkid], [isocode], [country], [include]) VALUES (98, N'HU', N'Hungary', 1)
INSERT [dbo].[t039country] ([pkid], [isocode], [country], [include]) VALUES (99, N'ID', N'Indonesia', NULL)
GO
INSERT [dbo].[t039country] ([pkid], [isocode], [country], [include]) VALUES (100, N'IC', N'Spain Canary Islands', 1)
INSERT [dbo].[t039country] ([pkid], [isocode], [country], [include]) VALUES (101, N'IE', N'Ireland Republic', 1)
INSERT [dbo].[t039country] ([pkid], [isocode], [country], [include]) VALUES (102, N'IL', N'Israel', 1)
INSERT [dbo].[t039country] ([pkid], [isocode], [country], [include]) VALUES (103, N'IM', N'Isle of Man', 1)
INSERT [dbo].[t039country] ([pkid], [isocode], [country], [include]) VALUES (104, N'IN', N'India', 1)
INSERT [dbo].[t039country] ([pkid], [isocode], [country], [include]) VALUES (105, N'IO', N'British Indian Ocean Territory', NULL)
INSERT [dbo].[t039country] ([pkid], [isocode], [country], [include]) VALUES (106, N'IQ', N'Iraq', NULL)
INSERT [dbo].[t039country] ([pkid], [isocode], [country], [include]) VALUES (107, N'IR', N'Iran Islamic Republic of', NULL)
INSERT [dbo].[t039country] ([pkid], [isocode], [country], [include]) VALUES (108, N'IS', N'Iceland', 1)
INSERT [dbo].[t039country] ([pkid], [isocode], [country], [include]) VALUES (109, N'IT', N'Italy', 1)
INSERT [dbo].[t039country] ([pkid], [isocode], [country], [include]) VALUES (110, N'JE', N'Jersey', 1)
INSERT [dbo].[t039country] ([pkid], [isocode], [country], [include]) VALUES (111, N'JM', N'Jamaica', 1)
INSERT [dbo].[t039country] ([pkid], [isocode], [country], [include]) VALUES (112, N'JO', N'Jordan', NULL)
INSERT [dbo].[t039country] ([pkid], [isocode], [country], [include]) VALUES (113, N'JP', N'Japan', 1)
INSERT [dbo].[t039country] ([pkid], [isocode], [country], [include]) VALUES (114, N'KE', N'Kenya', NULL)
INSERT [dbo].[t039country] ([pkid], [isocode], [country], [include]) VALUES (115, N'KG', N'Kyrgyzstan', NULL)
INSERT [dbo].[t039country] ([pkid], [isocode], [country], [include]) VALUES (116, N'KH', N'Cambodia', NULL)
INSERT [dbo].[t039country] ([pkid], [isocode], [country], [include]) VALUES (117, N'KI', N'Kiribati', NULL)
INSERT [dbo].[t039country] ([pkid], [isocode], [country], [include]) VALUES (118, N'KM', N'Comoros', NULL)
INSERT [dbo].[t039country] ([pkid], [isocode], [country], [include]) VALUES (119, N'KN', N'Saint Kitts and Nevis', NULL)
INSERT [dbo].[t039country] ([pkid], [isocode], [country], [include]) VALUES (120, N'KP', N'Korea Democratic Peoples Republic of', NULL)
INSERT [dbo].[t039country] ([pkid], [isocode], [country], [include]) VALUES (121, N'KR', N'Korea Republic of', NULL)
INSERT [dbo].[t039country] ([pkid], [isocode], [country], [include]) VALUES (122, N'KW', N'Kuwait', NULL)
INSERT [dbo].[t039country] ([pkid], [isocode], [country], [include]) VALUES (123, N'KY', N'Cayman Islands', NULL)
INSERT [dbo].[t039country] ([pkid], [isocode], [country], [include]) VALUES (124, N'KZ', N'Kazakhstan', NULL)
INSERT [dbo].[t039country] ([pkid], [isocode], [country], [include]) VALUES (125, N'LA', N'Lao Peoples Democratic Republic', NULL)
INSERT [dbo].[t039country] ([pkid], [isocode], [country], [include]) VALUES (126, N'LB', N'Lebanon', NULL)
INSERT [dbo].[t039country] ([pkid], [isocode], [country], [include]) VALUES (127, N'LC', N'Saint Lucia', NULL)
INSERT [dbo].[t039country] ([pkid], [isocode], [country], [include]) VALUES (128, N'LI', N'Liechtenstein', 1)
INSERT [dbo].[t039country] ([pkid], [isocode], [country], [include]) VALUES (129, N'LK', N'Sri Lanka', NULL)
INSERT [dbo].[t039country] ([pkid], [isocode], [country], [include]) VALUES (130, N'LR', N'Liberia', NULL)
INSERT [dbo].[t039country] ([pkid], [isocode], [country], [include]) VALUES (131, N'LS', N'Lesotho', NULL)
INSERT [dbo].[t039country] ([pkid], [isocode], [country], [include]) VALUES (132, N'LT', N'Lithuania', 1)
INSERT [dbo].[t039country] ([pkid], [isocode], [country], [include]) VALUES (133, N'LU', N'Luxembourg', 1)
INSERT [dbo].[t039country] ([pkid], [isocode], [country], [include]) VALUES (134, N'LV', N'Latvia', 1)
INSERT [dbo].[t039country] ([pkid], [isocode], [country], [include]) VALUES (135, N'LY', N'Libyan Arab Jamahiriya', NULL)
INSERT [dbo].[t039country] ([pkid], [isocode], [country], [include]) VALUES (136, N'MA', N'Morocco', NULL)
INSERT [dbo].[t039country] ([pkid], [isocode], [country], [include]) VALUES (137, N'MC', N'Monaco', 1)
INSERT [dbo].[t039country] ([pkid], [isocode], [country], [include]) VALUES (138, N'MD', N'Moldova Republic of', 1)
INSERT [dbo].[t039country] ([pkid], [isocode], [country], [include]) VALUES (139, N'ME', N'Montenegro', 1)
INSERT [dbo].[t039country] ([pkid], [isocode], [country], [include]) VALUES (140, N'MF', N'Saint Martin (French part)', NULL)
INSERT [dbo].[t039country] ([pkid], [isocode], [country], [include]) VALUES (141, N'MG', N'Madagascar', NULL)
INSERT [dbo].[t039country] ([pkid], [isocode], [country], [include]) VALUES (142, N'MK', N'Macedonia the former Yugoslav Republic of', NULL)
INSERT [dbo].[t039country] ([pkid], [isocode], [country], [include]) VALUES (143, N'ML', N'Mali', NULL)
INSERT [dbo].[t039country] ([pkid], [isocode], [country], [include]) VALUES (144, N'MM', N'Myanmar', NULL)
INSERT [dbo].[t039country] ([pkid], [isocode], [country], [include]) VALUES (145, N'MN', N'Mongolia', NULL)
INSERT [dbo].[t039country] ([pkid], [isocode], [country], [include]) VALUES (146, N'MO', N'Macau S.A.R. China', 1)
INSERT [dbo].[t039country] ([pkid], [isocode], [country], [include]) VALUES (147, N'MQ', N'Martinique', NULL)
INSERT [dbo].[t039country] ([pkid], [isocode], [country], [include]) VALUES (148, N'MR', N'Mauritania', NULL)
INSERT [dbo].[t039country] ([pkid], [isocode], [country], [include]) VALUES (149, N'MS', N'Montserrat', NULL)
INSERT [dbo].[t039country] ([pkid], [isocode], [country], [include]) VALUES (150, N'MT', N'Malta', 1)
INSERT [dbo].[t039country] ([pkid], [isocode], [country], [include]) VALUES (151, N'MU', N'Mauritius', NULL)
INSERT [dbo].[t039country] ([pkid], [isocode], [country], [include]) VALUES (152, N'MV', N'Maldives', NULL)
INSERT [dbo].[t039country] ([pkid], [isocode], [country], [include]) VALUES (153, N'MW', N'Malawi', NULL)
INSERT [dbo].[t039country] ([pkid], [isocode], [country], [include]) VALUES (154, N'MX', N'Mexico', 1)
INSERT [dbo].[t039country] ([pkid], [isocode], [country], [include]) VALUES (155, N'MY', N'Malaysia', 1)
INSERT [dbo].[t039country] ([pkid], [isocode], [country], [include]) VALUES (156, N'MZ', N'Mozambique', NULL)
INSERT [dbo].[t039country] ([pkid], [isocode], [country], [include]) VALUES (157, N'NA', N'Namibia', NULL)
INSERT [dbo].[t039country] ([pkid], [isocode], [country], [include]) VALUES (158, N'NC', N'New Caledonia', NULL)
INSERT [dbo].[t039country] ([pkid], [isocode], [country], [include]) VALUES (159, N'NE', N'Niger', NULL)
INSERT [dbo].[t039country] ([pkid], [isocode], [country], [include]) VALUES (160, N'NF', N'Norfolk Island', NULL)
INSERT [dbo].[t039country] ([pkid], [isocode], [country], [include]) VALUES (161, N'NG', N'Nigeria', NULL)
INSERT [dbo].[t039country] ([pkid], [isocode], [country], [include]) VALUES (162, N'NI', N'Nicaragua', NULL)
INSERT [dbo].[t039country] ([pkid], [isocode], [country], [include]) VALUES (163, N'NL', N'Netherlands', 1)
INSERT [dbo].[t039country] ([pkid], [isocode], [country], [include]) VALUES (164, N'NO', N'Norway', 1)
INSERT [dbo].[t039country] ([pkid], [isocode], [country], [include]) VALUES (165, N'NP', N'Nepal', NULL)
INSERT [dbo].[t039country] ([pkid], [isocode], [country], [include]) VALUES (166, N'NR', N'Nauru', NULL)
INSERT [dbo].[t039country] ([pkid], [isocode], [country], [include]) VALUES (167, N'NU', N'Niue', NULL)
INSERT [dbo].[t039country] ([pkid], [isocode], [country], [include]) VALUES (168, N'NZ', N'New Zealand', 1)
INSERT [dbo].[t039country] ([pkid], [isocode], [country], [include]) VALUES (169, N'OM', N'Oman', NULL)
INSERT [dbo].[t039country] ([pkid], [isocode], [country], [include]) VALUES (170, N'PA', N'Panama', NULL)
INSERT [dbo].[t039country] ([pkid], [isocode], [country], [include]) VALUES (171, N'PE', N'Peru', NULL)
INSERT [dbo].[t039country] ([pkid], [isocode], [country], [include]) VALUES (172, N'PF', N'French Polynesia', NULL)
INSERT [dbo].[t039country] ([pkid], [isocode], [country], [include]) VALUES (173, N'PG', N'Papua New Guinea', NULL)
INSERT [dbo].[t039country] ([pkid], [isocode], [country], [include]) VALUES (174, N'PH', N'Philippines', NULL)
INSERT [dbo].[t039country] ([pkid], [isocode], [country], [include]) VALUES (175, N'PK', N'Pakistan', NULL)
INSERT [dbo].[t039country] ([pkid], [isocode], [country], [include]) VALUES (176, N'PL', N'Poland', 1)
INSERT [dbo].[t039country] ([pkid], [isocode], [country], [include]) VALUES (177, N'PM', N'Saint Pierre and Miquelon', NULL)
INSERT [dbo].[t039country] ([pkid], [isocode], [country], [include]) VALUES (178, N'PN', N'Pitcairn', NULL)
INSERT [dbo].[t039country] ([pkid], [isocode], [country], [include]) VALUES (179, N'PS', N'Palestine', NULL)
INSERT [dbo].[t039country] ([pkid], [isocode], [country], [include]) VALUES (180, N'PT', N'Portugal', 1)
INSERT [dbo].[t039country] ([pkid], [isocode], [country], [include]) VALUES (181, N'PY', N'Paraguay', 1)
INSERT [dbo].[t039country] ([pkid], [isocode], [country], [include]) VALUES (182, N'QA', N'Qatar', NULL)
INSERT [dbo].[t039country] ([pkid], [isocode], [country], [include]) VALUES (183, N'RE', N'Reunion', NULL)
INSERT [dbo].[t039country] ([pkid], [isocode], [country], [include]) VALUES (184, N'RO', N'Romania', 1)
INSERT [dbo].[t039country] ([pkid], [isocode], [country], [include]) VALUES (185, N'RS', N'Serbia', 1)
INSERT [dbo].[t039country] ([pkid], [isocode], [country], [include]) VALUES (186, N'RU', N'Russian Federation', 1)
INSERT [dbo].[t039country] ([pkid], [isocode], [country], [include]) VALUES (187, N'RW', N'Rwanda', NULL)
INSERT [dbo].[t039country] ([pkid], [isocode], [country], [include]) VALUES (188, N'SA', N'Saudi Arabia', NULL)
INSERT [dbo].[t039country] ([pkid], [isocode], [country], [include]) VALUES (189, N'SB', N'Solomon Islands', NULL)
INSERT [dbo].[t039country] ([pkid], [isocode], [country], [include]) VALUES (190, N'SC', N'Seychelles', NULL)
INSERT [dbo].[t039country] ([pkid], [isocode], [country], [include]) VALUES (191, N'SD', N'Sudan', NULL)
INSERT [dbo].[t039country] ([pkid], [isocode], [country], [include]) VALUES (192, N'SE', N'Sweden', 1)
INSERT [dbo].[t039country] ([pkid], [isocode], [country], [include]) VALUES (193, N'SG', N'Singapore', 1)
INSERT [dbo].[t039country] ([pkid], [isocode], [country], [include]) VALUES (194, N'SH', N'Saint Helena Ascension and Tristan da Cunha', NULL)
INSERT [dbo].[t039country] ([pkid], [isocode], [country], [include]) VALUES (195, N'SI', N'Slovenia', 1)
INSERT [dbo].[t039country] ([pkid], [isocode], [country], [include]) VALUES (196, N'SJ', N'Svalbard and Jan Mayen', NULL)
INSERT [dbo].[t039country] ([pkid], [isocode], [country], [include]) VALUES (197, N'SK', N'Slovakia', 1)
INSERT [dbo].[t039country] ([pkid], [isocode], [country], [include]) VALUES (198, N'SL', N'Sierra Leone', NULL)
INSERT [dbo].[t039country] ([pkid], [isocode], [country], [include]) VALUES (199, N'SM', N'San Marino', NULL)
GO
INSERT [dbo].[t039country] ([pkid], [isocode], [country], [include]) VALUES (200, N'SN', N'Senegal', NULL)
INSERT [dbo].[t039country] ([pkid], [isocode], [country], [include]) VALUES (201, N'SO', N'Somalia', NULL)
INSERT [dbo].[t039country] ([pkid], [isocode], [country], [include]) VALUES (202, N'SR', N'Suriname', NULL)
INSERT [dbo].[t039country] ([pkid], [isocode], [country], [include]) VALUES (203, N'SS', N'South Sudan', NULL)
INSERT [dbo].[t039country] ([pkid], [isocode], [country], [include]) VALUES (204, N'ST', N'Sao Tome and Principe', NULL)
INSERT [dbo].[t039country] ([pkid], [isocode], [country], [include]) VALUES (205, N'SV', N'El Salvador', NULL)
INSERT [dbo].[t039country] ([pkid], [isocode], [country], [include]) VALUES (206, N'SX', N'Sint Maarten (Dutch part)', NULL)
INSERT [dbo].[t039country] ([pkid], [isocode], [country], [include]) VALUES (207, N'SY', N'Syrian Arab Republic', NULL)
INSERT [dbo].[t039country] ([pkid], [isocode], [country], [include]) VALUES (208, N'SZ', N'Swaziland', NULL)
INSERT [dbo].[t039country] ([pkid], [isocode], [country], [include]) VALUES (209, N'TC', N'Turks and Caicos Islands', NULL)
INSERT [dbo].[t039country] ([pkid], [isocode], [country], [include]) VALUES (210, N'TD', N'Chad', NULL)
INSERT [dbo].[t039country] ([pkid], [isocode], [country], [include]) VALUES (211, N'TF', N'French Southern Territories', NULL)
INSERT [dbo].[t039country] ([pkid], [isocode], [country], [include]) VALUES (212, N'TG', N'Togo', NULL)
INSERT [dbo].[t039country] ([pkid], [isocode], [country], [include]) VALUES (213, N'TH', N'Thailand', NULL)
INSERT [dbo].[t039country] ([pkid], [isocode], [country], [include]) VALUES (214, N'TJ', N'Tajikistan', NULL)
INSERT [dbo].[t039country] ([pkid], [isocode], [country], [include]) VALUES (215, N'TK', N'Tokelau', NULL)
INSERT [dbo].[t039country] ([pkid], [isocode], [country], [include]) VALUES (216, N'TL', N'Timor-Leste', NULL)
INSERT [dbo].[t039country] ([pkid], [isocode], [country], [include]) VALUES (217, N'TM', N'Turkmenistan', NULL)
INSERT [dbo].[t039country] ([pkid], [isocode], [country], [include]) VALUES (218, N'TN', N'Tunisia', NULL)
INSERT [dbo].[t039country] ([pkid], [isocode], [country], [include]) VALUES (219, N'TO', N'Tonga', NULL)
INSERT [dbo].[t039country] ([pkid], [isocode], [country], [include]) VALUES (220, N'TR', N'Turkey', 1)
INSERT [dbo].[t039country] ([pkid], [isocode], [country], [include]) VALUES (221, N'TT', N'Trinidad and Tobago', NULL)
INSERT [dbo].[t039country] ([pkid], [isocode], [country], [include]) VALUES (222, N'TV', N'Tuvalu', NULL)
INSERT [dbo].[t039country] ([pkid], [isocode], [country], [include]) VALUES (223, N'TW', N'Taiwan', 1)
INSERT [dbo].[t039country] ([pkid], [isocode], [country], [include]) VALUES (224, N'TZ', N'Tanzania United Republic of', NULL)
INSERT [dbo].[t039country] ([pkid], [isocode], [country], [include]) VALUES (225, N'UA', N'Ukraine', 1)
INSERT [dbo].[t039country] ([pkid], [isocode], [country], [include]) VALUES (226, N'UG', N'Uganda', NULL)
INSERT [dbo].[t039country] ([pkid], [isocode], [country], [include]) VALUES (227, N'US', N'United States', 1)
INSERT [dbo].[t039country] ([pkid], [isocode], [country], [include]) VALUES (228, N'UY', N'Uruguay', NULL)
INSERT [dbo].[t039country] ([pkid], [isocode], [country], [include]) VALUES (229, N'UZ', N'Uzbekistan', NULL)
INSERT [dbo].[t039country] ([pkid], [isocode], [country], [include]) VALUES (230, N'VA', N'Holy See (Vatican City State)', NULL)
INSERT [dbo].[t039country] ([pkid], [isocode], [country], [include]) VALUES (231, N'VC', N'Saint Vincent and the Grenadines', NULL)
INSERT [dbo].[t039country] ([pkid], [isocode], [country], [include]) VALUES (232, N'VE', N'Venezuela Bolivarian Republic of', NULL)
INSERT [dbo].[t039country] ([pkid], [isocode], [country], [include]) VALUES (233, N'VG', N'Virgin Islands British', NULL)
INSERT [dbo].[t039country] ([pkid], [isocode], [country], [include]) VALUES (234, N'VN', N'Vietnam', NULL)
INSERT [dbo].[t039country] ([pkid], [isocode], [country], [include]) VALUES (235, N'VU', N'Vanuatu', NULL)
INSERT [dbo].[t039country] ([pkid], [isocode], [country], [include]) VALUES (236, N'WF', N'Wallis and Futuna', NULL)
INSERT [dbo].[t039country] ([pkid], [isocode], [country], [include]) VALUES (237, N'WS', N'Samoa', NULL)
INSERT [dbo].[t039country] ([pkid], [isocode], [country], [include]) VALUES (238, N'YE', N'Yemen', NULL)
INSERT [dbo].[t039country] ([pkid], [isocode], [country], [include]) VALUES (239, N'YT', N'Mayotte', NULL)
INSERT [dbo].[t039country] ([pkid], [isocode], [country], [include]) VALUES (240, N'ZA', N'South Africa', 1)
INSERT [dbo].[t039country] ([pkid], [isocode], [country], [include]) VALUES (241, N'ZM', N'Zambia', NULL)
INSERT [dbo].[t039country] ([pkid], [isocode], [country], [include]) VALUES (242, N'ZW', N'Zimbabwe', NULL)
INSERT [dbo].[t039country] ([pkid], [isocode], [country], [include]) VALUES (243, N'GB', N'United Kingdom Scotland', 1)
INSERT [dbo].[t039country] ([pkid], [isocode], [country], [include]) VALUES (244, N'GB', N'United Kingdom England', 1)
INSERT [dbo].[t039country] ([pkid], [isocode], [country], [include]) VALUES (245, N'GB', N'United Kingdom Wales', 1)
INSERT [dbo].[t039country] ([pkid], [isocode], [country], [include]) VALUES (246, N'PRI', N'Puerto Rico', 1)
SET IDENTITY_INSERT [dbo].[t039country] OFF
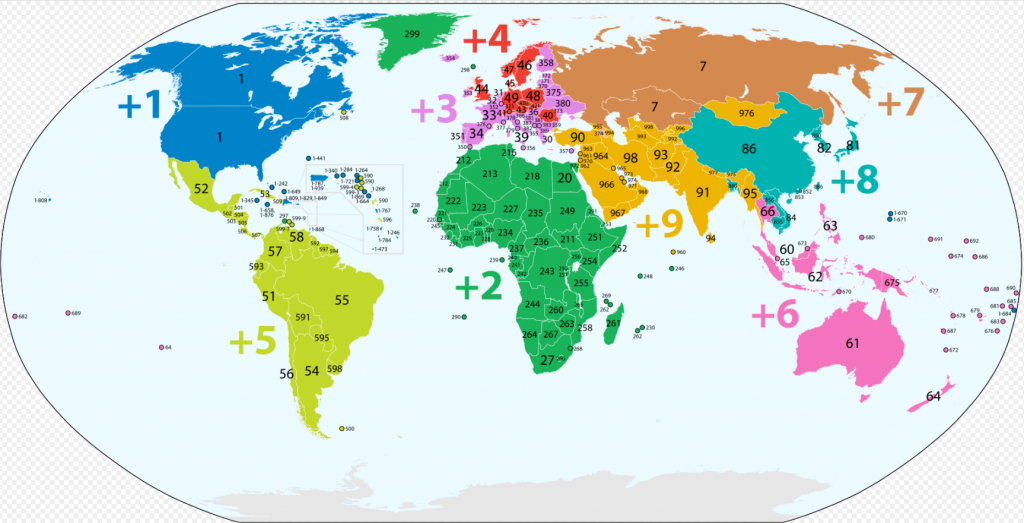
I’ve just thought I should add a international dialing code field