Postgres Command Line : psql : Create a switch to determine whether an Arc has a clockwise or anti-clockwise direction

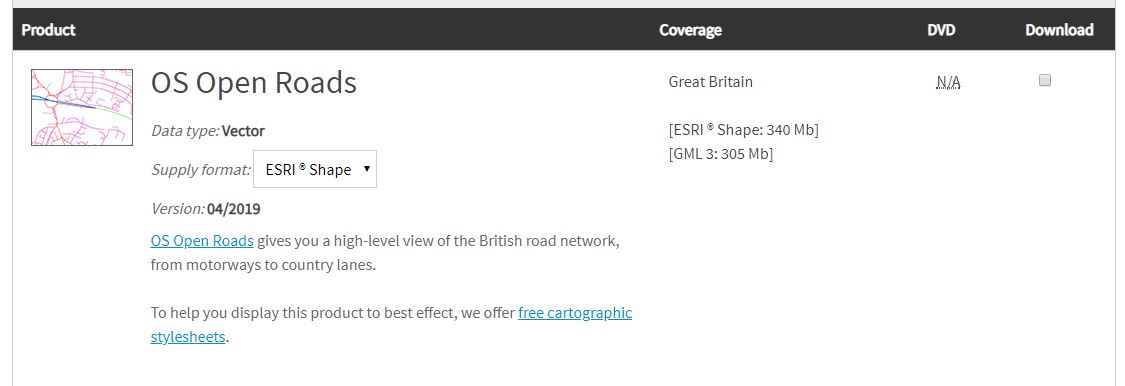
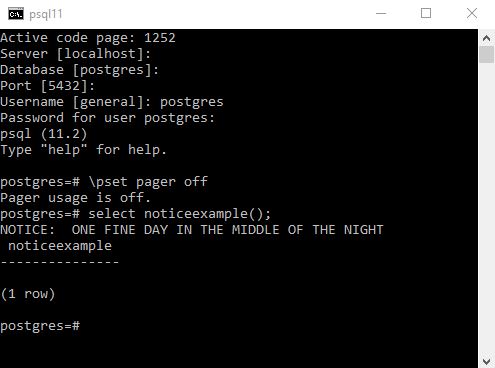
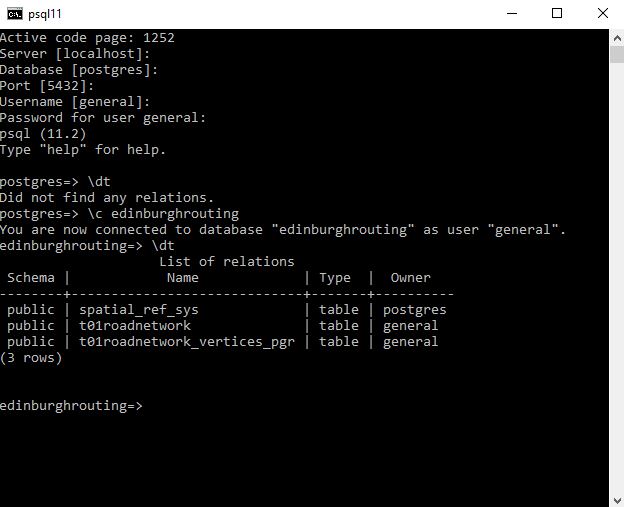
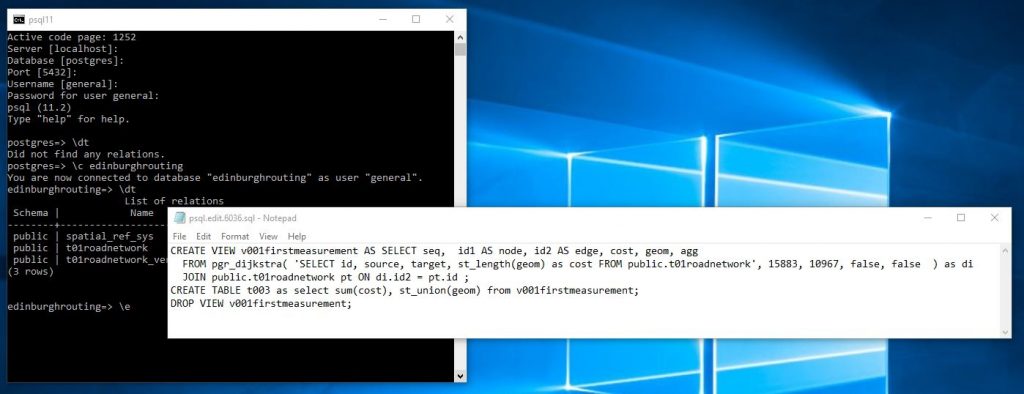
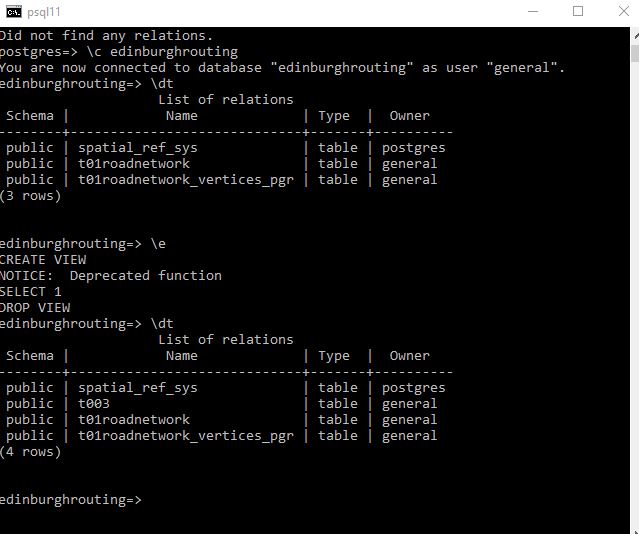
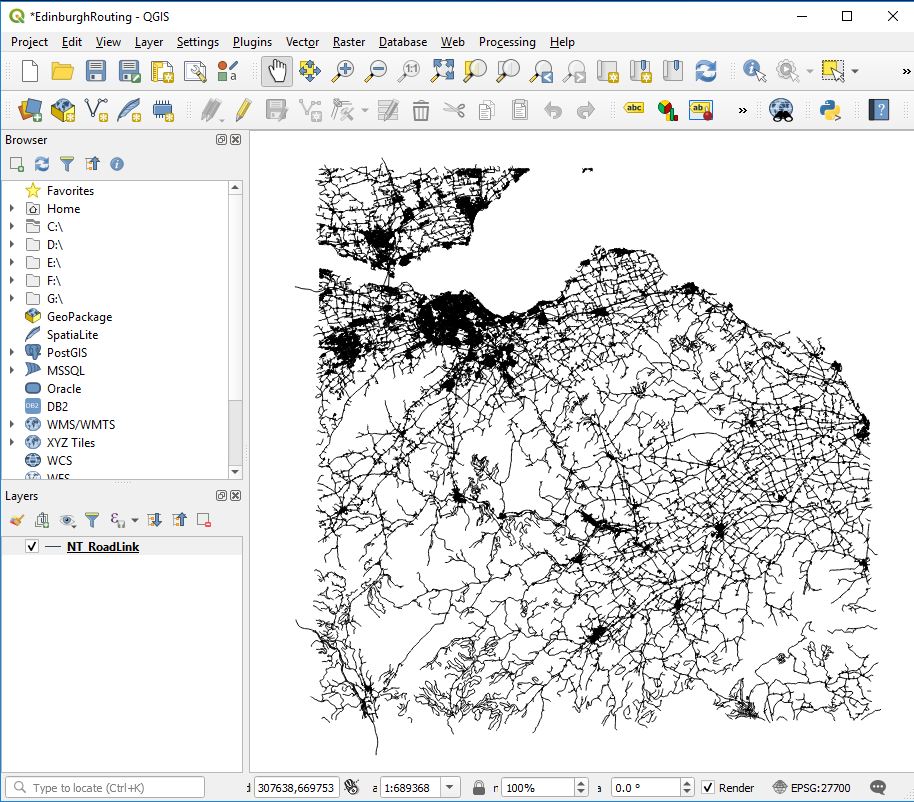
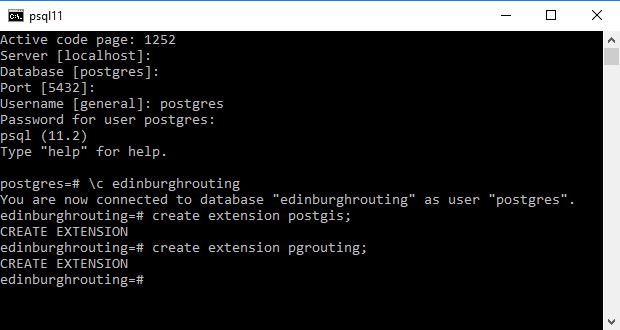
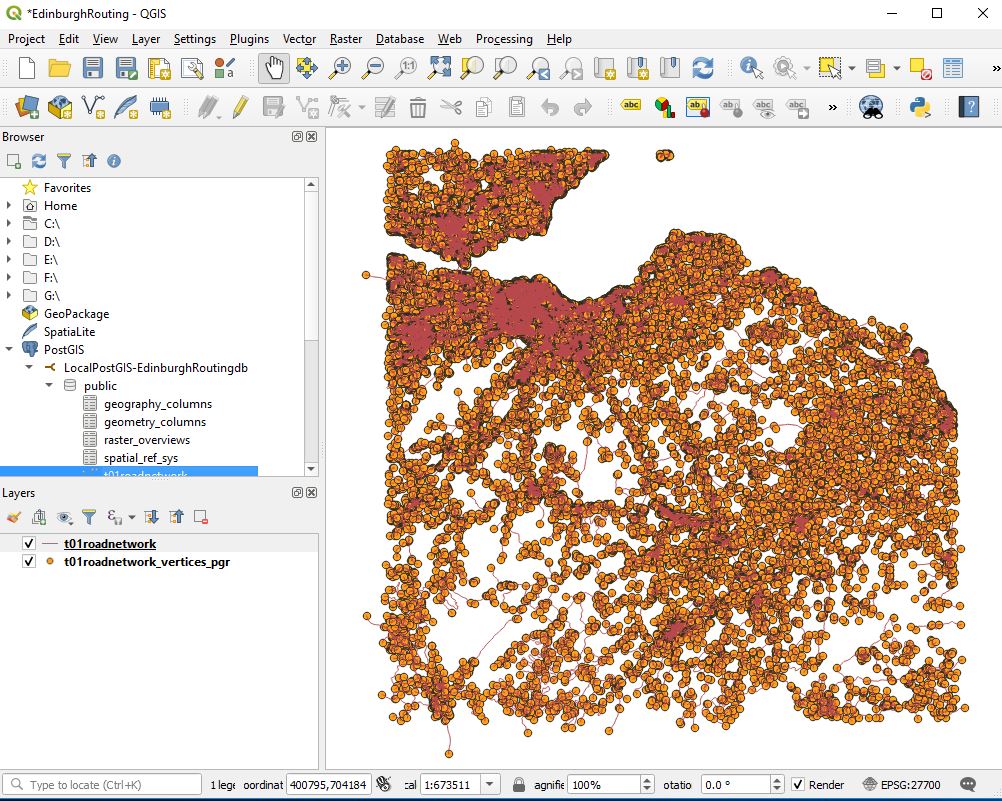
This is a post focused around Network distance measurement using POSTGIS and routing plugins.. This discusses the use of Ordnance survey Road Network information and its preparation in using it for routing.

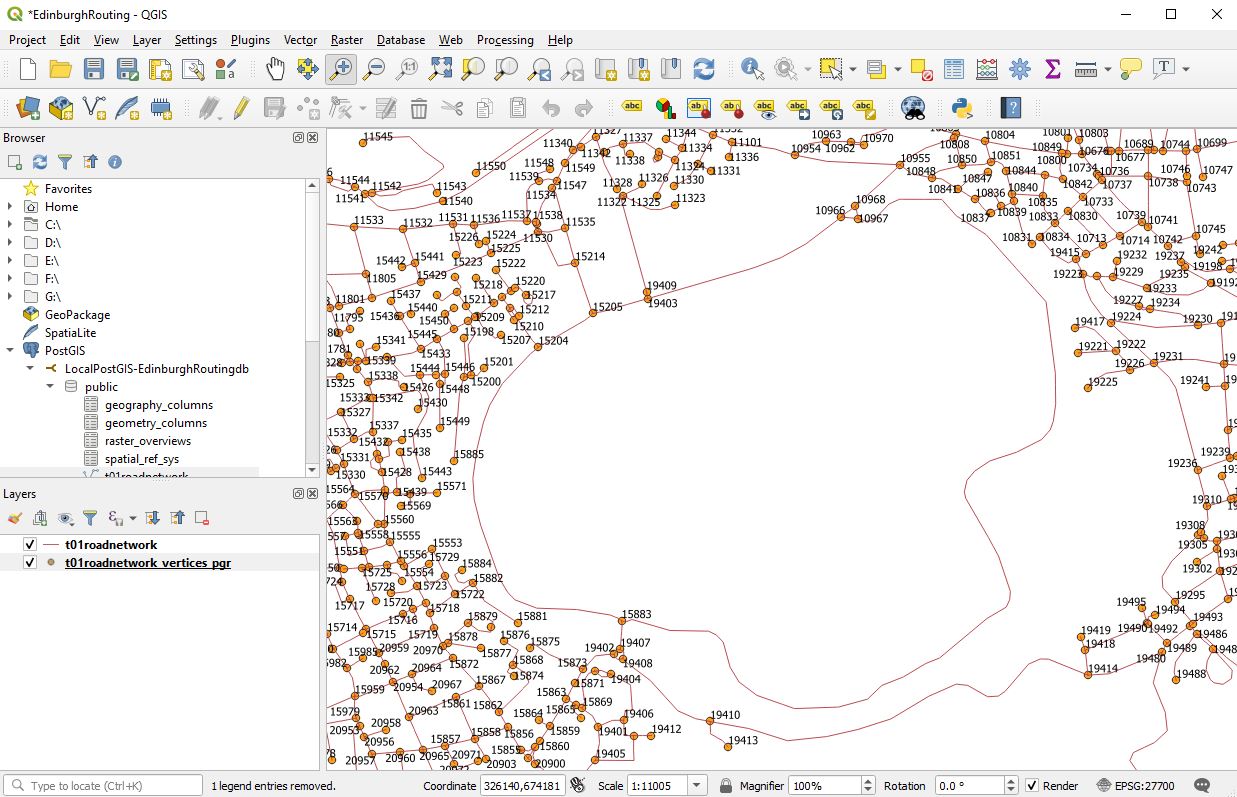
The Ordnance Survey open source road network layer includes roundabouts that have an attribute value of roundabout. Great but looking at them closely some of the constituent arcs are digitised in a clockwise direction while others are digitised in an anti-clockwise direction. When using dijkstra routing with weighting to prevent incorrect pathing it is necessary to ensure that networks are weighted in the correct fashion. Directional weighting only works if you know the direction and you weight appropriately. For use with directional routing in the UK roundabouts any directional weighting should prevent travel in anticlockwise direction. ST_reverse will correct incorrect direction BUT the Ordnance survey layer seems to have no attribute that consistently indicates whether an arc on a roundabout has or has not been digitised correctly. Marking lines with direction and viewing them we see the random nature of many arcs on roundabouts.

Here is Sheriff Hall Roundabout on Edinburgh City Bypass

Here is Straiton roundabout just north of the bypass

and finally Hermiston Gate roundabout again following the theme on Edinburgh city bypass

It got me thinking was there a way to determine whether arcs on roundabouts could be determined to be clockwise or anti-clockwise?

Having thought about it in my head quite a bit I determined that it probably would be possible if we knew three points and could create some kind of virtual graph with the start point being at 6 and a finish at 12 with mid points at 9 if travelling in a clockwise position and 3 if travelling in an anti-clockwise position.

I had a look around and the following post seemed to tally with the idea of three points and positive and negative relating to clockwise or anticlockwise.

Maths to determine direction of an arc

Having looked at this I set about working through the problem in Excel to see if I could get consistent results.

Firstly I created a set of directions North West South and East and placed some coordinates that could be used in calculations.

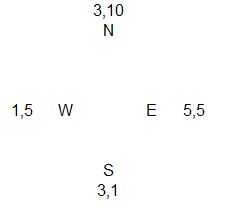
I then went forward and tested whether I could identify the direction of various arcs from these coordinates in excel using the formula identified on Stack Exchange.

Here I replaced a,b,c with b Beginning, m Middle and f Finish

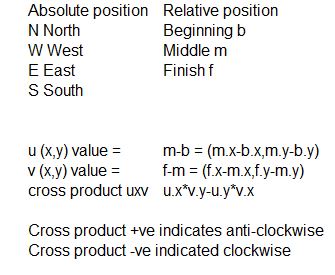
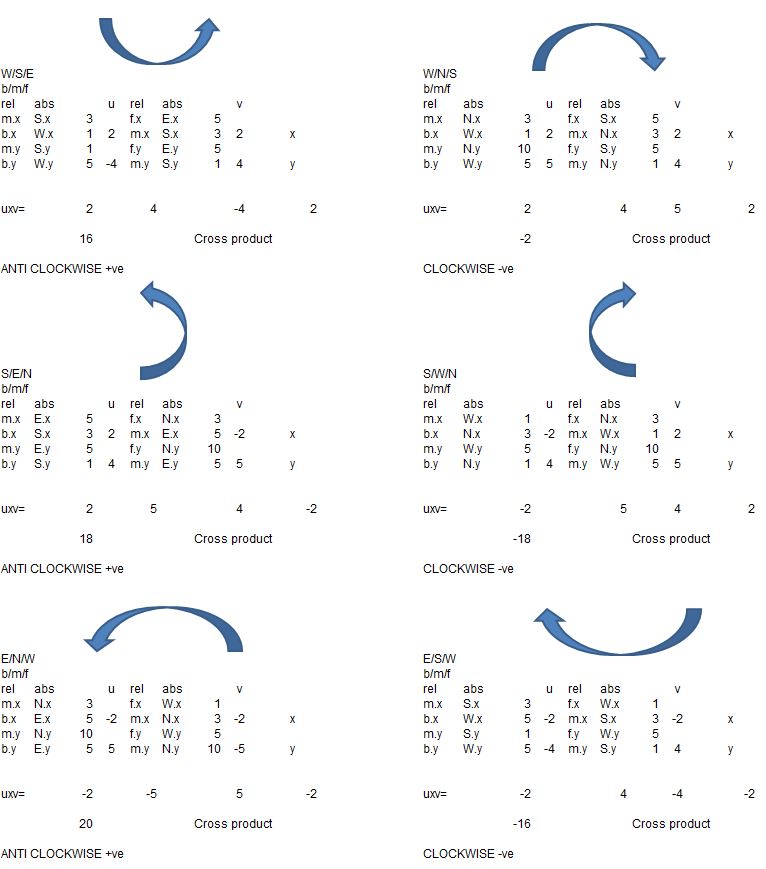
And I decided to work through manually in excel to ensure that I had the linear algebra correct.

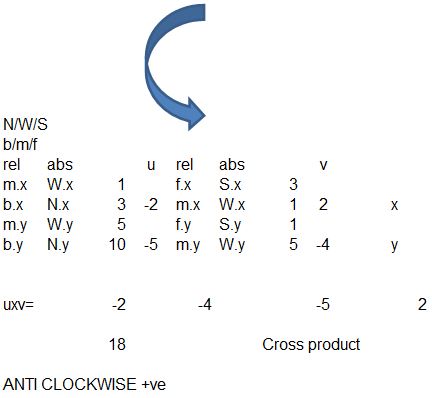
and further testing figures

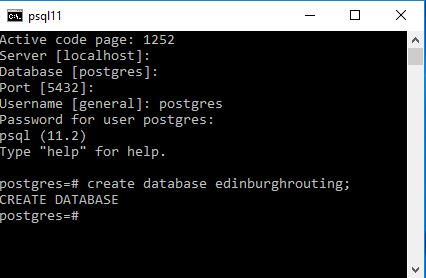
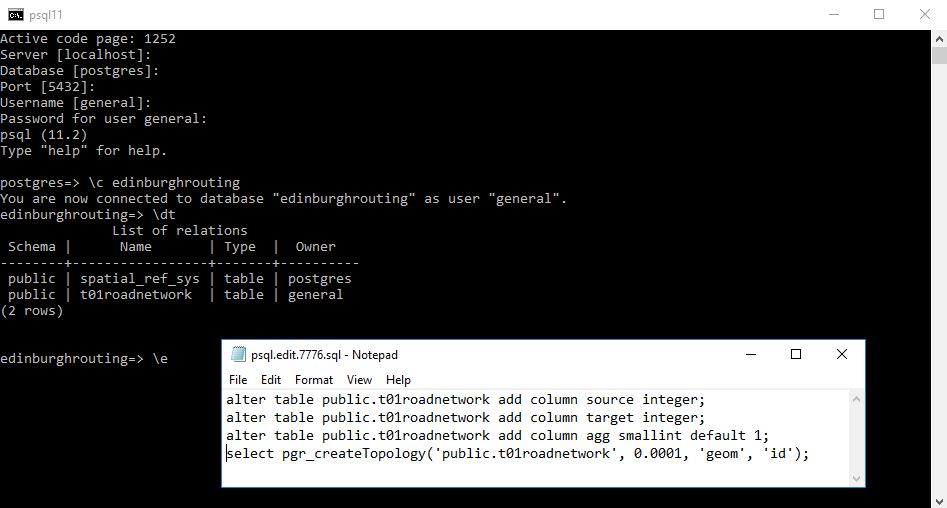
So firstly I create a separate table that just shows the roundabouts

CREATE TABLE t001roundaboutsntroadlink as select id pkidt001, st_linemerge(geom) as geom from ntroadlink where formofway = 'Roundabout';

In the above I use st_linemerge to ensure that all geometry is linestring as this is necessary to use the st_startpoint and st_endpoint postgis functions.

Next I added the the required variables from stack overflow algebra to the line table

ALTER TABLE t001roundaboutsntroadlink add column bx float(8),
Add column by float(8),
Add column mx float(8),
Add column my float(8),
Add column fx float(8),
Add column fy float(8),
Add column ux float(8),
Add column uy float(8),
Add column vx float(8),
Add column vy float(8),
Add column uxtimesvy float(8),
Add column uytimesvx float(8),
Add column uxv float(8);

Next I needed to identify a b beginning, m middle and f finish point for each line that I wanted to test.

b points (beginning)

CREATE TABLE t002bpoints AS SELECT pkidt001 as pkidt001,st_startpoint(geom) as geom, st_x(st_startpoint(geom)) as bx, st_y(st_startpoint(geom)) as by from t001roundaboutsntroadlink;

m points (middle)

CREATE TABLE t002mpoints AS SELECT pkidt001 as pkidt001,st_lineinterpolatepoint(geom,0.5) as geom, st_x(st_lineinterpolatepoint(geom,0.5)) as mx, st_y(st_lineinterpolatepoint(geom,0.5)) as my from t001roundaboutsntroadlink;

f points (finish)

CREATE TABLE t002fpoints AS SELECT pkidt001 as pkidt001,st_endpoint(geom) as geom, st_x(st_endpoint(geom)) as fx, st_y(st_endpoint(geom)) as fy from t001roundaboutsntroadlink;

It was then a case of simple update queries to complete the table

update t001roundaboutsntroadlink set bx = st_x(st_startpoint(geom));
update t001roundaboutsntroadlink set by = st_y(st_startpoint(geom));
update t001roundaboutsntroadlink set mx = st_x(st_lineinterpolatepoint(geom,0.5));
update t001roundaboutsntroadlink set my = st_y(st_lineinterpolatepoint(geom,0.5));
update t001roundaboutsntroadlink set fx = st_x(st_endpoint(geom));
update t001roundaboutsntroadlink set fy = st_y(st_endpoint(geom));
update t001roundaboutsntroadlink set ux=mx-bx;
update t001roundaboutsntroadlink set uy=my-by;
update t001roundaboutsntroadlink set vx=fx-mx;
update t001roundaboutsntroadlink set vy=fy-my;
update t001roundaboutsntroadlink set uxtimesvy = ux*vy;
update t001roundaboutsntroadlink set uytimesvx= uy*vx;
update t001roundaboutsntroadlink set uxv = uxtimesvy-uytimesvx;

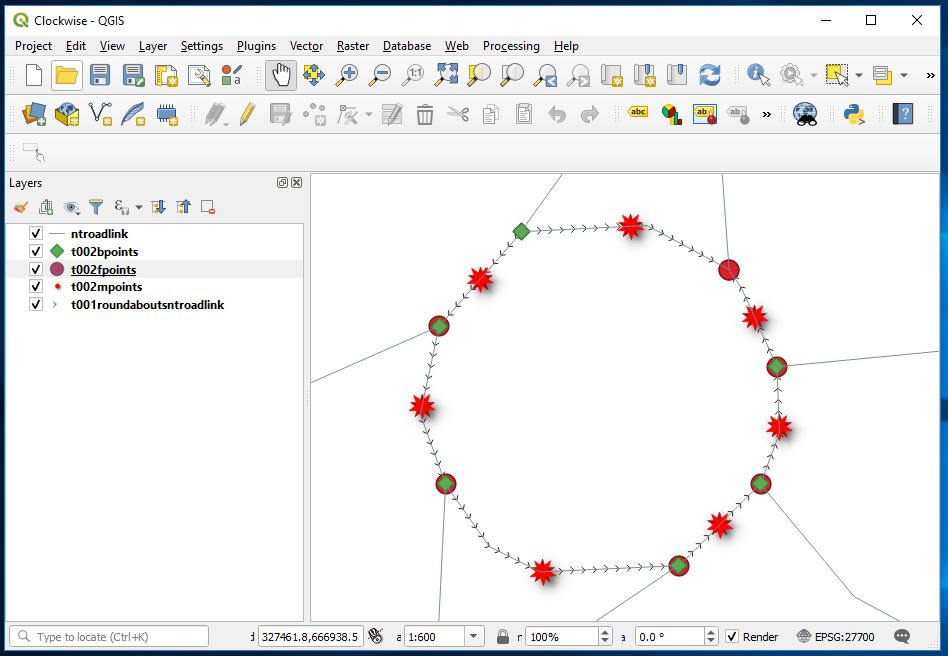
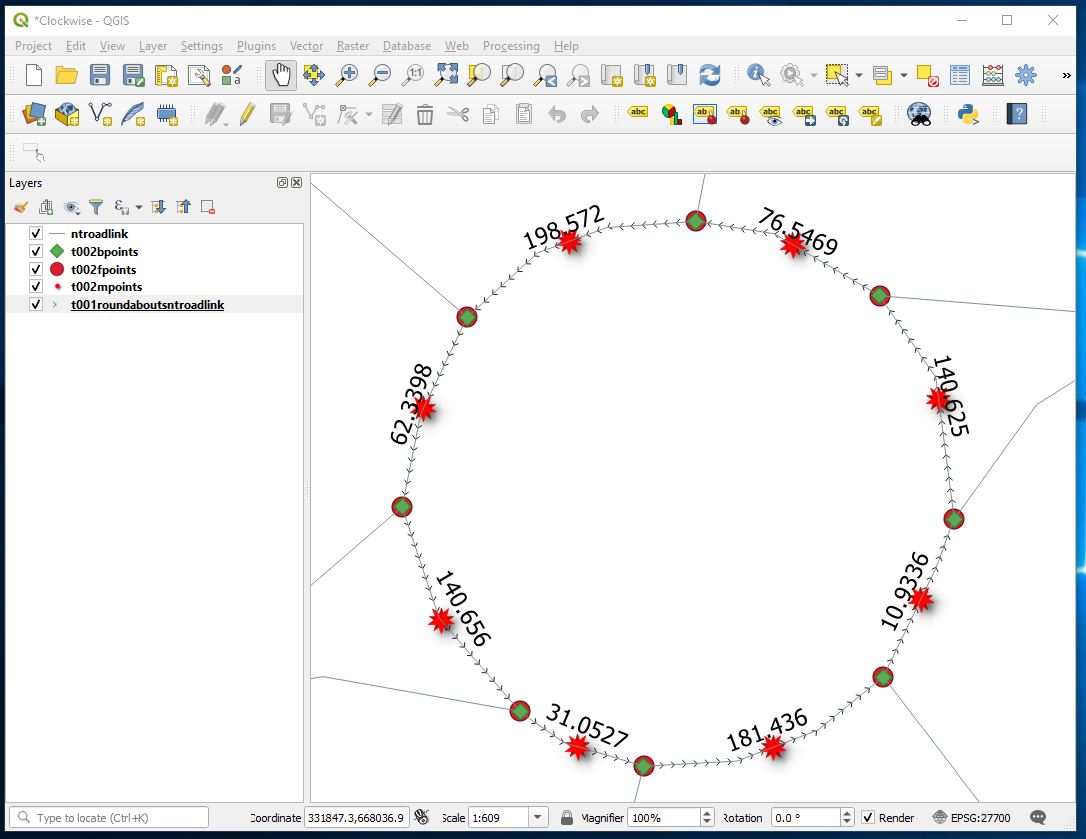
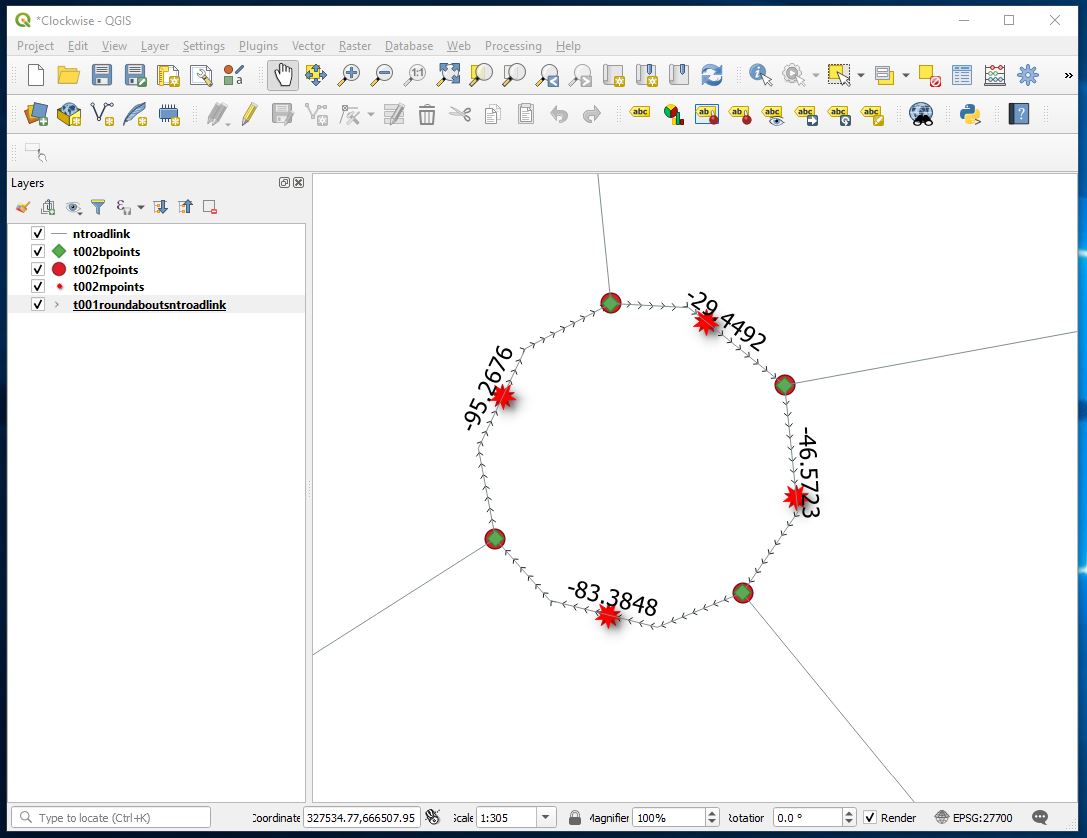
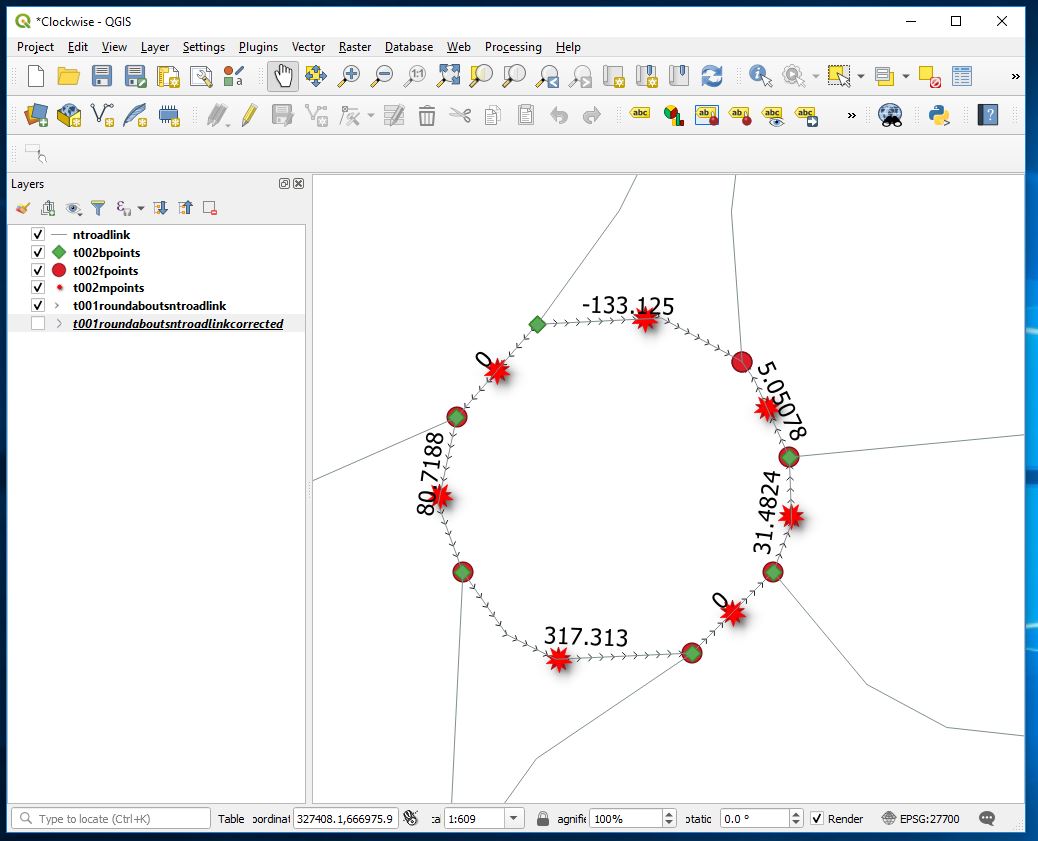
Labelling up the roundabouts Hermiston Gate now looks like

And Sheriff Hall Roundabout now looks like this

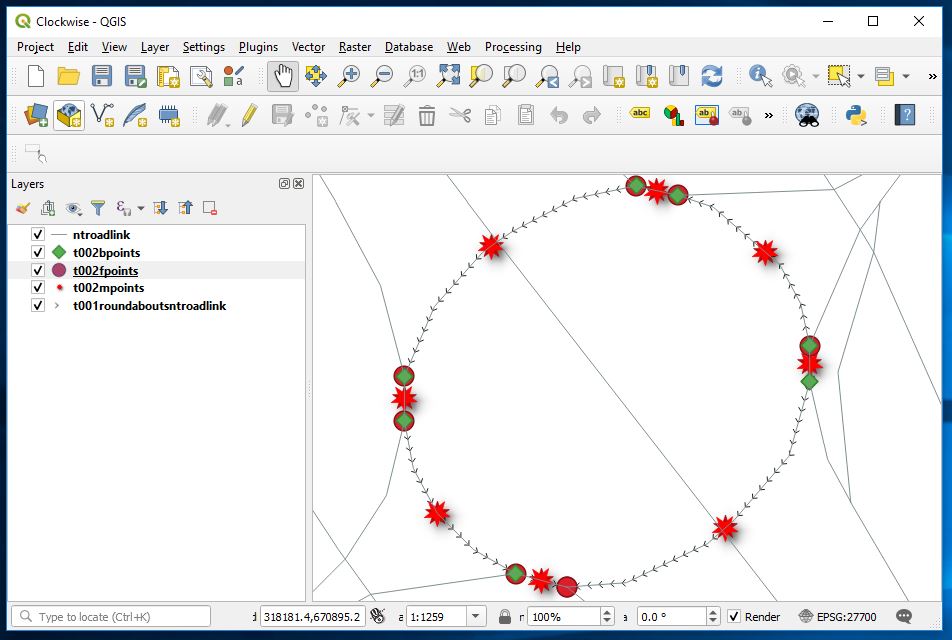
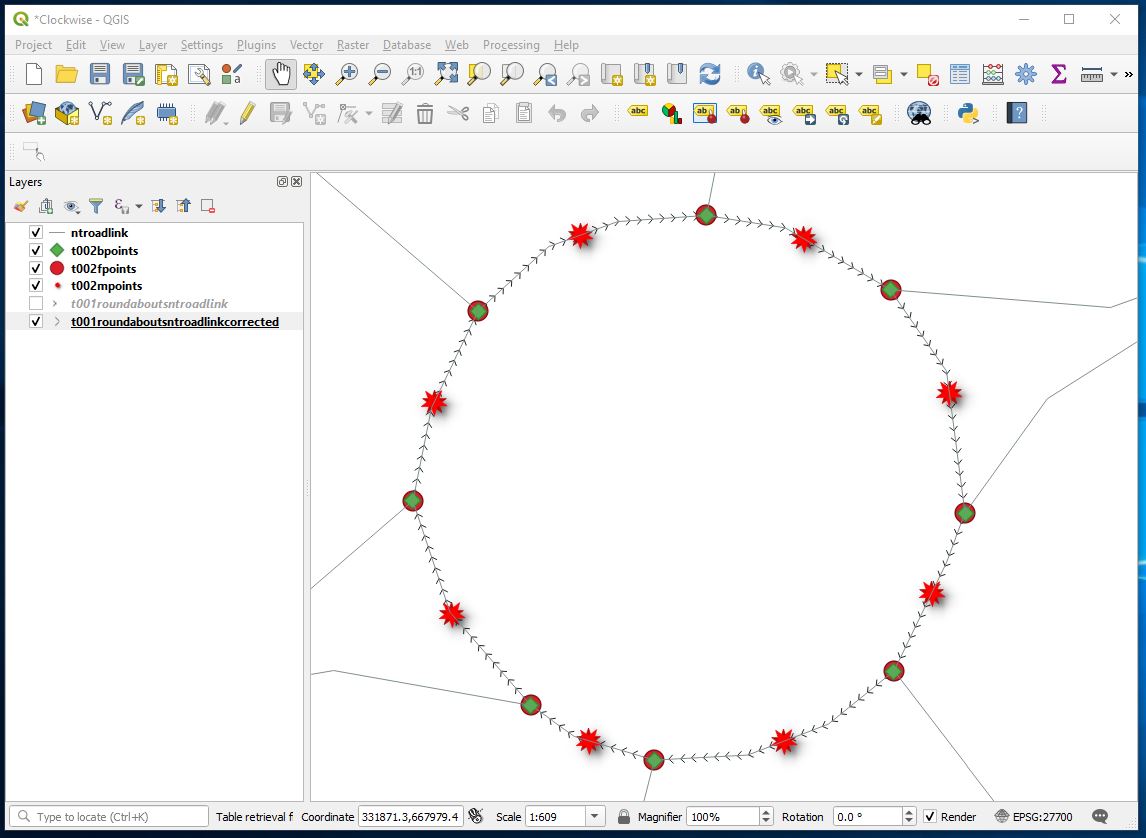
Compared with a correctly directed roundabout

CREATE TABLE t001roundaboutsntroadlinkcorrected AS TABLE t001roundaboutsntroadlink;

And now correct the items display as previous and see what we see.

UPDATE t001roundaboutsntroadlinkcorrected set geom = st_reverse(geom) where uxv > 0;

Sheriff hall roundabout now

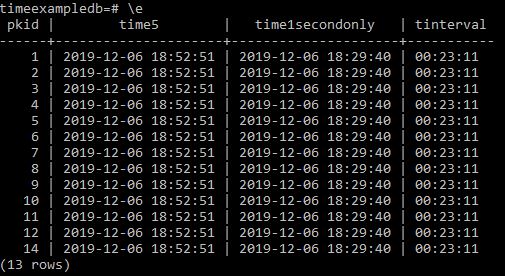
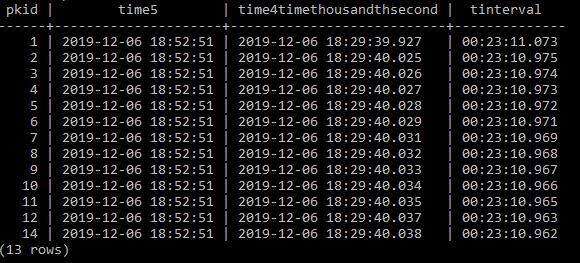
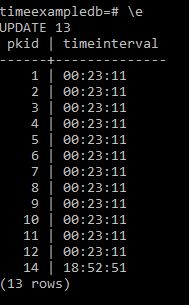
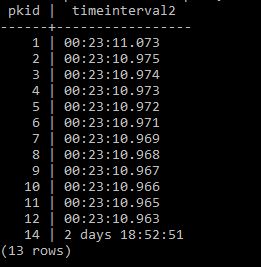
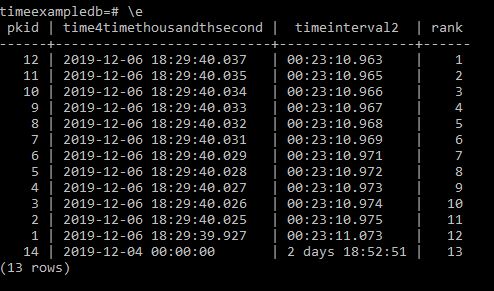
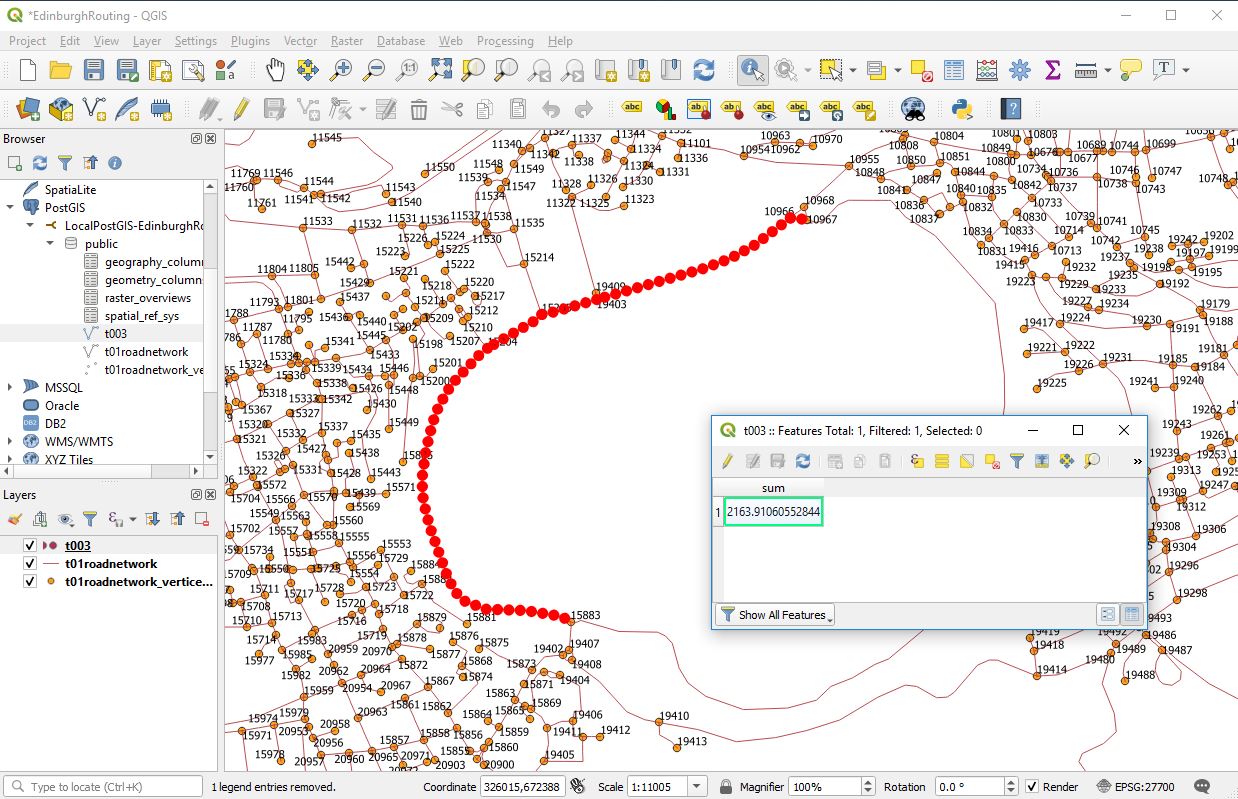
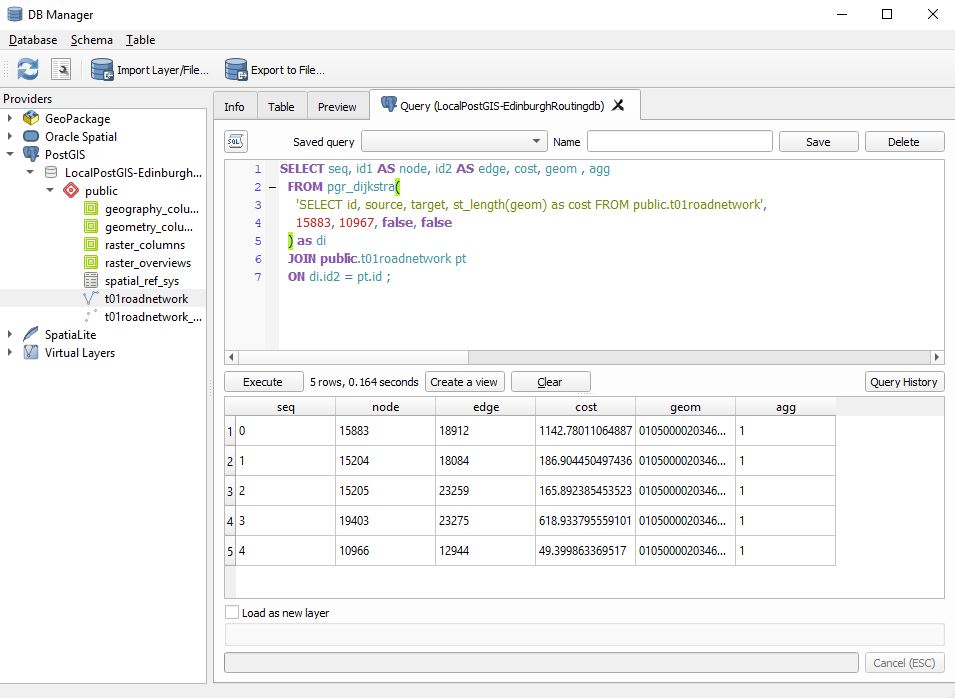
and some proof that reasonable number of lines were updated.

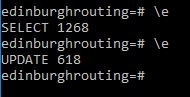
Which is an indication that all roundabouts arcs have been corrected properly

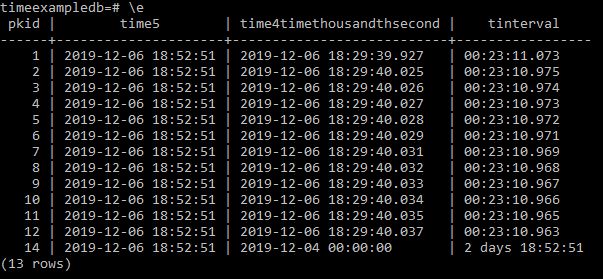
But a zero uxv value indicates a straight line.

It should however be possible to match starts with finishes for overlying points and where a line has 0 value of uxv and its ends and finishes are not matched with adjacent opposites create a switch to reverse the direction of all lines that are incorrect compared to their neighbours thus only correcting incorrect directions. Haven’t done that in this case.

023 Postgres – Ranking and the Timestamp variable

An investigation of ranking / the timestamp variable the time variable and the interval variable.

Hours minutes and seconds
Hours minutes and tenths of seconds
Hours minutes and hundredths of seconds
Hours minutes and thousandths of seconds

So to highlight the examples I will first create a databsae called timeexampledb

CREATE database timeexampledb;

Now lets connect to that database

\c timeexampledb

Now I create a table called timebucket that will hold examples of the different time formats.

create table timebucket 
(pkid serial primary key, 
time1secondonly timestamp(0), 
time2tenthsecond timestamp(1), 
time3hundredthsecond timestamp(2), 
time4timethousandthsecond timestamp(3));

Next input some examples and see what we get.

insert into timebucket values (1, now(),now(),now(),now());
insert into timebucket values (2, now(),now(),now(),now());
insert into timebucket values (3, now(),now(),now(),now());
insert into timebucket values (4, now(),now(),now(),now());
insert into timebucket values (5, now(),now(),now(),now());
insert into timebucket values (6, now(),now(),now(),now());
insert into timebucket values (7, now(),now(),now(),now());
insert into timebucket values (8, now(),now(),now(),now());
insert into timebucket values (9, now(),now(),now(),now());
insert into timebucket values (10, now(),now(),now(),now());
insert into timebucket values (11, now(),now(),now(),now());
insert into timebucket values (12, now(),now(),now(),now());
insert into timebucket values (14, now(),now(),now(),now());

and lets see what that looks like

Here you can see from the tenth of a second options where you hit right on a second then a digit will disappear.

Now we can do ranking on these to determine position.

Select pkid, 
time1secondonly, 
rank() over wn as rank from timebucket
window wn as (order by time1secondonly)
order by time1secondonly;

This results in

So lets change this to rank the next column along.

Select pkid, 
time2tenthsecond, 
rank() over wn as rank from timebucket 
window wn as (order by time2tenthsecond) 
order by time2tenthsecond;

Appears to be working but lets try the other columns.

Select pkid, 
time3hundredthsecond, 
rank() over wn as rank from timebucket 
window wn as (order by time3hundredthsecond) 
order by time3hundredthsecond;

Appears correct but for good measure thousandths of a second.

Select pkid, 
time4timethousandthsecond, 
rank() over wn as rank from timebucket 
window wn as (order by time4timethousandthsecond) 
order by time4timethousandthsecond;

And now lets add an interval column

Alter table timebucket add column timeinterval time(0);

But lets add a further time5 column that and update to now time so we can create some intervals

Alter table timebucket add column time5 timestamp(0);
Update timebucket set time5 = now();

Now if we want to get the time between items we can make the following SQL

Select pkid, 
time5, 
time1secondonly,
time5-time1secondonly as tinterval 
from timebucket;

And we get

Lets try with a different time column

Select pkid, 
time5, 
time4timethousandthsecond,
time5- time4timethousandthsecond as tinterval 
from timebucket;

So next I reduce pkid record 14 by a day and re run to see what happens.

Update timebucket set time4timethousandthsecond='2019-12-04' where pkid=14;

and run the former select again;

Select pkid, 
time5, 
time4timethousandthsecond,
time5- time4timethousandthsecond as tinterval 
from timebucket;

and we see the interval is correctly recording.

Now if we want to rank on tinterval I was unable to do it directly from a query so I went ahead and updated the former timeinterval column as follows

update timebucket set timeinterval=time5-time4timethousandthsecond;

and now doing a select on this we get

select pkid, timeinterval from timebucket;

What we see is

But we are not showing the fact that 14 should be 1 day this is because we should have defined timeinterval as an interval variable rather than a time(0) variable.

So we can do this as follows and update appropriately.

Alter table timebucket add column timeinterval2 interval;
update timebucket set timeinterval2=time5-time4timethousandthsecond;
select pkid, timeinterval2 from timebucket;

And we get the right result

And now lets rank these to check it is sorting them correctly.

Select pkid, 
time4timethousandthsecond, 
timeinterval2, 
rank() over wn as rank from timebucket 
window wn as (order by timeinterval2) 
order by rank;

And we get the correct result

019 Postgres and Postgis: Load multiple shape files into a Postgis database

Environment
Windows 10
Postgresql 11

To start you need a set of shape files that you know the location of.

For demonstration purposes I use the OS Open Road open data shape files.

Link to OS Open Data

Next within explorer I create a directory in the c:\ root called data.
And then I create two subdirectories.
1 – shp
2 – sql

Place all the shape files you wish to be loaded into a postgis database into the newly created c:\data\shp directory.

Next we will make sql text files that can be used to transfer the information from shape format into Postgis. At this point it is not necessary to even know what database you are going to place the shape files into.

Next open up the command prompt and navigate to the bin directory of your particular postgres installation. Standard as follows :-

Next I copy in the below text.

For %f in (C:\data\shp\*shp) do Shp2pgsql –s 27700 %f public.%~nf > C:\data\sql\%~nf.sql

This will take all the shape files in the C:\data\shp\ directory and create sql text files placing them in the C:\data\sql\. After completion you may wish to go to the directory and check that creation has occurred. You can even look at the text within a single file preferably with some kind of code editor to check that it looks approximately correct.

Next within psql I create the target database and apply the postgis extension.
create database osopenroaddb;
create extension postgis;

Next, unless you have a lot of time on your hands you will want to go to the
C:\Users\Mark\AppData\Roaming\postgresql
and open up the pgpass.conf file and place the following line in it.

localhost:5432:*:postgres:yoursecretpassword

Without that line you will be asked for a password everytime a new sql file is run.

Next back in command prompt bin directory do the following. Note no password it takes it from the pgpass.conf file.

For %f in (c:\data\sql\*sql) do psql –h localhost –d osopenroaddb –U postgres –f %f > nul

If you have a lot of big files this could take a while to run. But once finished all your shape files should now be in your postgis instance in the specified database.

QGIS and PostGIS : Identifying direction of a vector

If using the dijkstra function with direction turned on it is important to identify the order in which the nodes of a vector line have been digitised. This is called the direction, dijkstra can use this with a reverse_cost attribute to handicap wrong movement along lines to such an extent that the correct path can be calculated around things like roundabouts.

Here is an example of the roundabout in Straiton in Edinburgh just North of the A720 bypass. While some of the lines have a correct anti clockwise orienation clearly some have been incorrectly digitised.

First we can see this by displaying the network in QGIS but using the styling to arrow the direction.

The function that can be used to reverse such inaccuracies if you can’t resort to buying a correct dataset try ST_REVERSE

017 Postgres command line : psql : Notices

RAISE NOTICE can provide the same function as Message Box in VBA ie you can use it to comment on the progress of a script. RAISE NOTICE is not supported by SQL so you can’t place it in scripts containing SQL they need to be in plpgsql scripts. This isn’t too much of a hassle as the way I am working at the moment I am calling the SQL anyway from plpgsql so I can place my message boxes in there.

No VBA Ok buttons.

CREATE OR REPLACE FUNCTION noticeexample() returns void as $$
BEGIN
RAISE NOTICE 'ONE FINE DAY IN THE MIDDLE OF THE NIGHT';
END;
$$
LANGUAGE PLPGSQL;

016 Postgres command line : psql : Strip out the Z coordinate from a geometry field

When creating a topology the geometry field cannot contain a Z coordinate.

OK but the Ordnance Survey Open Data highways layers containse a Z coordinate. Previously I had stripped this out using the latest version of QGIS which has a tick box in the front end that allows for import stripping of the z coordinate in the process. If you don’t have access to the latest QGIS version how can you strip out the z coordinates.

ST_FORCE2D

ALTER TABLE public.nuroadlink ADD COLUMN geom2(multilinestring,27700);
UPDATE public.nuroadlink SET geom2 = ST_FORCE2D(public.nuroadlink.geom);
ALTER TABLE public.nuroadlink drop column geom;
ALTER TABLE public.nuroadlink RENAME COLUMN geom2 TO geom;

015 Postgres command line : psql : Create functions and then script those functions

I had assumed after I had created a working SQL Script I would just be able to wrap the whole thing easily into a function and then bang it would be off to the races.
My script really needed to be run in order and for some as yet undefined reason I was getting particular errors where a table would be created and then a following query would add or alter that table. It looked like the second query was trying to adapt the table prior to its creation with an inevitable error.

I managed to get it working by making each SQL Query a function and then scripting the functions consecutively in a separate function using the PERFORM instruction.

I incorporate into this the check_function_bodies switch which just allows the creation of sql referring to objects that may not be in existence yet.

BEGIN;
SET LOCAL check_function_bodies TO FALSE;
CREATE OR REPLACE FUNCTION query01() returns void as $$
CREATE TABLE t001start 
(
pkid serial primary key,
geompkidt001 geometry(point,27700)
);
$$ LANGUAGE SQL;
CREATE OR REPLACE FUNCTION query02() returns void as $$
CREATE TABLE t002end 
(
pkid serial primary key,
geompkidt002 geometry(point,27700)
);
$$ LANGUAGE SQL;
COMMIT;

And then subsequently I create a function that runs the functions.

CREATE OR REPLACE FUNCTION runallthequeries() 
returns text as
$BODY$
BEGIN
PERFORM query01();
PERFORM query02();
RETURN 'process end';
END;
$BODY$
LANGUAGE plpgsql;

014 Postgres command line : psql : Create SQL function referring to a table or column that does not yet exist

I was trying to write a script that would allow me to measure distances to schools and my original script gradually built up tables that were subsequently deleted. Worked fine in one big sql script but when I tried to convert this into a function so that it could be more easily stored with the database I kept on getting error messages stating that it was not possible to create sql that referred to objects that did not exist. Postgres validates functions and will at default prevent creation of functions containing SQL that refers to objects not yet in existence.

Postgres does not however save dependencies for code in the function body. So although once the function is created the tables and views can be dropped (and the function still exists) in default you need a set of tables in place with default settings before the function can be created. One workaround would be to create dummy tables and views in advance and later drop them but this if often clunky and awkward. Luckily this validation can be turned off.

BEGIN;
SET LOCAL check_function_bodies TO FALSE;
CREATE or REPLACE FUNCTION examplefunction() Returns void AS $$
  CREATE TABLE t001 (pkid serial primary key, field1 varchar(20));
$$ LANGUAGE sql;
COMMIT;

Documentation says

check_function_bodies (boolean)

This parameter is normally on. When set to off, it disables validation of the function body string during CREATE FUNCTION. Disabling validation avoids side effects of the validation process and avoids false positives due to problems such as forward references. Set this parameter to off before loading functions on behalf of other users; pg_dump does so automatically.

see here
Documentation

Totally invaluable when you write scripts like I do.

011 : Postgres amalgamate consecutive lines into a single line in a table

Here we take much of the work covered in post 010 and take the parts and user st_union to merge into a single record and place it in a table created by transforming a view into a table

Firstly go to your psql line and ensure that you are logged in with a username that you wish to be the owner of the table. In my case general

logging into edinburgh routing database

Now same measurement as before but this time we shall make a view out of the measurements then load that into a new table before deleting the view leaving us with the table with a combined measurement.

CREATE VIEW v001firstmeasurement AS SELECT seq,  id1 AS node, id2 AS edge, cost, geom, agg
  FROM pgr_dijkstra( 'SELECT id, source, target, st_length(geom) as cost FROM public.t01roadnetwork', 15883, 10967, false, false  ) as di
  JOIN public.t01roadnetwork pt ON di.id2 = pt.id ;

CREATE TABLE t003 as select sum(cost), st_union(geom) from v001firstmeasurement;

DROP VIEW v001firstmeasurement;

It is important in notepad to remove the blank spaces in the editor this looks as follows.

We then should then get some kind of confirmation that the view and table are created before the view is then dropped again. There might be a more efficient way of doing this but this was my first experiment. And we can go back to QGIS 3.4 and display the now single line in our project. Complete with now accurate measurement. It should be noted that if you were wanting to do multiple line measurements you would need to step out of the create statement and use an insert statement for all subsequent insertions as follows.
insert into t003(sum,st_union) select sum(cost),st_union(geom) from v001firstmeasurement;
This would allow you to do multiple measurments. I haven’t added up the measurement but it looks about right.

010 Postgres command line : psql : Getting started with pgrouting using open data from Ordnance Survey to identify and measure the shortest route between two points.

Objective here is to write a series of queries that can be used to measure the shortest distance between selected paired locations on a network such that the geometry of the routes can be calculated and displayed on a map.

For this particular tutorial you will need – QGIS 3 or higher and a version of Postgres I am using version 11.0 here (I have upgraded since my former posts). I believe this tutorial will work with previous versions but if you are following along now might be a good time to upgrade.

QGIS 3.4 or higher – needed as the Ordnance Survey road network geometry contains a z coordinate which will prevent the creation of the required geometry for measurement. QGIS 3 introduced the ability to save geometry excluding z coordinate. If you have a network without z coordinates you should not require this.

So let us first get the data. Here you tick the option in the top right hand corner – scroll to the bottom and submit your request after which you will be asked a few basic questions along with email address you wish the download to be sent to after a few minutes you should be sent the download link through your email – follow the instructions and you should be able to get the information

Ordnance Survey Open Data

The information you are downloading is a block framework for the whole of the uk. When you unzip the download into a folder you will see multiple files. We will be using a section of the national dataset relating to Edinburgh – NT. Choose the block or selection that you are interested in. More blocks may take more time however.

Open QGIS
Create a new project : eg EdinburghRouting.qgz
Load in your chosen network block : eg NT_RoadLink.shp

Select the layer you just loaded in : eg NT_RoadLink.shp

and navigate to the following in the menu settings
Layer / Save As

Fill out the Save Vector Layer as … dialog box
IMPORTANT – ensure within the Geometry section
Geometry type is set to LineString
Include z-dimension is unticked

Give the new file a name : eg ntosroutingnetwork.shp

Hit ok

Within the layer dialog of QGIS your new layer should appear you can now remove the for NT_RoadLink shape file from the project

Next go to your version of PostgreSQL and using a superuser account create a new database : eg edinburghrouting

I would suggest you use lower casing as well

As a superuser ensure you add the postgis and pgrouting extensions.

Next I set up the following connection between the QGIS project and PostgreSQL

Personal tastes may vary but I like like to select
Also list tables with no geometry
Allow saving/loading QGIS projects in the database

OK the selection and you should now have a connection to the new database you just created.

QGIS has an excellent dbmanager window which we will use to load our new shape file which excludes the z layer into the new database we created in PostgreSQL

Ensuring that you have a connection to your localpostgis database hit the

ImportLayerFile

Here I load the information into a new table t01roadnetwork

On pressing OK there will be delay after which if things go well you will receive the following message.

As ever it is good to check that things appear to be going well.
Add the layer to your project and determine approximately whether import was successful.

Next back in psql command line and in an editor we are going to run 4 queries
The first 2 add columns that are required in the shortest distance algorithm we shall use, the third will allow anyone to write an aggregation function to see the total cost of the route and the last creates a topology for the road network.

alter table public.t01roadnetwork add column source integer;
alter table public.t01roadnetwork add column target integer;
alter table public.t01roadnetwork add column agg smallint default 1;
select pgr_createTopology('public.t01roadnetwork', 0.0001, 'geom', 'id');

If things go correctly you should see the database engine start to create the topology and what I see is it gradually stepping through the creation process.

and on completion you should have something like the following:

A new table has been added to the edinburghrouting database and next step is to display the network and its vertices. In QGIS.

In QGIS we should see something like

The next thing that I like to do is to label the nodes so that for quick identification.

And look to the t01roadnetwork table and see if the columns are clear and present.

We are now ready to make a measurement. Here I choose the nodes 15883 and 10967

SELECT seq, id1 AS node, id2 AS edge, cost, geom , agg
  FROM pgr_dijkstra(
    'SELECT id, source, target, st_length(geom) as cost FROM public.t01roadnetwork',
    15883, 10967, false, false
  ) as di
  JOIN public.t01roadnetwork pt
  ON di.id2 = pt.id ;

Now we can load this as a new layer and then improve the symbology

Doing this we get.

It should be noted that the line you see is a collection of lines. In my next post I will go through and indicate how we can amalgamate that into a single line for storage in a table.

Congratulations if you have got this far you should be able to measure the shortest distance between any two points on a valid network by altering the numbers.