Nubuilder Forte – How to? Install on Windows – VIDEO INSTRUCTION

In a previous post I had mentioned that if you wanted a platform focused on database driven (MYSQL only) web application development, Nubuilder FORTE was an excellent choice.

On visiting their site the other day I noticed that they had published a new video out which describes how to install it on Windows. Configuration of Nubuilder is the hardest part and although I haven’t done it this video looks like an excellent instruction. So get yourself across there and have a go.

That link is here

  • How to Install Nubuilder on Windows

    Other links

  • Nubuilder main website
  • Nubuilder FORUM
  • MS SQL Azure – CONCAT_WS Working with addresses and nicely formatting separated fields

    I recently came across a very useful function that I am told was introduced in SQL Server 2017 called CONCAT_WS
    I have never used it in any other application other than SQL Server I hope it exists in MYSQL and PostgreSQL

    This will join together a series of fields with chosen separators and by combining it with NULLIF can be used to remove spaces and format address nicely.
    For applications that will at some point need addresses either for post or for information this function allows the display of addresses in a format the most clearly reflects the requirements of most postal systems. Needless to say it is likely that most of my systems will at some point transition to the use of this function.

    Here is a link to Microsofts documentation on the function CONCAT_WS

    Firstly let me review what I am starting to standardise on with regard to address fields which should be a balance between enough detail to store any address on the planet but not so much that it is overly complicated. I’ve expanded their descriptions somewhat. In my experience someone will have created an excel spreadsheet to start the process of recording information, often they standardise on column names such as address01/02/03 etc. If that breakdown exists then I have indicated the fields that I would normally expect to map those fields too.

    flatno-buildingdivision
    houseno-buildno
    housename-buildname
    streetfirst-address01
    streetsecond
    locality-address02
    towncity-address03
    stateoradminlocality
    postcode-address04
    country-address05

    And here is an example of the code implemented.

    CREATE VIEW v001formattedaddress AS SELECT pkid,
    email,
    CONCAT_WS(' ',NULLIF(dbo.t001addresstable.firstname,' '), NULLIF(dbo.t001addresstable.surname,' ')) AS fullname,
    CONCAT_WS(CHAR(13) + CHAR(10),
    NULLIF(dbo.t001addresstable.flatno, ' '), 
    NULLIF(dbo.t001addresstable.houseno,' '), 
    NULLIF(dbo.t001addresstable.housename,' '),
    NULLIF(dbo.t001addresstable.streetfirst,' '),
    NULLIF(dbo.t001addresstable.streetsecond,' '),
    NULLIF(dbo.t001addresstable.locality,' '),
    NULLIF(dbo.t001addresstable.towncity,' '),
    NULLIF(dbo.t001addresstable.stateoradminlocality,' '),
    NULLIF(dbo.t001addresstable.postcode,' '),
    NULLIF(dbo.t001addresstable.country,' '),
    REPLICATE('-', 30) ) AS addressconcat FROM dbo.t001addresstable;
    

    Additionally on reflection for a recent project I made up a list of countries that covers most in the world. For my project I put an include field next to them to allow system administrators to include whether these would be visible in the drop down. Clearly while overtime more and more countries may be added there I would expect it to be years or possibly decades before some of the values of the smaller nations are needed. (For my particular application anyway)

    I standardised on the following the 2 digit codes are the ISO Country code standard

    AD Andorra
    AE United Arab Emirates
    AF Afghanistan
    AG Antigua and Barbuda
    AI Anguilla
    AL Albania
    AM Armenia
    AO Angola
    AQ Antarctica
    AR Argentina
    AT Austria
    AU Australia
    AW Aruba
    AX Aland Islands
    AZ Azerbaijan
    BA Bosnia and Herzegovina
    BB Barbados
    BD Bangladesh
    BE Belgium
    BF Burkina Faso
    BG Bulgaria
    BH Bahrain
    BI Burundi
    BJ Benin
    BL Saint Barthélemy
    BM Bermuda
    BN Brunei Darussalam
    BO Bolivia, Plurinational State of
    BQ Bonaire, Sint Eustatius and Saba
    BR Brazil
    BS Bahamas
    BT Bhutan
    BV Bouvet Island
    BW Botswana
    BY Belarus
    BZ Belize
    CA Canada
    CC Cocos (Keeling) Islands
    CD Congo, the Democratic Republic of the
    CF Central African Republic
    CG Congo
    CH Switzerland
    CI Cote d’Ivoire
    CK Cook Islands
    CL Chile
    CM Cameroon
    CN China*
    CO Colombia
    CR Costa Rica
    CU Cuba
    CV Cape Verde
    CW Curaçao
    CX Christmas Island
    CY Cyprus
    CZ Czech Republic
    DE Germany
    DJ Djibouti
    DK Denmark
    DM Dominica
    DO Dominican Republic
    DZ Algeria
    EC Ecuador
    EE Estonia
    EG Egypt
    EH Western Sahara
    ER Eritrea
    ES Spain
    ET Ethiopia
    FI Finland
    FJ Fiji
    FK Falkland Islands (Malvinas)
    FO Faroe Islands
    FR France
    GA Gabon
    GB United Kingdom
    GB United Kingdom Northern Ireland
    GD Grenada
    GE Georgia
    GF French Guiana
    GG Guernsey
    GH Ghana
    GI Gibraltar
    GL Greenland
    GM Gambia
    GN Guinea
    GP Guadeloupe
    GQ Equatorial Guinea
    GR Greece
    GS South Georgia and the South Sandwich Islands
    GT Guatemala
    GW Guinea-Bissau
    GY Guyana
    HK Hong Kong SAR China
    HM Heard Island and McDonald Islands
    HN Honduras
    HR Croatia
    HT Haiti
    HU Hungary
    ID Indonesia
    IC Spain Canary Islands
    IE Ireland Republic
    IL Israel
    IM Isle of Man
    IN India
    IO British Indian Ocean Territory
    IQ Iraq
    IR Iran, Islamic Republic of
    IS Iceland
    IT Italy
    JE Jersey
    JM Jamaica
    JO Jordan
    JP Japan
    KE Kenya
    KG Kyrgyzstan
    KH Cambodia
    KI Kiribati
    KM Comoros
    KN Saint Kitts and Nevis
    KP Korea, Democratic People’s Republic of
    KR Korea, Republic of
    KW Kuwait
    KY Cayman Islands
    KZ Kazakhstan
    LA Lao People’s Democratic Republic
    LB Lebanon
    LC Saint Lucia
    LI Liechtenstein
    LK Sri Lanka
    LR Liberia
    LS Lesotho
    LT Lithuania
    LU Luxembourg
    LV Latvia
    LY Libyan Arab Jamahiriya
    MA Morocco
    MC Monaco
    MD Moldova, Republic of
    ME Montenegro
    MF Saint Martin (French part)
    MG Madagascar
    MK Macedonia, the former Yugoslav Republic of
    ML Mali
    MM Myanmar
    MN Mongolia
    MO Macau SAR China
    MQ Martinique
    MR Mauritania
    MS Montserrat
    MT Malta
    MU Mauritius
    MV Maldives
    MW Malawi
    MX Mexico
    MY Malaysia
    MZ Mozambique
    NA Namibia
    NC New Caledonia
    NE Niger
    NF Norfolk Island
    NG Nigeria
    NI Nicaragua
    NL Netherlands
    NO Norway
    NP Nepal
    NR Nauru
    NU Niue
    NZ New Zealand
    OM Oman
    PA Panama
    PE Peru
    PF French Polynesia
    PG Papua New Guinea
    PH Philippines
    PK Pakistan
    PL Poland
    PM Saint Pierre and Miquelon
    PN Pitcairn
    PS Palestine
    PT Portugal
    PY Paraguay
    QA Qatar
    RE Reunion
    RO Romania
    RS Serbia
    RU Russian Federation
    RW Rwanda
    SA Saudi Arabia
    SB Solomon Islands
    SC Seychelles
    SD Sudan
    SE Sweden
    SG Singapore
    SH Saint Helena, Ascension and Tristan da Cunha
    SI Slovenia
    SJ Svalbard and Jan Mayen
    SK Slovakia
    SL Sierra Leone
    SM San Marino
    SN Senegal
    SO Somalia
    SR Suriname
    SS South Sudan
    ST Sao Tome and Principe
    SV El Salvador
    SX Sint Maarten (Dutch part)
    SY Syrian Arab Republic
    SZ Swaziland
    TC Turks and Caicos Islands
    TD Chad
    TF French Southern Territories
    TG Togo
    TH Thailand
    TJ Tajikistan
    TK Tokelau
    TL Timor-Leste
    TM Turkmenistan
    TN Tunisia
    TO Tonga
    TR Turkey
    TT Trinidad and Tobago
    TV Tuvalu
    TW Taiwan
    TZ Tanzania United Republic of
    UA Ukraine
    UG Uganda
    US United States
    UY Uruguay
    UZ Uzbekistan
    VA Holy See (Vatican City State)
    VC Saint Vincent and the Grenadines
    VE Venezuela Bolivarian Republic of
    VG Virgin Islands, British
    VN Vietnam
    VU Vanuatu
    WF Wallis and Futuna
    WS Samoa
    YE Yemen
    YT Mayotte
    ZA South Africa
    ZM Zambia
    ZW Zimbabwe
    

    023 Postgres – Ranking and the Timestamp variable

    An investigation of ranking / the timestamp variable the time variable and the interval variable.

    Hours minutes and seconds
    Hours minutes and tenths of seconds
    Hours minutes and hundredths of seconds
    Hours minutes and thousandths of seconds

    So to highlight the examples I will first create a databsae called timeexampledb

    CREATE database timeexampledb;

    Now lets connect to that database

    \c timeexampledb

    Now I create a table called timebucket that will hold examples of the different time formats.

    create table timebucket 
    (pkid serial primary key, 
    time1secondonly timestamp(0), 
    time2tenthsecond timestamp(1), 
    time3hundredthsecond timestamp(2), 
    time4timethousandthsecond timestamp(3));
    

    Next input some examples and see what we get.

    insert into timebucket values (1, now(),now(),now(),now());
    insert into timebucket values (2, now(),now(),now(),now());
    insert into timebucket values (3, now(),now(),now(),now());
    insert into timebucket values (4, now(),now(),now(),now());
    insert into timebucket values (5, now(),now(),now(),now());
    insert into timebucket values (6, now(),now(),now(),now());
    insert into timebucket values (7, now(),now(),now(),now());
    insert into timebucket values (8, now(),now(),now(),now());
    insert into timebucket values (9, now(),now(),now(),now());
    insert into timebucket values (10, now(),now(),now(),now());
    insert into timebucket values (11, now(),now(),now(),now());
    insert into timebucket values (12, now(),now(),now(),now());
    insert into timebucket values (14, now(),now(),now(),now());
    

    and lets see what that looks like

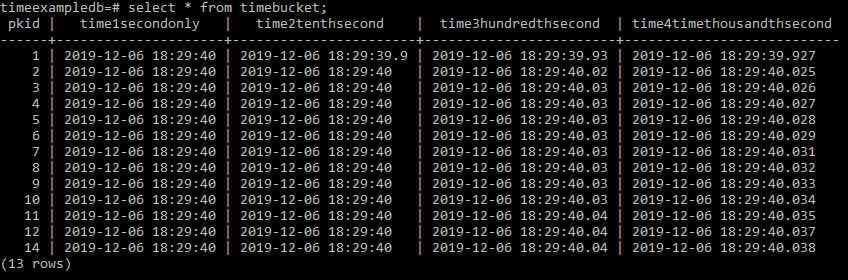
    Here you can see from the tenth of a second options where you hit right on a second then a digit will disappear.

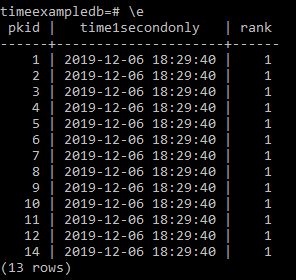
    Now we can do ranking on these to determine position.

    Select pkid, 
    time1secondonly, 
    rank() over wn as rank from timebucket
    window wn as (order by time1secondonly)
    order by time1secondonly;

    This results in

    So lets change this to rank the next column along.

    Select pkid, 
    time2tenthsecond, 
    rank() over wn as rank from timebucket 
    window wn as (order by time2tenthsecond) 
    order by time2tenthsecond;

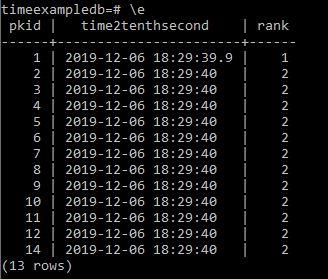
    Appears to be working but lets try the other columns.

    Select pkid, 
    time3hundredthsecond, 
    rank() over wn as rank from timebucket 
    window wn as (order by time3hundredthsecond) 
    order by time3hundredthsecond;

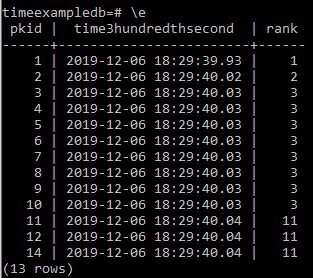
    Appears correct but for good measure thousandths of a second.

    Select pkid, 
    time4timethousandthsecond, 
    rank() over wn as rank from timebucket 
    window wn as (order by time4timethousandthsecond) 
    order by time4timethousandthsecond;

    And now lets add an interval column

    Alter table timebucket add column timeinterval time(0);
    

    But lets add a further time5 column that and update to now time so we can create some intervals

    Alter table timebucket add column time5 timestamp(0);
    Update timebucket set time5 = now();
    

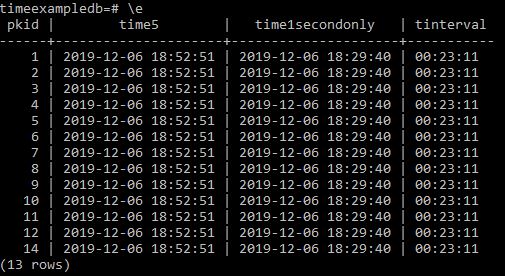
    Now if we want to get the time between items we can make the following SQL

    Select pkid, 
    time5, 
    time1secondonly,
    time5-time1secondonly as tinterval 
    from timebucket;
    

    And we get

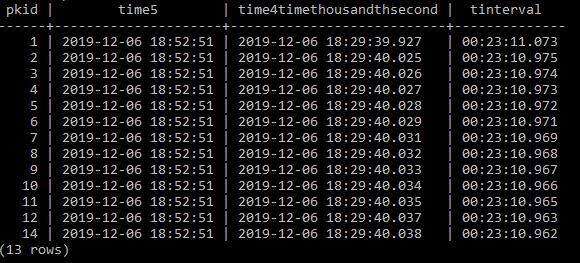
    Lets try with a different time column

    Select pkid, 
    time5, 
    time4timethousandthsecond,
    time5- time4timethousandthsecond as tinterval 
    from timebucket;

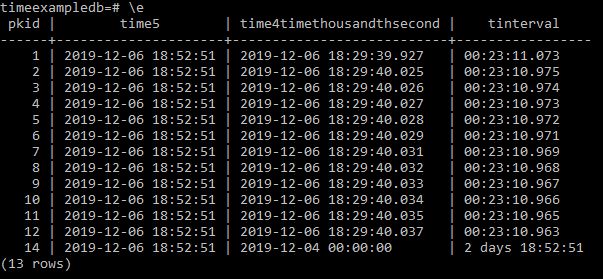
    So next I reduce pkid record 14 by a day and re run to see what happens.

    Update timebucket set time4timethousandthsecond='2019-12-04' where pkid=14;
    

    and run the former select again;

    Select pkid, 
    time5, 
    time4timethousandthsecond,
    time5- time4timethousandthsecond as tinterval 
    from timebucket;

    and we see the interval is correctly recording.

    Now if we want to rank on tinterval I was unable to do it directly from a query so I went ahead and updated the former timeinterval column as follows

    update timebucket set timeinterval=time5-time4timethousandthsecond;

    and now doing a select on this we get

    select pkid, timeinterval from timebucket;

    What we see is

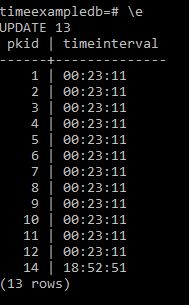
    But we are not showing the fact that 14 should be 1 day this is because we should have defined timeinterval as an interval variable rather than a time(0) variable.

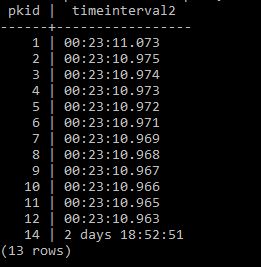
    So we can do this as follows and update appropriately.

    Alter table timebucket add column timeinterval2 interval;
    update timebucket set timeinterval2=time5-time4timethousandthsecond;
    select pkid, timeinterval2 from timebucket;

    And we get the right result

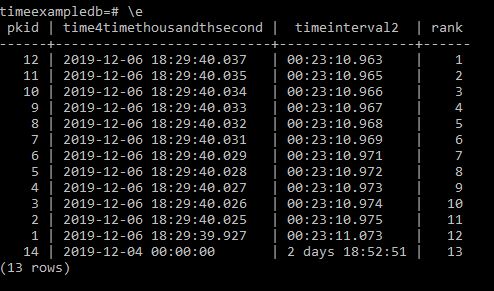
    And now lets rank these to check it is sorting them correctly.

    Select pkid, 
    time4timethousandthsecond, 
    timeinterval2, 
    rank() over wn as rank from timebucket 
    window wn as (order by timeinterval2) 
    order by rank;

    And we get the correct result

    022 Postgres – Setting up starting variables in psqlrc

    So how do we adjust the defaults for the command line prompt in psql Postgres

    Set up your psqlrc defaults

    Go to the command prompt and navigate to the following directory

    c:\Users\Mark\AppData\Roaming\Postgresql\

    and either find or create a file called

    psqlrc.conf

    This is a simple text file that you can edit or create in notepad.

    --------------------------
    --psqlrc set preferences--
    -- Author Mark Brooks --
    --------------------------
    
    \set QUIET 1
    
    \x auto
    \timing
    \set COMP_KEYWORD_CASE upper
    
    \pset border 2
    \pset pager off
    \pset null <NULL>
    \setenv editor 'C:\\Program Files (x86)\\Notepad++\\notepad++.exe'
    \set VERBOSITY verbose
    
    \set QUIET 0
    
    \echo 'Welcome to PostgreSQL \n'
    \echo 'Type :version to see PostgreSQL version \n'
    \echo 'Type :extensions to see the available extensions'
    
    \set version 'SELECT version();'
    \set extensions 'select * from pg_available_extensions;'

    This allows you for instance to set up which editor will appear when you perform the \e command

    021 Postgres with PostGIS plugin – Create junction table sites in catchments

    This is a working example of how it would be possible to set up code that would automatically allocate for example housing sites to School Catchment areas. It could also be used to list constraints relevant to particular housing sites. This is more complicated in that it will indicate what percentage of the housing site is within which catchment areas and therefore allows for a single housing site being in multiple catchment areas. I am planning on coming back and expanding on this post. In this respect it represents a refinement of this Post

    So we need two tables

    t001asites which has a geometry field called geom
    and another table which will be the catchments table called
    t002bcatchments which has a geometry field called geom.

    Both tables must have a serial primary key of pkid and both tables must be polygon data and the geom field MUST be defined as polygon and NOT multipolygon.

    Air code is as follows.

      1. Create table containing digitised polygons of housing sites.
      2. Create table containing digitised polygons of catchments.
      3. Measure the area of the housing sites and place that value in an area column within the housing sites table t001asites.
      4. Split the housing sites by the catchment boundaries ensuing that each split polygon inherits the catchment it was split by.
      5. Re-measure the areas of these split sites and add an area column to store the new calculations.
      6. Divide figure obtained in 5. by figure obtained in 3 which will indicate the proportion of the housing site is in which catchment.
      7. Perform a least remainder method on the individual sites grouped by their original housing sites to ensure the proportions sum to 1.

    So to the code

    BEGIN;
    SET LOCAL check_function_bodies TO FALSE;
    CREATE OR REPLACE FUNCTION part01catchjunctionmaker() returns void as $$
    Alter table t001asites add column area integer;
    $$ LANGUAGE SQL;
    CREATE OR REPLACE FUNCTION part02catchjunctionmaker() returns void as $$
    Update t001asites set area=ST_Area(geom);
    $$ LANGUAGE SQL;
    CREATE OR REPLACE FUNCTION part022catchjunctionmaker() RETURNS void AS $$
    DROP TABLE IF EXISTS t200;
    $$ LANGUAGE SQL;
    CREATE OR REPLACE FUNCTION part03catchjunctionmaker() RETURNS void AS $$
    CREATE TABLE t200 AS select a.pkid as t001pkid, b.pkid as t002pkid, a.area as t001area, ST_intersection(a.geom, b.geom) as geom FROM t001asites a, t002bcatchments b;
    $$ LANGUAGE SQL;
    CREATE OR REPLACE FUNCTION part04catchjunctionmaker() RETURNS void AS $$
    ALTER TABLE t200 add column pkid serial primary key, add column area integer,add column proportion decimal (10,9);
    $$ LANGUAGE SQL;
    CREATE OR REPLACE FUNCTION part06catchjunctionmaker() RETURNS void AS $$
    UPDATE t200 SET area=ST_Area(geom);
    $$ LANGUAGE SQL;
    CREATE OR REPLACE FUNCTION part07catchjunctionmaker() RETURNS void AS $$
    DELETE from t200 where area=0 or null;
    $$ LANGUAGE SQL;
    CREATE OR REPLACE FUNCTION part08catchjunctionmaker() RETURNS void AS $$
    UPDATE t200 SET proportion= cast(area as decimal)/cast(t001area as decimal) WHERE area > 0;
    $$ LANGUAGE SQL;
    CREATE OR REPLACE FUNCTION part088catchjunctionmaker() RETURNS void AS $$
    DROP table IF EXISTS t201;
    $$ LANGUAGE SQL;
    CREATE OR REPLACE FUNCTION part09catchjunctionmaker() RETURNS void AS $$
    Create table t201 as Select pkid,t001pkid,t002pkid, t001area, area, proportion, sum(proportion) OVER (PARTITION BY t001pkid ORDER BY t001pkid, proportion) as cum_proportion FROM t200 ORDER BY t001pkid, proportion;
    $$ LANGUAGE SQL;
    CREATE OR REPLACE FUNCTION part10catchjunctionmaker() RETURNS void AS $$
    Alter table t201 add column value decimal (14,9),
    Add column valuerounded integer,
    Add column cumulvaluerounded integer,
    Add column prevbaseline integer,
    Add column roundproportion integer;
    $$ LANGUAGE SQL;
    CREATE OR REPLACE FUNCTION part11catchjunctionmaker() RETURNS void AS $$
    UPDATE t201 set value = proportion * 100;
    $$ LANGUAGE SQL;
    CREATE OR REPLACE FUNCTION part12catchjunctionmaker() RETURNS void AS $$
    UPDATE t201 set valuerounded = round(value,0);
    $$ LANGUAGE SQL;
    CREATE OR REPLACE FUNCTION part13catchjunctionmaker() RETURNS void AS $$
    update t201 set cumulvaluerounded = round((cum_proportion*100),0);
    $$ LANGUAGE SQL;
    CREATE OR REPLACE FUNCTION part14catchjunctionmaker() RETURNS void AS $$
    update t201 set cumulvaluerounded=100 where cumulvaluerounded = 101;
    $$ LANGUAGE SQL;
    CREATE OR REPLACE FUNCTION part15catchjunctionmaker() RETURNS void AS $$
    update t201 set prevbaseline = round((cum_proportion - proportion)*100);
    $$ LANGUAGE SQL;
    CREATE OR REPLACE FUNCTION part16catchjunctionmaker() RETURNS void AS $$
    update t201 set roundproportion = (cumulvaluerounded-prevbaseline);
    $$ LANGUAGE SQL;
    CREATE OR REPLACE FUNCTION part17catchjunctionmaker() RETURNS void AS $$
    DELETE from t201 where roundproportion=0 or null;
    $$ LANGUAGE SQL;
    CREATE OR REPLACE FUNCTION part18catchjunctionmaker() RETURNS void AS $$
    alter table t201 add column proppercent decimal(3,2);
    $$ LANGUAGE SQL;
    CREATE OR REPLACE FUNCTION part19catchjunctionmaker() RETURNS void AS $$
    update t201 set proppercent = cast(roundproportion as decimal)/100;
    $$ LANGUAGE SQL;
    COMMIT;
    

    and now a function to pull it all together;

    CREATE OR REPLACE FUNCTION createcjt()
    RETURNS TEXT AS
    $BODY$
    BEGIN
    PERFORM part01catchjunctionmaker();
    PERFORM part02catchjunctionmaker();
    PERFORM part022catchjunctionmaker();
    PERFORM part03catchjunctionmaker();
    PERFORM part04catchjunctionmaker();
    PERFORM part06catchjunctionmaker();
    PERFORM part07catchjunctionmaker();
    PERFORM part08catchjunctionmaker();
    PERFORM part088catchjunctionmaker();
    PERFORM part09catchjunctionmaker();
    PERFORM part10catchjunctionmaker();
    PERFORM part11catchjunctionmaker();
    PERFORM part12catchjunctionmaker();
    PERFORM part13catchjunctionmaker();
    PERFORM part14catchjunctionmaker();
    PERFORM part15catchjunctionmaker();
    PERFORM part16catchjunctionmaker();
    PERFORM part17catchjunctionmaker();
    PERFORM part18catchjunctionmaker();
    PERFORM part19catchjunctionmaker();
    RETURN 'process end';
    END;
    $BODY$
    LANGUAGE plpgsql;
    

    MS SQL Azure – Creating contained users – SQL Authentication – DACPAC and BACPAC import

    In every database engine it is important to create logins that enforce security around your database and that can be maintained.
    Additionally if you are working for a client you may wish to transfer this database at some point in the future to the client.

    In SQL Azure users can be created against the master database in the instance and the role can then be transferred to individual databases.

    Fine but there may be circumstances where you want to isolate roles to individual databases so that when they are moved the roles move with them and are not left in the master database.
    The following sets out an example of how to set up a Contained database in SQL Azure along with something extra you have to think about when re-importing to an SQL Server instance.

    Using your sysadmin account connect to the database you wish to add a user to and run;

    CREATE USER rocketengineapplication WITH PASSWORD = 'Bluedanube99';
    ALTER ROLE db_owner ADD MEMBER rocketengineapplication;
    

    Note SQL Azure requires passwords to be ‘sufficiently complicated’ at the time of writing this seemed to be
    The default Azure password complexity rules: minimum length of 8 characters, minimum of 1 uppercase character, minimum of 1 lowercase character, minimum of 1 number.

    And to drop the login
    Go in through SSMS

    Security / Users / the users should be listed where you can select and choose DELETE

    Now developers could use this password and username to login to the database and do most of what is required without having any privileges to the SQL Server and if you ever transfer the database the role will pass with the database.

    Here is a link to built in database roles
    SQL Database Roles

    Secure a single or pooled database in SQL Azure

    and here is a useful query that can be run to identify the users and roles that a particular database has. This allows you to check what users are on a database and what are there roles.

    SELECT u.name AS UserName, u.type_desc AS UserType, r.name AS RoleName
    FROM sys.database_principals AS u
    LEFT JOIN sys.database_role_members AS rm ON rm.member_principal_id = u.principal_id
    LEFT JOIN sys.database_principals AS r ON r.principal_id = rm.role_principal_id
    WHERE
        u.type NOT IN('R', 'G')
    ORDER BY
          UserName
        , RoleName;
    

    Note that when deploying or importing data tier applications to for instance SQL Express versions by default contained database authentication is deactivated and must be activated.

    To do this connect to the local sql express instance and highlight the Databases on the left hand side then run the following code

    sp_configure 'contained database authentication', 1;
    GO
    RECONFIGURE;
    GO
    

    DACPAC (structure only) and BACPAC (data and structure) import should now be possible locally!

    This will specifically assist with the following error message which I was getting when I tried to import the database back into a local machine.

    TITLE: Microsoft SQL Server Management Studio
    ------------------------------
    
    Could not deploy package.
    Error SQL72014: .Net SqlClient Data Provider: Msg 12824, Level 16, State 1, Line 5 The sp_configure value 'contained database authentication' must be set to 1 in order to alter a contained database. You may need to use RECONFIGURE to set the value_in_use.
    Error SQL72045: Script execution error. The executed script:
    IF EXISTS (SELECT 1
    FROM [master].[dbo].[sysdatabases]
    WHERE [name] = N'$(DatabaseName)')
    BEGIN
    ALTER DATABASE [$(DatabaseName)]
    SET FILESTREAM(NON_TRANSACTED_ACCESS = OFF),
    CONTAINMENT = PARTIAL
    WITH ROLLBACK IMMEDIATE;
    END
    
    Error SQL72014: .Net SqlClient Data Provider: Msg 5069, Level 16, State 1, Line 5 ALTER DATABASE statement failed.
    Error SQL72045: Script execution error. The executed script:
    IF EXISTS (SELECT 1
    FROM [master].[dbo].[sysdatabases]
    WHERE [name] = N'$(DatabaseName)')
    BEGIN
    ALTER DATABASE [$(DatabaseName)]
    SET FILESTREAM(NON_TRANSACTED_ACCESS = OFF),
    CONTAINMENT = PARTIAL
    WITH ROLLBACK IMMEDIATE;
    END
    
    (Microsoft.SqlServer.Dac)
    

    I note that for local SQL Express and I believe enterprise SQL Server there is the additional option of creating a Backup in SQL Express. I also note that from my reading baks are considered preferable to bacpac files because they have enforced ACID compliance and that for large databases that are constantly being used they are recommended to bacpac files. SQL Azure doesn’t allow BAK file backups through SSMS from what I can see so if this is an issue for you consider temporarily disconnecting front ends from the database while a bacpac is conducted. If you need a bak file for some reason you can attach locally to a SQL Server instance and from there take a bak file.

    Something to be aware of..

    MS SQL Azure – Computed Columns

    It can be really nice to create a computed column and add it to the table rather than adding it in a field

    This would work well using the function listed in the previous post where I automatically calculate the age of trees.

    Add Computed Column to SQL Azure Table

    ALTER TABLE dbo.t001trees ADD treeage AS (dbo.functionyearmonthday(dbo.t001trees.plantdate, GETDATE()));
    

    This will appear in the table and look like it is an actual field but it is calculated and will not keep the figures in the table unless you specify persistance

    see the above link for further reading on this topic

    MS SQL Azure – TSQL to name the age between dates in text

    It is relatively easy to calculate the number of either years, months days hours or seconds between two dates using the native DATEDIFF built in function which comes with SQL.

    e.g.

    SELECT dbo.t001trees.pkid, 
    dbo.t001trees.plantdate, 
    DATEDIFF(Year, dbo.t001trees.plantdate, GETDATE()) as treeage 
    from dbo.t001trees;
    

    But here is a function that will spell it out into a string that reads something like
    2 days
    1 month 2 days
    2 years 1 month 2 days

    CREATE OR ALTER FUNCTION dbo.functionyearmonthday
    (
    @datefrom Date,
    @dateto Date
    )
    RETURNS varchar(100)
    as
    BEGIN
    DECLARE @date1 DATETIME, @date2 DATETIME, @result VARCHAR(100);
    DECLARE @years INT, @months INT, @days INT;
    
    SET @date1 = @datefrom
    SET @date2 = @dateto
    
    SELECT @years = DATEDIFF(yy, @date1, @date2)
    IF DATEADD(yy, -@years, @date2) < @date1
    SELECT @years = @years-1
    SET @date2 = DATEADD(yy, -@years, @date2)
    
    SELECT @months = DATEDIFF(mm, @date1, @date2)
    IF DATEADD(mm, -@months, @date2) < @date1
    SELECT @months=@months-1
    SET @date2= DATEADD(mm, -@months, @date2)
    
    SELECT @days=DATEDIFF(dd, @date1, @date2)
    IF DATEADD(dd, -@days, @date2) < @date1
    SELECT @days=@days-1
    SET @date2= DATEADD(dd, -@days, @date2)
    
    SELECT @result= ISNULL(CAST(NULLIF(@years,0) AS VARCHAR(10)) + ' years ','')
    + ISNULL(' ' + CAST(NULLIF(@months,0) AS VARCHAR(10)) + ' months ','')
    + ISNULL(' ' + CAST(NULLIF(@days,0) AS VARCHAR(10)) + ' days','')
    
    RETURN @result;
    END
    

    And if you would like to call the function from another query here is an example

    SELECT dbo.functionyearmonthday(dbo.t001trees.plantdate, GETDATE()) as treeage FROM dbo.t001trees

    That is enough for most people but it can be expanded to include hours minutes seconds and milliseconds which could be useful if you need more precision it can be seen that the DATEDIFF native function is included extensively within this function.

    CREATE OR ALTER FUNCTION dbo.functiontimeperiodmoreprecision
    (
    @datefrom Date,
    @dateto Date
    )
    RETURNS varchar(100)
    as
    BEGIN
    DECLARE @date1 DATETIME, @date2 DATETIME, @result VARCHAR(100);
    DECLARE @years INT, @months INT, @days INT,
    @hours INT, @minutes INT, @seconds INT, @milliseconds INT;
    
    SET @date1 = @datefrom
    SET @date2 = @dateto
    
    SELECT @years = DATEDIFF(yy, @date1, @date2)
    IF DATEADD(yy, -@years, @date2) < @date1
    SELECT @years = @years-1
    SET @date2 = DATEADD(yy, -@years, @date2)
    
    SELECT @months = DATEDIFF(mm, @date1, @date2)
    IF DATEADD(mm, -@months, @date2) < @date1
    SELECT @months=@months-1
    SET @date2= DATEADD(mm, -@months, @date2)
    
    SELECT @days=DATEDIFF(dd, @date1, @date2)
    IF DATEADD(dd, -@days, @date2) < @date1
    SELECT @days=@days-1
    SET @date2= DATEADD(dd, -@days, @date2)
    
    SELECT @hours=DATEDIFF(hh, @date1, @date2)
    IF DATEADD(hh, -@hours, @date2) < @date1
    SELECT @hours=@hours-1
    SET @date2= DATEADD(hh, -@hours, @date2)
    
    SELECT @minutes=DATEDIFF(mi, @date1, @date2)
    IF DATEADD(mi, -@minutes, @date2) < @date1
    SELECT @minutes=@minutes-1
    SET @date2= DATEADD(mi, -@minutes, @date2)
    
    SELECT @seconds=DATEDIFF(s, @date1, @date2)
    IF DATEADD(s, -@seconds, @date2) < @date1
    SELECT @seconds=@seconds-1
    SET @date2= DATEADD(s, -@seconds, @date2)
    
    SELECT @milliseconds=DATEDIFF(ms, @date1, @date2)
    
    SELECT @result= ISNULL(CAST(NULLIF(@years,0) AS VARCHAR(10)) + ' years,','')
    + ISNULL(' ' + CAST(NULLIF(@months,0) AS VARCHAR(10)) + ' months,','')
    + ISNULL(' ' + CAST(NULLIF(@days,0) AS VARCHAR(10)) + ' days,','')
    + ISNULL(' ' + CAST(NULLIF(@hours,0) AS VARCHAR(10)) + ' hours,','')
    + ISNULL(' ' + CAST(@minutes AS VARCHAR(10)) + ' minutes and','')
    + ISNULL(' ' + CAST(@seconds AS VARCHAR(10))
    + CASE
    WHEN @milliseconds > 0
    THEN '.' + CAST(@milliseconds AS VARCHAR(10))
    ELSE ''
    END
    + ' seconds','')
    
    RETURN @result
    END
    

    MS Access Function : Function to create SQL union queries

    Another small function that can speed up the text required to be written for large union queries.

    Typically this can be used with
    MS Access Function : Scan through a directory and write list of files to a table.

    There are a number of data providers that provide data files broken down into different geographical areas. In previous posts I have outlined how we can get these all into Postgis. But once they are in postgis (or any other database) you may wish to get these separate tables into one single global table. Clearly a union query will do this, however it can be time consuming to write the union query out as it simply has so many tables in it.

    I used the code in the link to scan a directory and get all the filenames (in this case shape files of the UK road network) into a table that I called UKRoadLinks which had two fields PKID (primary long integer autonumber) and Filen text field where Filen were the filenames.

    I then wrote the following function to write a text file that on completion will contain an sql union of all the tables listed in your recordset – I then copied and pasted this into Postgis database within which I had already imported all the sub tables to union the tables into a single copy. Alter the recordset source if for instance if you wish to use only a subset. The nice thing about this is if you have hundreds of tables to amalgamate there should be less likelyhood of you accidentally missing or misspelling table names.

    Public Function createunionsqllinks()
    
    Dim rst As DAO.Recordset
    Set rst = CurrentDb.OpenRecordset("UKRoadLinks")
    
    Dim fs, TextFile
    Set fs = CreateObject("Scripting.FileSystemObject")
    Set TextFile = fs.CreateTextFile("c:\data\sqlmerge.txt", True)
    TextFile.WriteLine ("CREATE TABLE sqltomergetables AS ")
    Do Until rst.EOF = True
    TextFile.WriteLine (Chr$(40) & "select * from " & rst!Filen & Chr$(41) & " UNION ")
    rst.MoveNext
    Loop
    rst.Close
    TextFile.WriteLine (";")
    TextFile.Close
    
    MsgBox "Created"
    
    End Function

    019 Postgres and Postgis: Load multiple shape files into a Postgis database

    Environment
    Windows 10
    Postgresql 11

    To start you need a set of shape files that you know the location of.

    For demonstration purposes I use the OS Open Road open data shape files.

    Link to OS Open Data

    Next within explorer I create a directory in the c:\ root called data.
    And then I create two subdirectories.
    1 – shp
    2 – sql

    Place all the shape files you wish to be loaded into a postgis database into the newly created c:\data\shp directory.

    Next we will make sql text files that can be used to transfer the information from shape format into Postgis. At this point it is not necessary to even know what database you are going to place the shape files into.

    Next open up the command prompt and navigate to the bin directory of your particular postgres installation. Standard as follows :-

    Next I copy in the below text.

    For %f in (C:\data\shp\*shp) do Shp2pgsql –s 27700 %f public.%~nf > C:\data\sql\%~nf.sql

    This will take all the shape files in the C:\data\shp\ directory and create sql text files placing them in the C:\data\sql\. After completion you may wish to go to the directory and check that creation has occurred. You can even look at the text within a single file preferably with some kind of code editor to check that it looks approximately correct.

    Next within psql I create the target database and apply the postgis extension.
    create database osopenroaddb;
    create extension postgis;

    Next, unless you have a lot of time on your hands you will want to go to the
    C:\Users\Mark\AppData\Roaming\postgresql
    and open up the pgpass.conf file and place the following line in it.

    localhost:5432:*:postgres:yoursecretpassword

    Without that line you will be asked for a password everytime a new sql file is run.

    Next back in command prompt bin directory do the following. Note no password it takes it from the pgpass.conf file.

    For %f in (c:\data\sql\*sql) do psql –h localhost –d osopenroaddb –U postgres –f %f > nul

    If you have a lot of big files this could take a while to run. But once finished all your shape files should now be in your postgis instance in the specified database.

    018 Postgres : Export Data and Structure of a Single database from a Postgres instance / Import Data and Structure of a Single database into a Postgres Instance

    Demonstration environment and programs
    Windows 10
    Postgres Version : 11.2
    QGIS desktop version : 3.4.4

    My working through of a process to export a single database (structure and data) from a Postgres Instance, the database has PostGIS and pgrouting extensions enabled, followed by importing into in this example the same instance but in principle could be a different instance.
    Access the command prompt (RUN AS ADMINISTRATOR)

    PLEASE NOTE run the command prompt as administrator or you will get frequently get an ACCESS DENIED message after using pg dump command.

    Navigate to the directory of the PostgresVersion from which you wish to export the database. This will typically be the bin subdirectory of the version of your postgres ( here 11 ). You can ensure that pg_dump.exe is here if you do a dir on the directory to reveal alternatively you could reference the full path to pgdump and then pass the parameters to it subsequently.

    eg

    Next place in the parameters of the database what database you wish to export along with the name that you want to call the exported file and then hit return.

    pg_dump -U postgres -p 5432 edinburghrouting > c:\dbexport.pgsql

    Hitting return depending on the security of your instance you will be prompted for a password.

    Enter the password hit return

    When I do this on my home computer there is no return message but going into the C drive I can see that dbexport.pgsql now exists.

    Next we want to create a blank database this is required to import the data and structure into.
    This we do in psql signed in as a user with sufficient privelege.

    Now back in the command line running as administrator we can run the following.

    psql -U postgres importededinburghrouting < c:\dbexport.pgsql

    Pressing return depending on your security you should be asked for your password.

    Once this is done it goes through a process of recreating the structure of the database then importing all the data

    For me the first lines look like this

    and the last look like this

    Now looking at the instance as a whole we can see the imported database

    and here I am displaying geographical information through QGIS to get an idea of the data and ensure that it appears to be all correct.

      SUMMARY


    There are quite a lot of tutorials online on how to do this but most seem to skip over some details - I've tried to be as accurate as possible but depending on you setup there may be differences. Nonetheless this is an extremely important task to perform so worth practicing to get right.

    MS Access Function : Print to excel spreadsheet field definitions of all tables in a database

    This places all tables and fields into an excel file on a single worksheet as a single table.

    Public Function TableDef()
    Dim def As TableDef
    Dim wb As Object
    Dim xL As Object
    Dim lngRow As Long
    Dim f As Field
    Set xL = CreateObject("Excel.Application")
    xL.Visible = True
    Set wb = xL.workbooks.Add
    lngRow = 2
    For Each def In CurrentDb.TableDefs
    For Each f In def.Fields
    With wb.sheets("Sheet1")
    .Range("A" & lngRow).Value = def.Name
    .Range("B" & lngRow).Value = f.Name
    .Range("C" & lngRow).Value = f.Type
    .Range("D" & lngRow).Value = f.Size
    .Range("E" & lngRow).Value = f.Required
    lngRow = lngRow + 1
    End With
    Next
    Next
    End Function
    

    MS Access Function : Loop through tables and export to csv

    A function that will loop through an access database and export all tables to csv and xls.

    Useful for subsequent import through QGIS into Postgres.

    Public Function ExportAll()
    Dim obj As AccessObject, dbs As Object
    Dim strFolder As String
    strFolder = "c:\"
    Set dbs = Application.CurrentData
    For Each obj In dbs.AllTables
    If Left(obj.Name, 4) <> "MSys" Then
    DoCmd.TransferText acExportDelim, , obj.Name, strFolder & obj.Name & ".csv", True
    DoCmd.TransferSpreadsheet acExport, acSpreadsheetTypeExcel9, obj.Name, strFolder & obj.Name & ".xls", True
    End If
    Next obj
    End Function

    QGIS and PostGIS : Identifying direction of a vector

    If using the dijkstra function with direction turned on it is important to identify the order in which the nodes of a vector line have been digitised. This is called the direction, dijkstra can use this with a reverse_cost attribute to handicap wrong movement along lines to such an extent that the correct path can be calculated around things like roundabouts.

    Here is an example of the roundabout in Straiton in Edinburgh just North of the A720 bypass. While some of the lines have a correct anti clockwise orienation clearly some have been incorrectly digitised.

    First we can see this by displaying the network in QGIS but using the styling to arrow the direction.

    The function that can be used to reverse such inaccuracies if you can’t resort to buying a correct dataset try ST_REVERSE

    017 Postgres command line : psql : Notices

    RAISE NOTICE can provide the same function as Message Box in VBA ie you can use it to comment on the progress of a script. RAISE NOTICE is not supported by SQL so you can’t place it in scripts containing SQL they need to be in plpgsql scripts. This isn’t too much of a hassle as the way I am working at the moment I am calling the SQL anyway from plpgsql so I can place my message boxes in there.

    No VBA Ok buttons.

    CREATE OR REPLACE FUNCTION noticeexample() returns void as $$
    BEGIN
    RAISE NOTICE 'ONE FINE DAY IN THE MIDDLE OF THE NIGHT';
    END;
    $$
    LANGUAGE PLPGSQL;

    016 Postgres command line : psql : Strip out the Z coordinate from a geometry field

    When creating a topology the geometry field cannot contain a Z coordinate.

    OK but the Ordnance Survey Open Data highways layers containse a Z coordinate. Previously I had stripped this out using the latest version of QGIS which has a tick box in the front end that allows for import stripping of the z coordinate in the process. If you don’t have access to the latest QGIS version how can you strip out the z coordinates.

    ST_FORCE2D

    ALTER TABLE public.nuroadlink ADD COLUMN geom2(multilinestring,27700);
    UPDATE public.nuroadlink SET geom2 = ST_FORCE2D(public.nuroadlink.geom);
    ALTER TABLE public.nuroadlink drop column geom;
    ALTER TABLE public.nuroadlink RENAME COLUMN geom2 TO geom;

    015 Postgres command line : psql : Create functions and then script those functions

    I had assumed after I had created a working SQL Script I would just be able to wrap the whole thing easily into a function and then bang it would be off to the races.
    My script really needed to be run in order and for some as yet undefined reason I was getting particular errors where a table would be created and then a following query would add or alter that table. It looked like the second query was trying to adapt the table prior to its creation with an inevitable error.

    I managed to get it working by making each SQL Query a function and then scripting the functions consecutively in a separate function using the PERFORM instruction.

    I incorporate into this the check_function_bodies switch which just allows the creation of sql referring to objects that may not be in existence yet.

    BEGIN;
    SET LOCAL check_function_bodies TO FALSE;
    CREATE OR REPLACE FUNCTION query01() returns void as $$
    CREATE TABLE t001start 
    (
    pkid serial primary key,
    geompkidt001 geometry(point,27700)
    );
    $$ LANGUAGE SQL;
    CREATE OR REPLACE FUNCTION query02() returns void as $$
    CREATE TABLE t002end 
    (
    pkid serial primary key,
    geompkidt002 geometry(point,27700)
    );
    $$ LANGUAGE SQL;
    COMMIT;

    And then subsequently I create a function that runs the functions.

    CREATE OR REPLACE FUNCTION runallthequeries() 
    returns text as
    $BODY$
    BEGIN
    PERFORM query01();
    PERFORM query02();
    RETURN 'process end';
    END;
    $BODY$
    LANGUAGE plpgsql;

    014 Postgres command line : psql : Create SQL function referring to a table or column that does not yet exist

    I was trying to write a script that would allow me to measure distances to schools and my original script gradually built up tables that were subsequently deleted. Worked fine in one big sql script but when I tried to convert this into a function so that it could be more easily stored with the database I kept on getting error messages stating that it was not possible to create sql that referred to objects that did not exist. Postgres validates functions and will at default prevent creation of functions containing SQL that refers to objects not yet in existence.

    Postgres does not however save dependencies for code in the function body. So although once the function is created the tables and views can be dropped (and the function still exists) in default you need a set of tables in place with default settings before the function can be created. One workaround would be to create dummy tables and views in advance and later drop them but this if often clunky and awkward. Luckily this validation can be turned off.

    BEGIN;
    SET LOCAL check_function_bodies TO FALSE;
    CREATE or REPLACE FUNCTION examplefunction() Returns void AS $$
      CREATE TABLE t001 (pkid serial primary key, field1 varchar(20));
    $$ LANGUAGE sql;
    COMMIT;

    Documentation says

    check_function_bodies (boolean)

    This parameter is normally on. When set to off, it disables validation of the function body string during CREATE FUNCTION. Disabling validation avoids side effects of the validation process and avoids false positives due to problems such as forward references. Set this parameter to off before loading functions on behalf of other users; pg_dump does so automatically.

    see here
    Documentation

    Totally invaluable when you write scripts like I do.

    013 Postgres command line : psql : Using ST_Within function to build junction tables to compare 2 separate polygon tables

    First off let us create a new database to hold our examples in.

    CREATE DATABASE stwithindb;
    

    Now add the postgis extension.

    Lets create two tables one called fields and one called plots

    CREATE TABLE
    t00001fields
    (
    pkid serial primary key,
    fieldname varchar(50),
    geom geometry(polygon,27700)
    )
    ;
    CREATE TABLE
    t00002Plots
    (
    pkid serial primary key,
    plotname varchar(50),
    geom geometry(polygon,27700)
    )
    ;

    Now lets go to QGIS connect to the PostGIS instance add the tables and create some test data manually.

    Here I have added fields in green with bold number labels and plots in brown with smaller number labelling. The numbers represent the pkid fields.

    Now here I can quickly run a query to identify the plots that are in fields

    SELECT t00002plots.pkid
    FROM
    t00002plots,
    t00001fields
    WHERE 
    ST_WITHIN(PUBLIC.T00002PLOTS.GEOM, PUBLIC.T00001FIELDS.GEOM);

    And it correctly identifies that plot 1 is within the fields layer.

    But what would be great in an application is to have some kind of junction table that individual master records could display their children on. For this we need a junction table that links between the field and plots table showing the pkids from each.

    SELECT t00002plots.pkid as Plotspkid,t00001fields.pkid as Fieldspkid
    FROM
    t00002plots,
    t00001fields
    WHERE 
    ST_WITHIN(PUBLIC.T00002PLOTS.GEOM, PUBLIC.T00001FIELDS.GEOM);

    Now I will move plot 2 into field 3 and rerun the above.

    The layer now looks like

    and running the former query we get.

    Now its possible to either create a junction table to hold this information..

    eg

    CREATE TABLE t00010fieldplotjunction AS 
    SELECT t00002plots.pkid as Plotspkid,t00001fields.pkid as Fieldspkid
    FROM
    t00002plots,
    t00001fields
    WHERE 
    ST_WITHIN(PUBLIC.T00002PLOTS.GEOM, PUBLIC.T00001FIELDS.GEOM);

    or we can create a view that will constantly calculate this everytime it is seen

    CREATE VIEW v001FieldPlotJunction AS
    SELECT t00002plots.pkid as Plotspkid,t00001fields.pkid as Fieldspkid
    FROM
    t00002plots,
    t00001fields
    WHERE 
    ST_WITHIN(PUBLIC.T00002PLOTS.GEOM, PUBLIC.T00001FIELDS.GEOM);

    Now if I add a few more plots and fields and then pull up the view we shall see that everything has been adjusted

    and running the view we now get

    In some circumstances this calculation may be expensive so we may wish to run and create a junction table overnight other times we may be happy to do it fully dynamically. Of course in a front end you could query and filter such that only one record was compared against the fields plot at anytime. Very useful nonetheless.

    Extraction Transformation and Load (ETL) – some thoughts on a large IT transfer project

    In 2017 I was involved in an important work project to transfer all the records in a legacy system that was being deprecated by the vendor (IDOX Group) into another maintained system. We were in some ways fortunate because both systems had been designed by a single company (IDOX) and they were encouraging us to transfer. We had delayed transfer for several years already but were aware that we now had to move. The vendor did have some tools in place , had staff dedicated to such transfers and were offering favourable consultancy rates. The amount of data was not horrendous in computing terms but they were far far beyond the remit of the ability to cope with any sort of manual data correction and the system was an absolute core system upon which several departments completely depended. These were systems that all departments are in from the moment they start the work day to the end. Generally its unusual if they are down for more than 5 minutes in a month, all work pretty much stops when they stop and in no circumstances could they be down for more than a day without special dispensation and coordination to indicate to manage customer expectations.

    The whole project was a success although it was challenging. Here is an outline of the steps we took. As ever order here is important in most of the steps. I had written something on this before but consider this to be a more accurate rundown see here

    Step 1
    Inform managers of all involved sections and ensure they are on board – identify and ring fence budget

    Step 2
    Appoint project manager on vendor and client side
    draw together team to perform transformation.

    Step 3
    Draft time table creation of how long it will take putting in place planning for tutorials on systems and consultancy.

    Step 4
    Request managers to put forward staff on all sides willing to be involved

    Step 5
    Identify any omissions in knowledge and start to identify how this can be remedied. Kick off and complete acquisition of said staff.

    Step 6
    Meeting with lead staff to confirm buy in. Request buy in from staff including ring fencing of holidays etc.. to ensure key staff are available at required times.

    Step 7
    Set up test systems that all individuals have access to and ensure that the old and new systems can be viewed simultaneously by individuals. Ensure that the domain specialists can identify processes that will be mirrored from the old system to the new system

    Step 8
    Give DBAs or those that will be doing data transfer access to databases of source so that they can start thinking of how they can pull out information.

    Step 9
    Training for all individuals concerned in new systems.

    Step 10
    In new system start tasking individuals with how they are going to do the simple processes – eg register a record approve a record alter a record and get reports out. If possible allow new champions to start to define things like reports.

    Step 11
    Start making up any new lookup fields compared with old lookups and also start tasking individuals with creation of reports and letter that will need to be done.

    Step 12
    Start mapping the data from old system to new system – excel spreadsheets can be used for this that show the data going from the old system and what fields they are going to go into in the new system. Divide this task up between domain users – this step needs to be done after old and new systems are on domain users machines. As part of this the applications in question should expose if possible the table and field names of the source and target fields. With the systems we were involved in this was possible both for the old and new systems.

    For each form on the two systems try to identify the below

    Source table.field Target table.field

    Also get them to map the lookup table values if direct transfer is not possible or if alias id are used in these lookups.

    Source table.field.value=Equivalent.Target table.field.value

    Step 13
    Give both mapping documents to the ETL people to allow them to start writing the queries. It is unlikely that there will be a straight transfer across from table to table. While it would be expected that field and table names will be completely different it will be expected that table structure will in certain places be different in this respect it would be good to have a really nice schema diagram of both source and target.

    Step 14
    Allow data individuals to write scripts that can be run live against present initial system – if necessary doesn’t need to be live live could copy every night and then perform on 1 day old database backend – which is what we did. This means work can go on in old system and then at a touch of a button.

    Encourage DBAs to be able to run these scripts every day to ensure that running them for go live is absolutely no issue. Our scripts only took about half an hour to run so this wasn’t an issue. I was personally involved in writing the SQL for those and I had systems in place to cross tab the amount coming into each new table so I could see new records and information from the old system trickling manually into the system and then being transferred.

    Step 15
    Test data input into new system

    Step 16
    Check test data input into new system with reference to domain users.

    Step 17
    Confirm go live date ensure staff available for issues

    Step 18
    Go live to production and start all new procedures ensure staff technical and domain key players on hand to make flexible solutions to things

    Step 19
    Project review on going maintenance and improvement of new system

    Step 20
    After suitable time turn off of old system if possible.