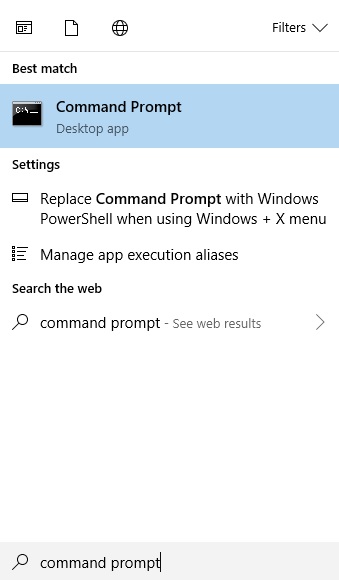
Go to the command prompt and navigate to the following directory
c:\Users\Mark\AppData\Roaming\Postgresql\
and either find or create a file called
psqlrc.conf
This is a simple text file that you can edit or create in notepad.
--------------------------
--psqlrc set preferences--
-- Author Mark Brooks --
--------------------------

\set QUIET 1

\x auto
\timing
\set COMP_KEYWORD_CASE upper

\pset border 2
\pset pager off
\pset null <NULL>
\setenv editor 'C:\\Program Files (x86)\\Notepad++\\notepad++.exe'
\set VERBOSITY verbose

\set QUIET 0

\echo 'Welcome to PostgreSQL \n'
\echo 'Type :version to see PostgreSQL version \n'
\echo 'Type :extensions to see the available extensions'

\set version 'SELECT version();'
\set extensions 'select * from pg_available_extensions;'
This allows you for instance to set up which editor will appear when you perform the \e command
This is a working example of how it would be possible to set up code that would automatically allocate for example housing sites to School Catchment areas. It could also be used to list constraints relevant to particular housing sites. This is more complicated in that it will indicate what percentage of the housing site is within which catchment areas and therefore allows for a single housing site being in multiple catchment areas. I am planning on coming back and expanding on this post. In this respect it represents a refinement of this Post
So we need two tables
t001asites which has a geometry field called geom
and another table which will be the catchments table called
t002bcatchments which has a geometry field called geom.
Both tables must have a serial primary key of pkid and both tables must be polygon data and the geom field MUST be defined as polygon and NOT multipolygon.
Air code is as follows.
1. Create table containing digitised polygons of housing sites.
2. Create table containing digitised polygons of catchments.
3. Measure the area of the housing sites and place that value in an area column within the housing sites table t001asites.
4. Split the housing sites by the catchment boundaries ensuing that each split polygon inherits the catchment it was split by.
5. Re-measure the areas of these split sites and add an area column to store the new calculations.
6. Divide figure obtained in 5. by figure obtained in 3 which will indicate the proportion of the housing site is in which catchment.
7. Perform a least remainder method on the individual sites grouped by their original housing sites to ensure the proportions sum to 1.
So to the code
BEGIN;
SET LOCAL check_function_bodies TO FALSE;
CREATE OR REPLACE FUNCTION part01catchjunctionmaker() returns void as $$
Alter table t001asites add column area integer;
$$ LANGUAGE SQL;
CREATE OR REPLACE FUNCTION part02catchjunctionmaker() returns void as $$
Update t001asites set area=ST_Area(geom);
$$ LANGUAGE SQL;
CREATE OR REPLACE FUNCTION part022catchjunctionmaker() RETURNS void AS $$
DROP TABLE IF EXISTS t200;
$$ LANGUAGE SQL;
CREATE OR REPLACE FUNCTION part03catchjunctionmaker() RETURNS void AS $$
CREATE TABLE t200 AS select a.pkid as t001pkid, b.pkid as t002pkid, a.area as t001area, ST_intersection(a.geom, b.geom) as geom FROM t001asites a, t002bcatchments b;
$$ LANGUAGE SQL;
CREATE OR REPLACE FUNCTION part04catchjunctionmaker() RETURNS void AS $$
ALTER TABLE t200 add column pkid serial primary key, add column area integer,add column proportion decimal (10,9);
$$ LANGUAGE SQL;
CREATE OR REPLACE FUNCTION part06catchjunctionmaker() RETURNS void AS $$
UPDATE t200 SET area=ST_Area(geom);
$$ LANGUAGE SQL;
CREATE OR REPLACE FUNCTION part07catchjunctionmaker() RETURNS void AS $$
DELETE from t200 where area=0 or null;
$$ LANGUAGE SQL;
CREATE OR REPLACE FUNCTION part08catchjunctionmaker() RETURNS void AS $$
UPDATE t200 SET proportion= cast(area as decimal)/cast(t001area as decimal) WHERE area > 0;
$$ LANGUAGE SQL;
CREATE OR REPLACE FUNCTION part088catchjunctionmaker() RETURNS void AS $$
DROP table IF EXISTS t201;
$$ LANGUAGE SQL;
CREATE OR REPLACE FUNCTION part09catchjunctionmaker() RETURNS void AS $$
Create table t201 as Select pkid,t001pkid,t002pkid, t001area, area, proportion, sum(proportion) OVER (PARTITION BY t001pkid ORDER BY t001pkid, proportion) as cum_proportion FROM t200 ORDER BY t001pkid, proportion;
$$ LANGUAGE SQL;
CREATE OR REPLACE FUNCTION part10catchjunctionmaker() RETURNS void AS $$
Alter table t201 add column value decimal (14,9),
Add column valuerounded integer,
Add column cumulvaluerounded integer,
Add column prevbaseline integer,
Add column roundproportion integer;
$$ LANGUAGE SQL;
CREATE OR REPLACE FUNCTION part11catchjunctionmaker() RETURNS void AS $$
UPDATE t201 set value = proportion * 100;
$$ LANGUAGE SQL;
CREATE OR REPLACE FUNCTION part12catchjunctionmaker() RETURNS void AS $$
UPDATE t201 set valuerounded = round(value,0);
$$ LANGUAGE SQL;
CREATE OR REPLACE FUNCTION part13catchjunctionmaker() RETURNS void AS $$
update t201 set cumulvaluerounded = round((cum_proportion*100),0);
$$ LANGUAGE SQL;
CREATE OR REPLACE FUNCTION part14catchjunctionmaker() RETURNS void AS $$
update t201 set cumulvaluerounded=100 where cumulvaluerounded = 101;
$$ LANGUAGE SQL;
CREATE OR REPLACE FUNCTION part15catchjunctionmaker() RETURNS void AS $$
update t201 set prevbaseline = round((cum_proportion - proportion)*100);
$$ LANGUAGE SQL;
CREATE OR REPLACE FUNCTION part16catchjunctionmaker() RETURNS void AS $$
update t201 set roundproportion = (cumulvaluerounded-prevbaseline);
$$ LANGUAGE SQL;
CREATE OR REPLACE FUNCTION part17catchjunctionmaker() RETURNS void AS $$
DELETE from t201 where roundproportion=0 or null;
$$ LANGUAGE SQL;
CREATE OR REPLACE FUNCTION part18catchjunctionmaker() RETURNS void AS $$
alter table t201 add column proppercent decimal(3,2);
$$ LANGUAGE SQL;
CREATE OR REPLACE FUNCTION part19catchjunctionmaker() RETURNS void AS $$
update t201 set proppercent = cast(roundproportion as decimal)/100;
$$ LANGUAGE SQL;
COMMIT;
and now a function to pull it all together;
CREATE OR REPLACE FUNCTION createcjt()
RETURNS TEXT AS
$BODY$
BEGIN
PERFORM part01catchjunctionmaker();
PERFORM part02catchjunctionmaker();
PERFORM part022catchjunctionmaker();
PERFORM part03catchjunctionmaker();
PERFORM part04catchjunctionmaker();
PERFORM part06catchjunctionmaker();
PERFORM part07catchjunctionmaker();
PERFORM part08catchjunctionmaker();
PERFORM part088catchjunctionmaker();
PERFORM part09catchjunctionmaker();
PERFORM part10catchjunctionmaker();
PERFORM part11catchjunctionmaker();
PERFORM part12catchjunctionmaker();
PERFORM part13catchjunctionmaker();
PERFORM part14catchjunctionmaker();
PERFORM part15catchjunctionmaker();
PERFORM part16catchjunctionmaker();
PERFORM part17catchjunctionmaker();
PERFORM part18catchjunctionmaker();
PERFORM part19catchjunctionmaker();
RETURN 'process end';
END;
$BODY$
LANGUAGE plpgsql;
Next within explorer I create a directory in the c:\ root called data.
And then I create two subdirectories.
1 – shp
2 – sql
Place all the shape files you wish to be loaded into a postgis database into the newly created c:\data\shp directory.
Next we will make sql text files that can be used to transfer the information from shape format into Postgis. At this point it is not necessary to even know what database you are going to place the shape files into.
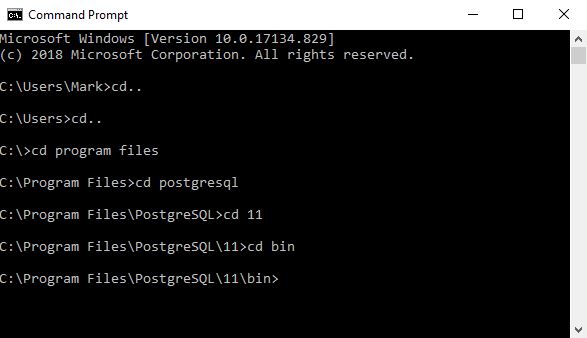
Next open up the command prompt and navigate to the bin directory of your particular postgres installation. Standard as follows :-
Next I copy in the below text.
For %f in (C:\data\shp\*shp) do Shp2pgsql –s 27700 %f public.%~nf > C:\data\sql\%~nf.sql
This will take all the shape files in the C:\data\shp\ directory and create sql text files placing them in the C:\data\sql\. After completion you may wish to go to the directory and check that creation has occurred. You can even look at the text within a single file preferably with some kind of code editor to check that it looks approximately correct.
Next within psql I create the target database and apply the postgis extension.
create database osopenroaddb;
create extension postgis;
Next, unless you have a lot of time on your hands you will want to go to the
C:\Users\Mark\AppData\Roaming\postgresql
and open up the pgpass.conf file and place the following line in it.
localhost:5432:*:postgres:yoursecretpassword
Without that line you will be asked for a password everytime a new sql file is run.
Next back in command prompt bin directory do the following. Note no password it takes it from the pgpass.conf file.
For %f in (c:\data\sql\*sql) do psql –h localhost –d osopenroaddb –U postgres –f %f > nul
If you have a lot of big files this could take a while to run. But once finished all your shape files should now be in your postgis instance in the specified database.
Demonstration environment and programs
Windows 10
Postgres Version : 11.2
QGIS desktop version : 3.4.4
My working through of a process to export a single database (structure and data) from a Postgres Instance, the database has PostGIS and pgrouting extensions enabled, followed by importing into in this example the same instance but in principle could be a different instance.
Access the command prompt (RUN AS ADMINISTRATOR)
PLEASE NOTE run the command prompt as administrator or you will get frequently get an ACCESS DENIED message after using pg dump command.
Navigate to the directory of the PostgresVersion from which you wish to export the database. This will typically be the bin subdirectory of the version of your postgres ( here 11 ). You can ensure that pg_dump.exe is here if you do a dir on the directory to reveal alternatively you could reference the full path to pgdump and then pass the parameters to it subsequently.
eg
Next place in the parameters of the database what database you wish to export along with the name that you want to call the exported file and then hit return.
Hitting return depending on the security of your instance you will be prompted for a password.
Enter the password hit return
When I do this on my home computer there is no return message but going into the C drive I can see that dbexport.pgsql now exists.
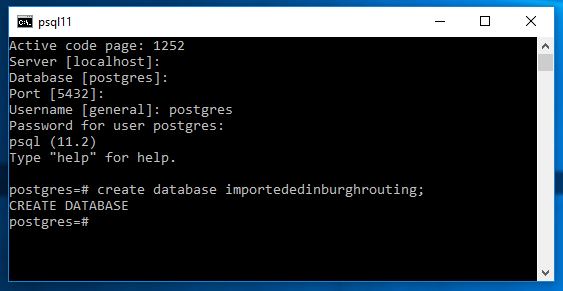
Next we want to create a blank database this is required to import the data and structure into.
This we do in psql signed in as a user with sufficient privelege.
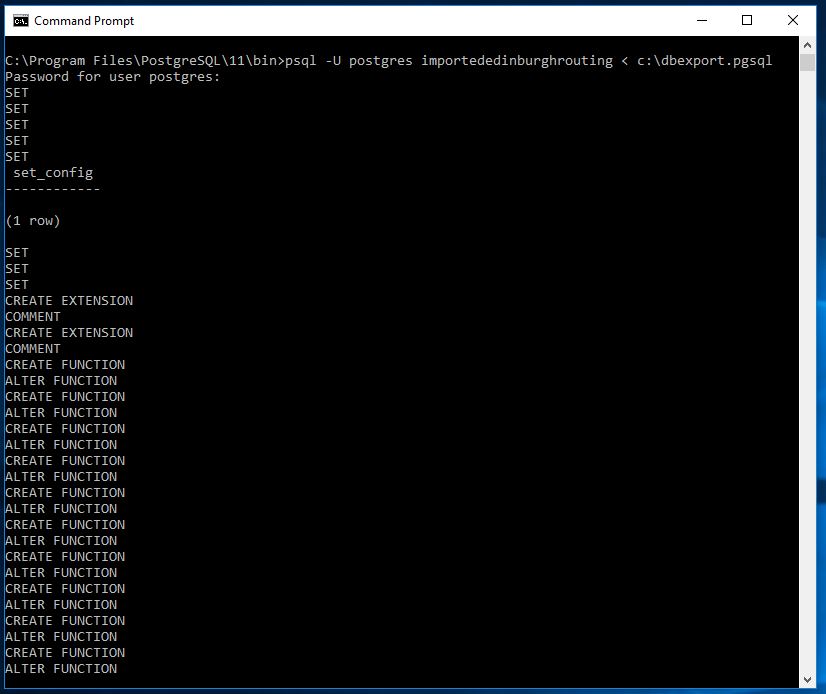
Now back in the command line running as administrator we can run the following.
Pressing return depending on your security you should be asked for your password.
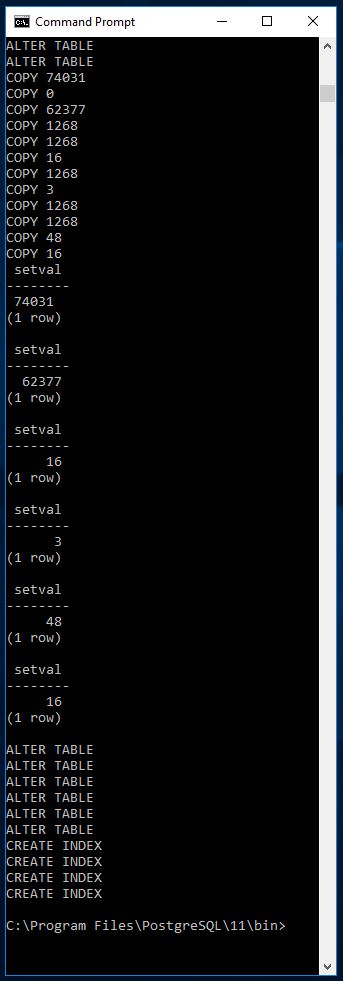
Once this is done it goes through a process of recreating the structure of the database then importing all the data
For me the first lines look like this
and the last look like this
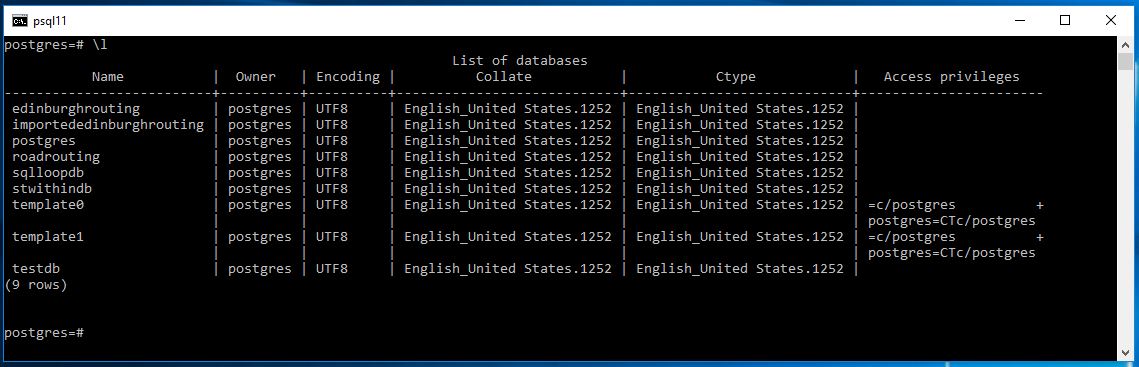
Now looking at the instance as a whole we can see the imported database
and here I am displaying geographical information through QGIS to get an idea of the data and ensure that it appears to be all correct.
SUMMARY
There are quite a lot of tutorials online on how to do this but most seem to skip over some details - I've tried to be as accurate as possible but depending on you setup there may be differences. Nonetheless this is an extremely important task to perform so worth practicing to get right.
A function that will loop through an access database and export all tables to csv and xls.
Useful for subsequent import through QGIS into Postgres.
Public Function ExportAll()
Dim obj As AccessObject, dbs As Object
Dim strFolder As String
strFolder = "c:\"
Set dbs = Application.CurrentData
For Each obj In dbs.AllTables
If Left(obj.Name, 4) <> "MSys" Then
DoCmd.TransferText acExportDelim, , obj.Name, strFolder & obj.Name & ".csv", True
DoCmd.TransferSpreadsheet acExport, acSpreadsheetTypeExcel9, obj.Name, strFolder & obj.Name & ".xls", True
End If
Next obj
End Function
If using the dijkstra function with direction turned on it is important to identify the order in which the nodes of a vector line have been digitised. This is called the direction, dijkstra can use this with a reverse_cost attribute to handicap wrong movement along lines to such an extent that the correct path can be calculated around things like roundabouts.
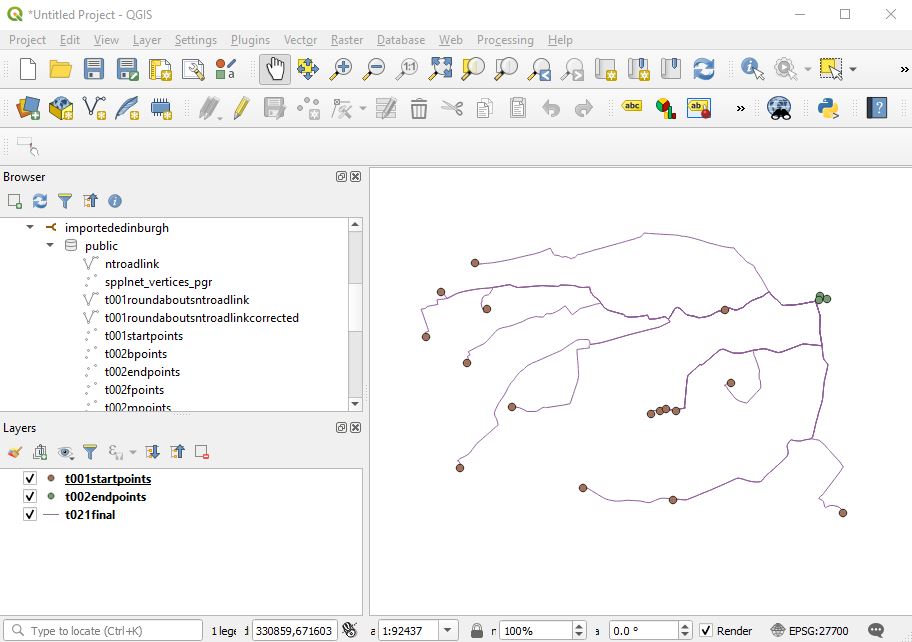
Here is an example of the roundabout in Straiton in Edinburgh just North of the A720 bypass. While some of the lines have a correct anti clockwise orienation clearly some have been incorrectly digitised.
First we can see this by displaying the network in QGIS but using the styling to arrow the direction.
The function that can be used to reverse such inaccuracies if you can’t resort to buying a correct dataset try ST_REVERSE
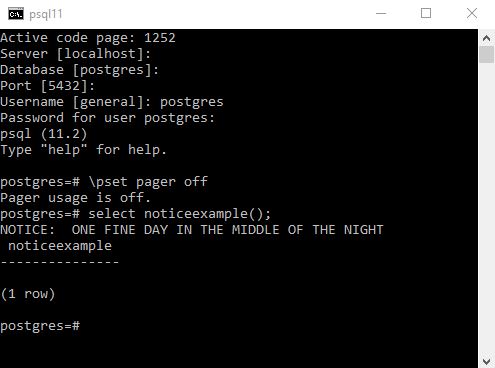
RAISE NOTICE can provide the same function as Message Box in VBA ie you can use it to comment on the progress of a script. RAISE NOTICE is not supported by SQL so you can’t place it in scripts containing SQL they need to be in plpgsql scripts. This isn’t too much of a hassle as the way I am working at the moment I am calling the SQL anyway from plpgsql so I can place my message boxes in there.
No VBA Ok buttons.
CREATE OR REPLACE FUNCTION noticeexample() returns void as $$
BEGIN
RAISE NOTICE 'ONE FINE DAY IN THE MIDDLE OF THE NIGHT';
END;
$$
LANGUAGE PLPGSQL;
When creating a topology the geometry field cannot contain a Z coordinate.
OK but the Ordnance Survey Open Data highways layers containse a Z coordinate. Previously I had stripped this out using the latest version of QGIS which has a tick box in the front end that allows for import stripping of the z coordinate in the process. If you don’t have access to the latest QGIS version how can you strip out the z coordinates.
ST_FORCE2D
ALTER TABLE public.nuroadlink ADD COLUMN geom2(multilinestring,27700);
UPDATE public.nuroadlink SET geom2 = ST_FORCE2D(public.nuroadlink.geom);
ALTER TABLE public.nuroadlink drop column geom;
ALTER TABLE public.nuroadlink RENAME COLUMN geom2 TO geom;
I had assumed after I had created a working SQL Script I would just be able to wrap the whole thing easily into a function and then bang it would be off to the races.
My script really needed to be run in order and for some as yet undefined reason I was getting particular errors where a table would be created and then a following query would add or alter that table. It looked like the second query was trying to adapt the table prior to its creation with an inevitable error.
I managed to get it working by making each SQL Query a function and then scripting the functions consecutively in a separate function using the PERFORM instruction.
I incorporate into this the check_function_bodies switch which just allows the creation of sql referring to objects that may not be in existence yet.
BEGIN;
SET LOCAL check_function_bodies TO FALSE;
CREATE OR REPLACE FUNCTION query01() returns void as $$
CREATE TABLE t001start
(
pkid serial primary key,
geompkidt001 geometry(point,27700)
);
$$ LANGUAGE SQL;
CREATE OR REPLACE FUNCTION query02() returns void as $$
CREATE TABLE t002end
(
pkid serial primary key,
geompkidt002 geometry(point,27700)
);
$$ LANGUAGE SQL;
COMMIT;
And then subsequently I create a function that runs the functions.
CREATE OR REPLACE FUNCTION runallthequeries()
returns text as
$BODY$
BEGIN
PERFORM query01();
PERFORM query02();
RETURN 'process end';
END;
$BODY$
LANGUAGE plpgsql;
Now lets go to QGIS connect to the PostGIS instance add the tables and create some test data manually.
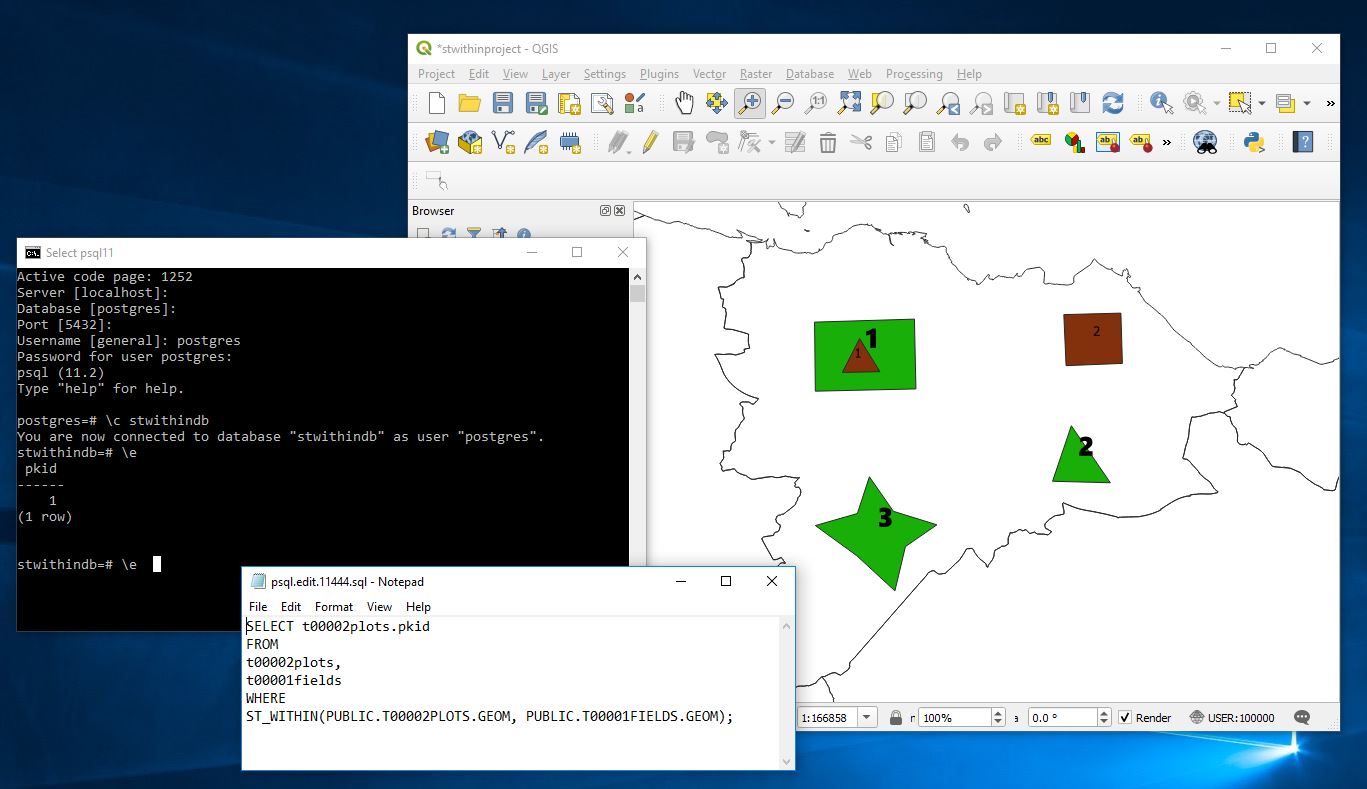
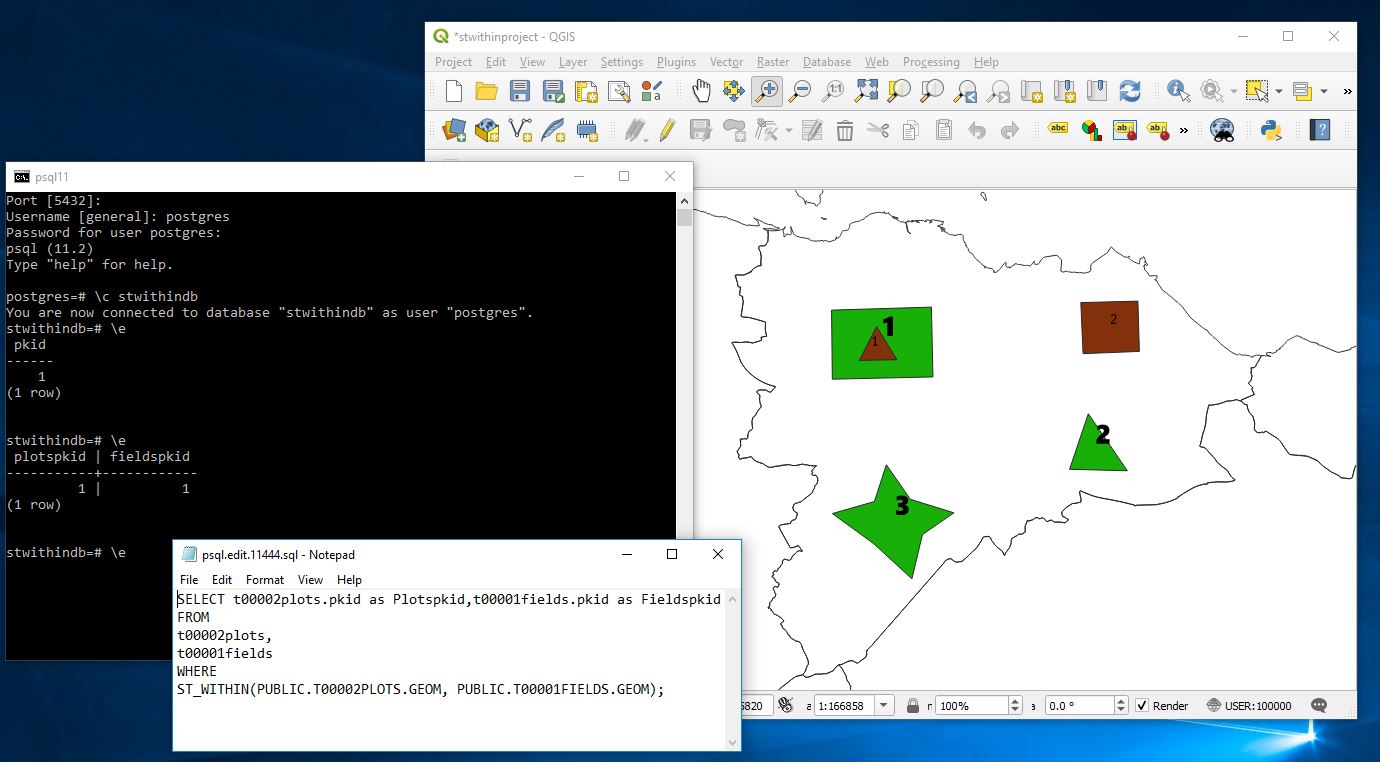
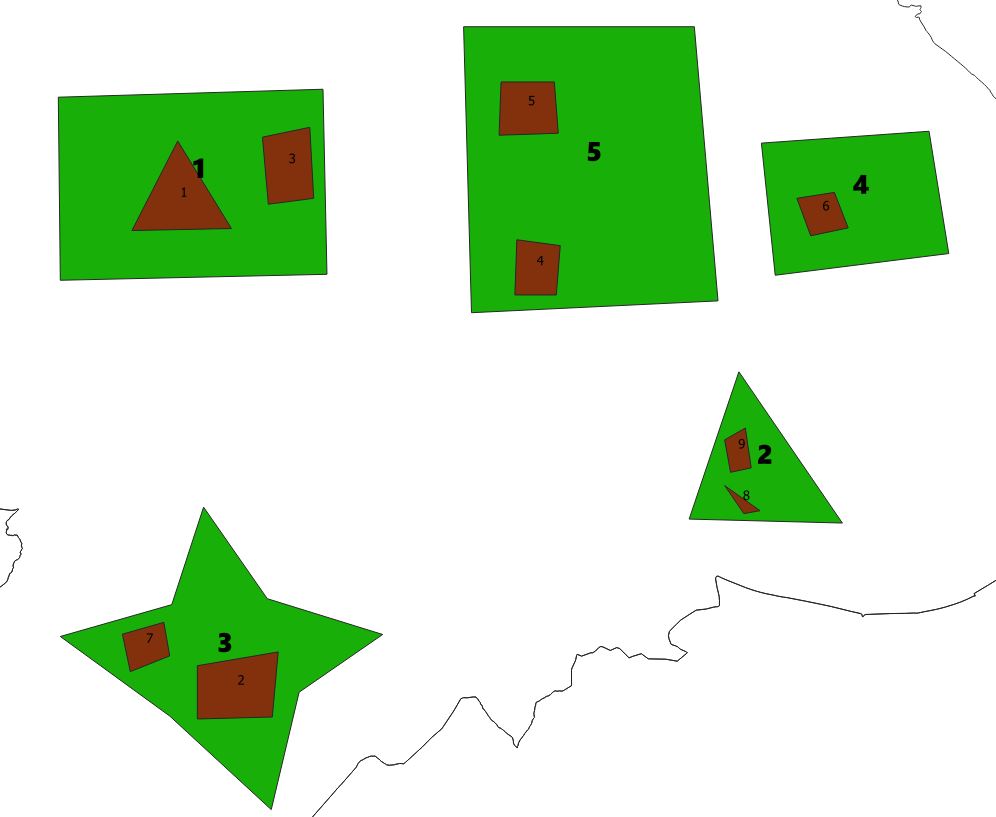
Here I have added fields in green with bold number labels and plots in brown with smaller number labelling. The numbers represent the pkid fields.
Now here I can quickly run a query to identify the plots that are in fields
SELECT t00002plots.pkid
FROM
t00002plots,
t00001fields
WHERE
ST_WITHIN(PUBLIC.T00002PLOTS.GEOM, PUBLIC.T00001FIELDS.GEOM);
And it correctly identifies that plot 1 is within the fields layer.
But what would be great in an application is to have some kind of junction table that individual master records could display their children on. For this we need a junction table that links between the field and plots table showing the pkids from each.
SELECT t00002plots.pkid as Plotspkid,t00001fields.pkid as Fieldspkid
FROM
t00002plots,
t00001fields
WHERE
ST_WITHIN(PUBLIC.T00002PLOTS.GEOM, PUBLIC.T00001FIELDS.GEOM);
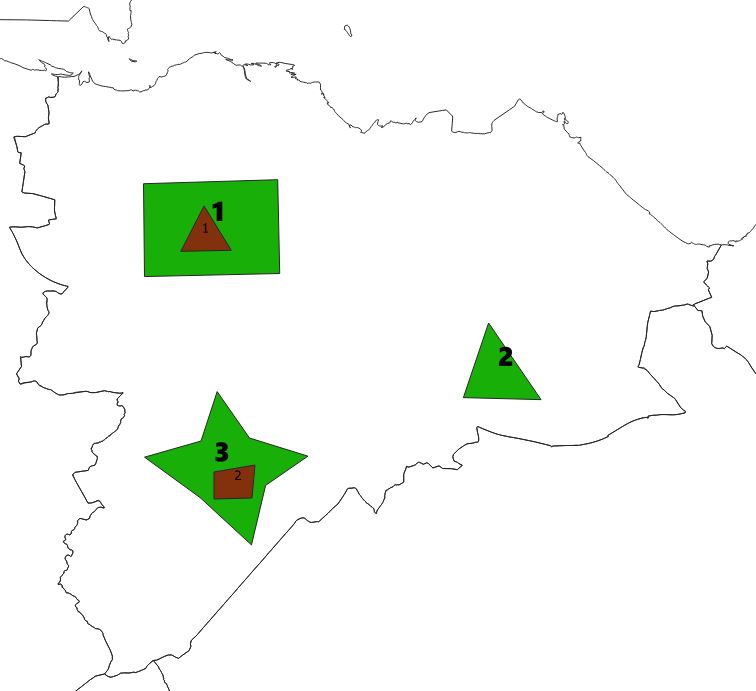
Now I will move plot 2 into field 3 and rerun the above.
The layer now looks like
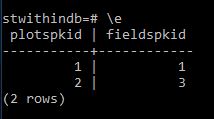
and running the former query we get.
Now its possible to either create a junction table to hold this information..
eg
CREATE TABLE t00010fieldplotjunction AS
SELECT t00002plots.pkid as Plotspkid,t00001fields.pkid as Fieldspkid
FROM
t00002plots,
t00001fields
WHERE
ST_WITHIN(PUBLIC.T00002PLOTS.GEOM, PUBLIC.T00001FIELDS.GEOM);
or we can create a view that will constantly calculate this everytime it is seen
CREATE VIEW v001FieldPlotJunction AS
SELECT t00002plots.pkid as Plotspkid,t00001fields.pkid as Fieldspkid
FROM
t00002plots,
t00001fields
WHERE
ST_WITHIN(PUBLIC.T00002PLOTS.GEOM, PUBLIC.T00001FIELDS.GEOM);
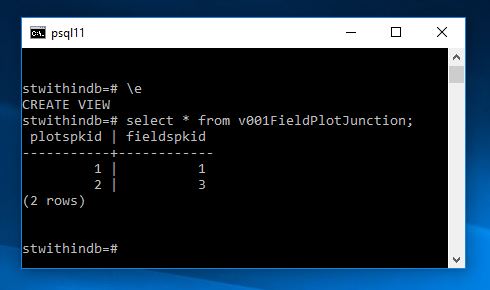
Now if I add a few more plots and fields and then pull up the view we shall see that everything has been adjusted
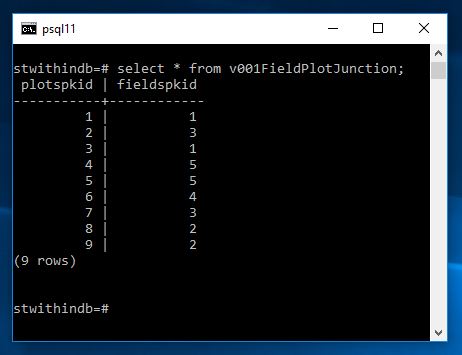
and running the view we now get
In some circumstances this calculation may be expensive so we may wish to run and create a junction table overnight other times we may be happy to do it fully dynamically. Of course in a front end you could query and filter such that only one record was compared against the fields plot at anytime. Very useful nonetheless.
I wanted to be able to run thousands of queries or hundreds from Postgres like I can in MS Access this didn’t turn out to be too difficult.
Here’s something that works firstly lets create a new database
CREATE DATABASE sqlloopdb;
You will then need to connect to the database.
Next I will create 2 tables with; One table to be called t001sqltarget – this is the table we shall change with queries. One table called t002sqlrun – this will contain queries that we will run.
Please note the field names are important as well but I will let you study them in the code.
I then have 4 inserts that place valid SQL strings into the field sqltorun.
CREATE TABLE t001sqltarget (pkid serial primary key, fieldforupdate varchar(1));
CREATE TABLE t002sqlrun (pkid serial primary key, sqltorun varchar(1000));
INSERT INTO t002sqlrun(sqltorun) values ('INSERT INTO t001sqltarget(fieldforupdate) values (1);');
INSERT INTO t002sqlrun(sqltorun) values ('INSERT INTO t001sqltarget(fieldforupdate) values (2);');
INSERT INTO t002sqlrun(sqltorun) values ('INSERT INTO t001sqltarget(fieldforupdate) values (3);');
INSERT INTO t002sqlrun(sqltorun) values ('INSERT INTO t001sqltarget(fieldforupdate) values (4);');
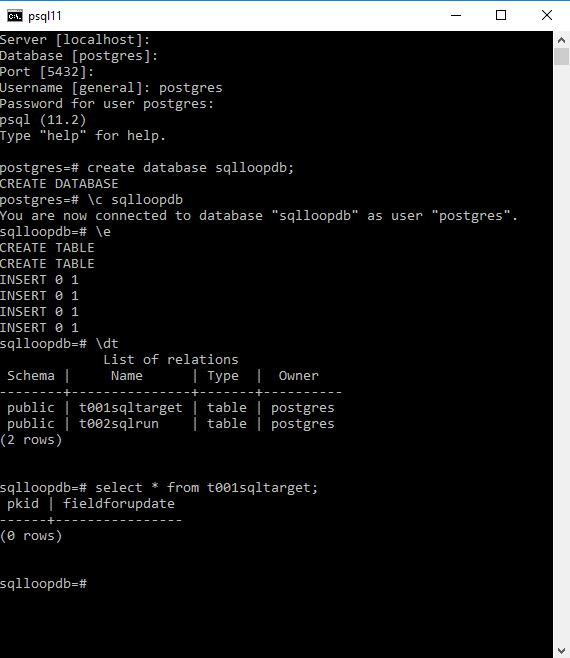
First lets run the above and see what we have. Below you can see that I create the database then connect to it before opening the editor from which I run the above code I then take a look at the tables in the database and run a select to return all the records within the t001sqltarget table of which there are none.
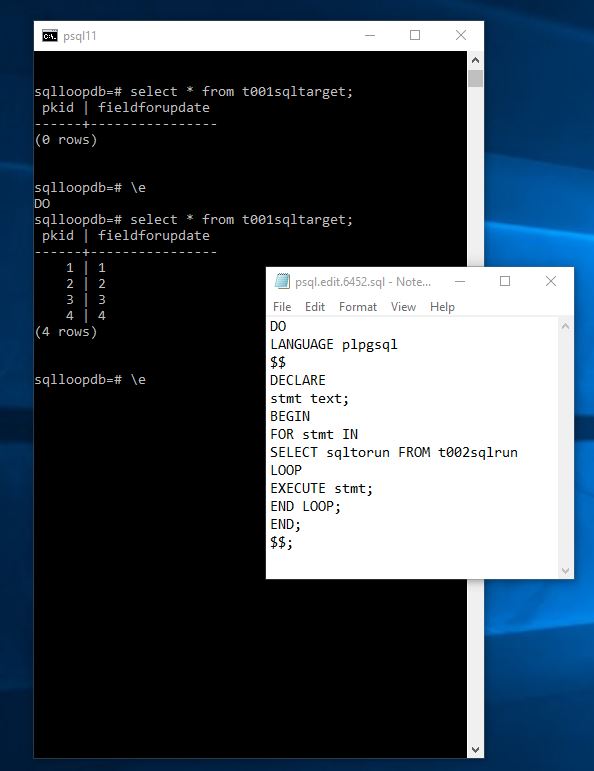
Now lets run the following code and then take a look at t001sqltarget.
DO
LANGUAGE plpgsql
$$
DECLARE
stmt text;
BEGIN
FOR stmt IN
SELECT sqltorun FROM t002sqlrun
LOOP
EXECUTE stmt;
END LOOP;
END;
$$;
And after running there are 4 lines in the table
Every time I run the Do code four more records will be added to this table. Any SQL could be included in t002sqlrun and this is a nice demonstration of what I had previously able to do in MS Access and is massively powerful. It could be used for instance to calculate multiple measurements.
Objective here is to write a series of queries that can be used to measure the shortest distance between selected paired locations on a network such that the geometry of the routes can be calculated and displayed on a map.
For this particular tutorial you will need – QGIS 3 or higher and a version of Postgres I am using version 11.0 here (I have upgraded since my former posts). I believe this tutorial will work with previous versions but if you are following along now might be a good time to upgrade.
QGIS 3.4 or higher – needed as the Ordnance Survey road network geometry contains a z coordinate which will prevent the creation of the required geometry for measurement. QGIS 3 introduced the ability to save geometry excluding z coordinate. If you have a network without z coordinates you should not require this.
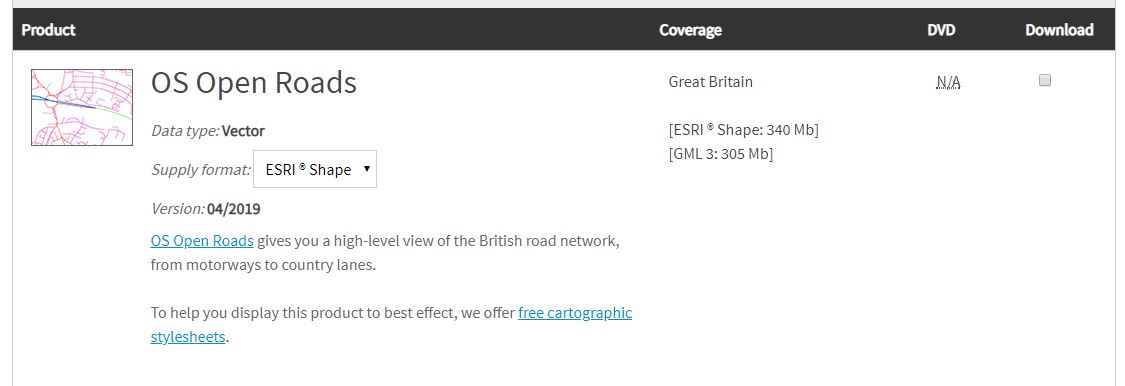
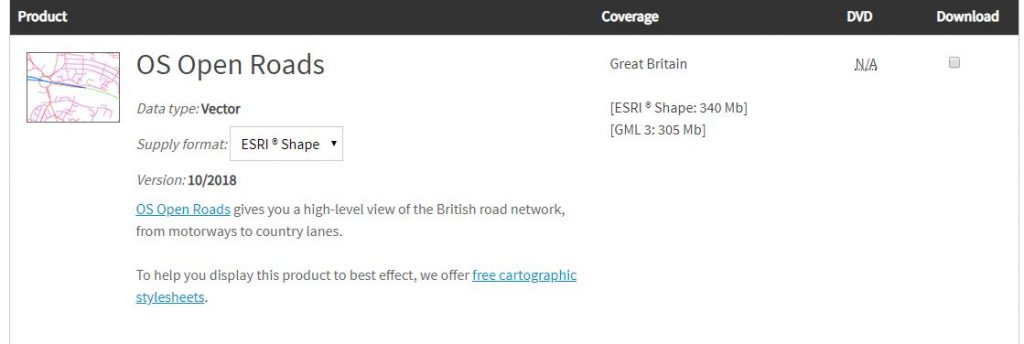
So let us first get the data. Here you tick the option in the top right hand corner – scroll to the bottom and submit your request after which you will be asked a few basic questions along with email address you wish the download to be sent to after a few minutes you should be sent the download link through your email – follow the instructions and you should be able to get the information
The information you are downloading is a block framework for the whole of the uk. When you unzip the download into a folder you will see multiple files. We will be using a section of the national dataset relating to Edinburgh – NT. Choose the block or selection that you are interested in. More blocks may take more time however.
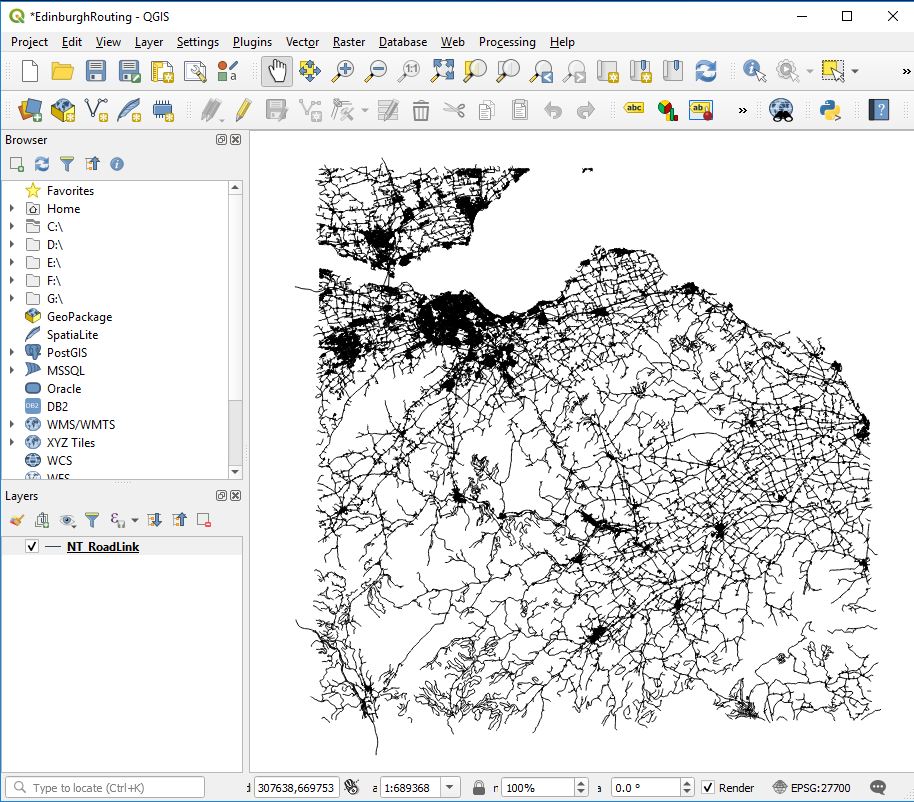
Open QGIS Create a new project : eg EdinburghRouting.qgz Load in your chosen network block : eg NT_RoadLink.shp
Select the layer you just loaded in : eg NT_RoadLink.shp
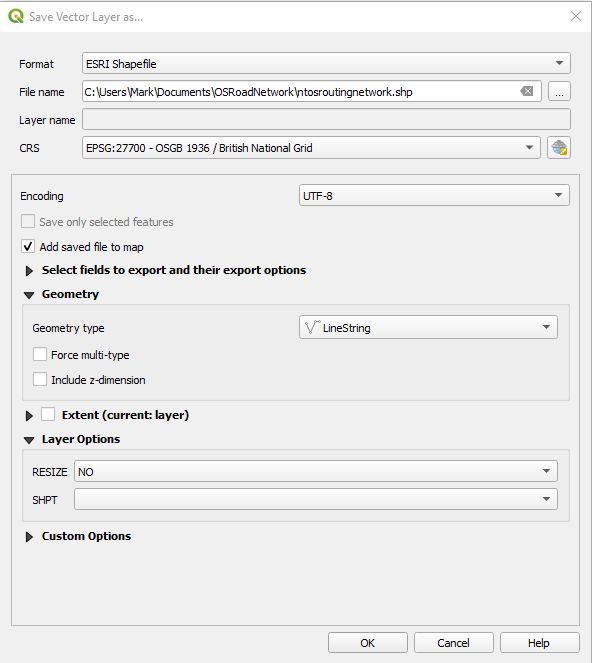
and navigate to the following in the menu settings Layer / Save As
Fill out the Save Vector Layer as … dialog box IMPORTANT – ensure within the Geometry section Geometry type is set to LineString Include z-dimension is unticked
Give the new file a name : eg ntosroutingnetwork.shp
Hit ok
Within the layer dialog of QGIS your new layer should appear you can now remove the for NT_RoadLink shape file from the project
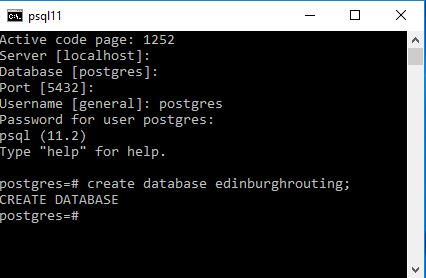
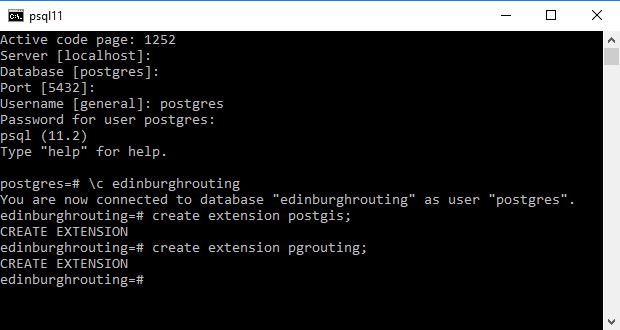
Next go to your version of PostgreSQL and using a superuser account create a new database : eg edinburghrouting
I would suggest you use lower casing as well
As a superuser ensure you add the postgis and pgrouting extensions.
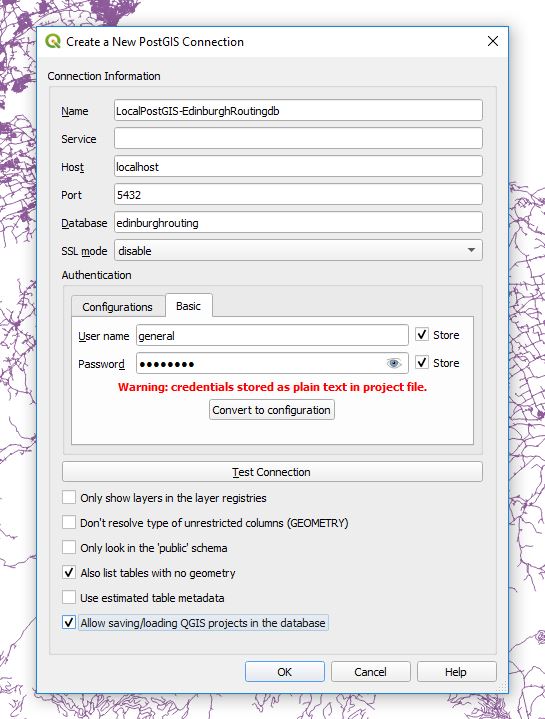
Next I set up the following connection between the QGIS project and PostgreSQL
Personal tastes may vary but I like like to select Also list tables with no geometry Allow saving/loading QGIS projects in the database
OK the selection and you should now have a connection to the new database you just created.
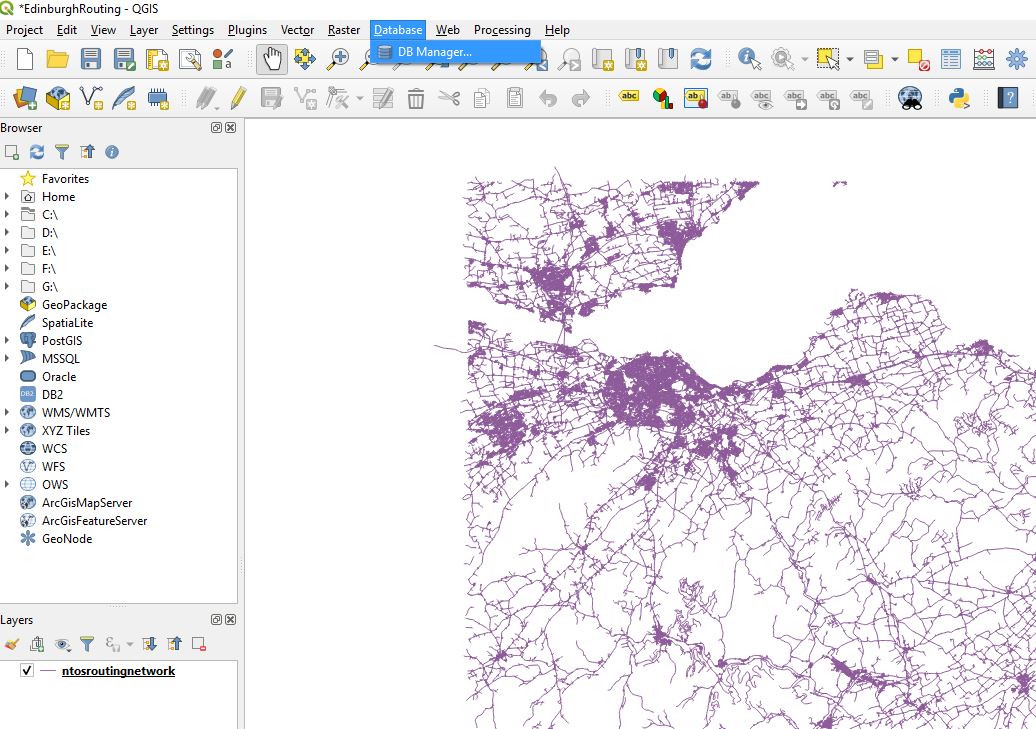
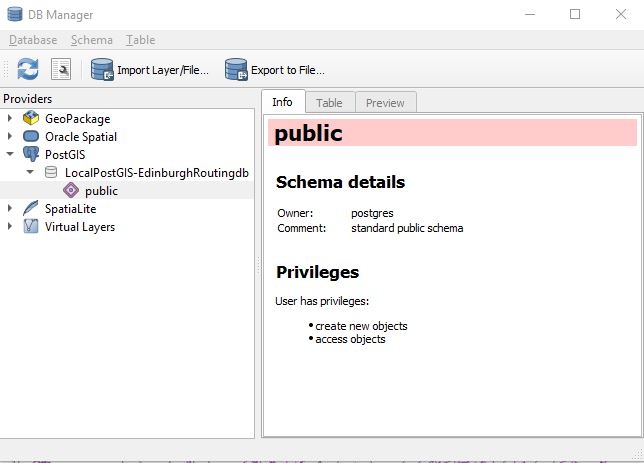
QGIS has an excellent dbmanager window which we will use to load our new shape file which excludes the z layer into the new database we created in PostgreSQL
Ensuring that you have a connection to your localpostgis database hit the
ImportLayerFile
Here I load the information into a new table t01roadnetwork
On pressing OK there will be delay after which if things go well you will receive the following message.
As ever it is good to check that things appear to be going well. Add the layer to your project and determine approximately whether import was successful.
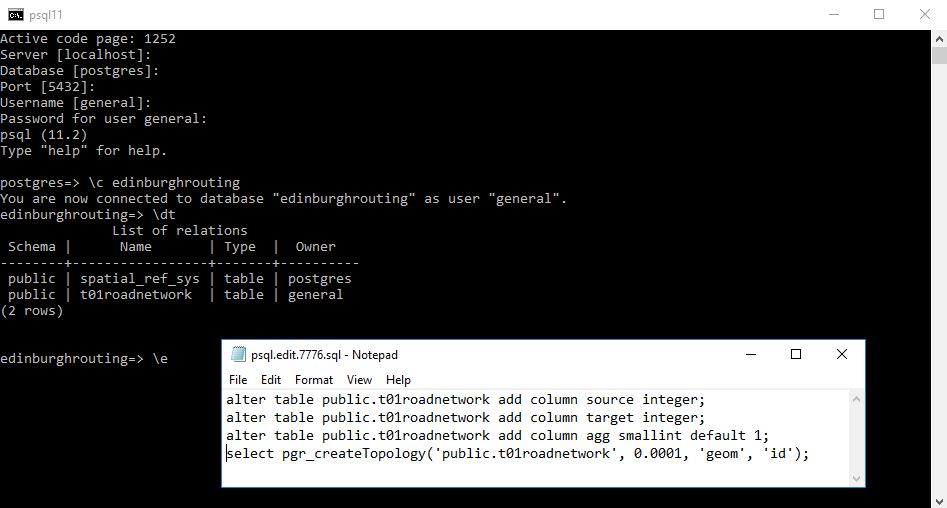
Next back in psql command line and in an editor we are going to run 4 queries The first 2 add columns that are required in the shortest distance algorithm we shall use, the third will allow anyone to write an aggregation function to see the total cost of the route and the last creates a topology for the road network.
alter table public.t01roadnetwork add column source integer;
alter table public.t01roadnetwork add column target integer;
alter table public.t01roadnetwork add column agg smallint default 1;
select pgr_createTopology('public.t01roadnetwork', 0.0001, 'geom', 'id');
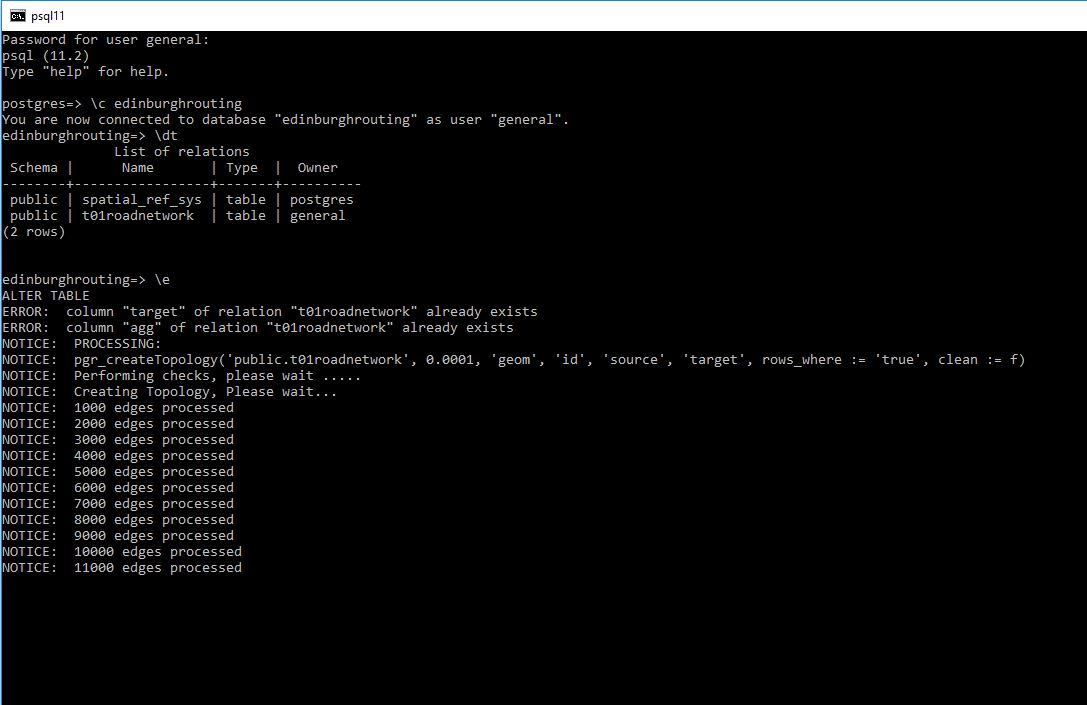
If things go correctly you should see the database engine start to create the topology and what I see is it gradually stepping through the creation process.
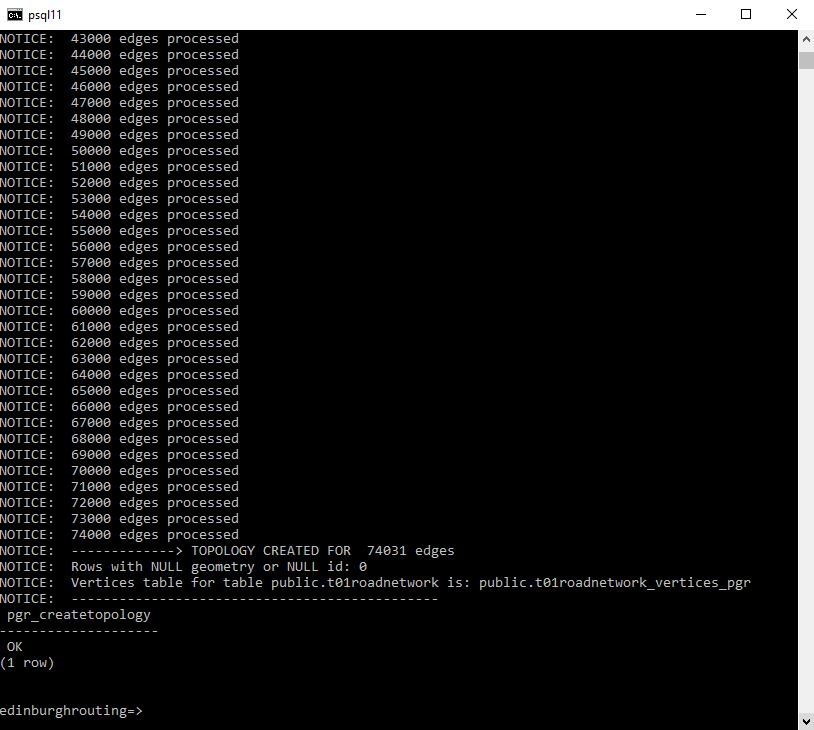
and on completion you should have something like the following:
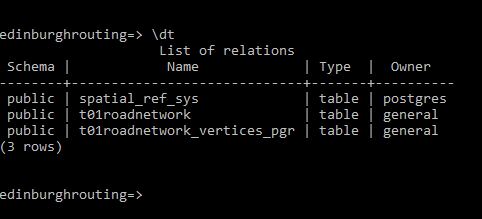
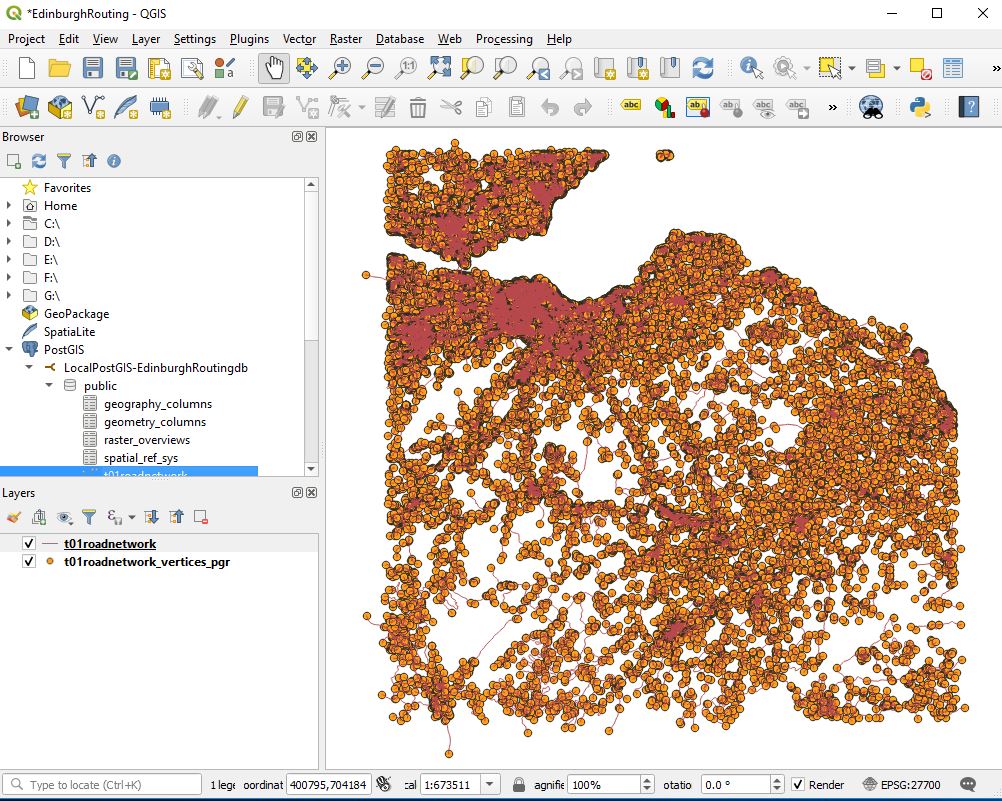
A new table has been added to the edinburghrouting database and next step is to display the network and its vertices. In QGIS.
In QGIS we should see something like
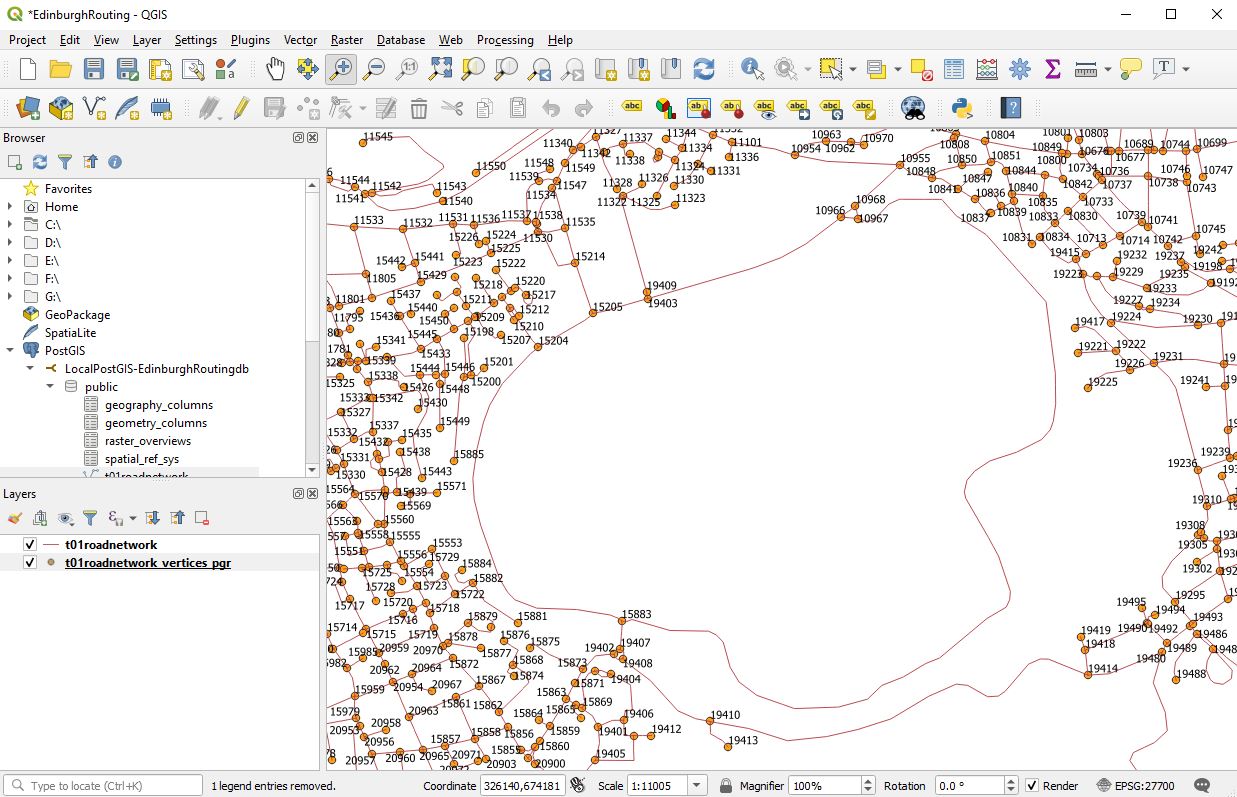
The next thing that I like to do is to label the nodes so that for quick identification.
And look to the t01roadnetwork table and see if the columns are clear and present.
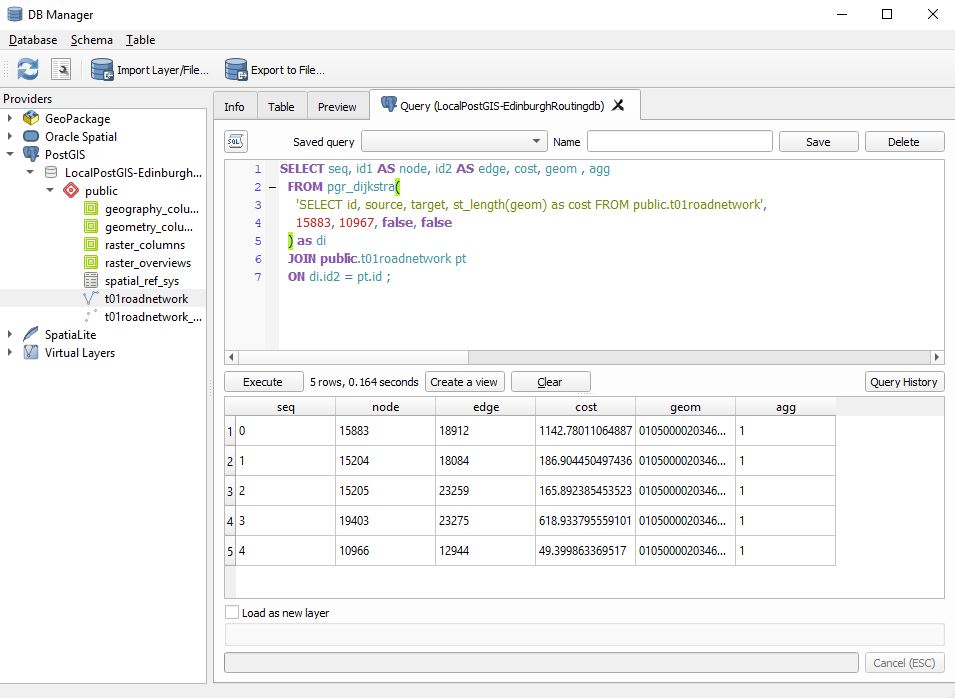
We are now ready to make a measurement. Here I choose the nodes 15883 and 10967
SELECT seq, id1 AS node, id2 AS edge, cost, geom , agg
  FROM pgr_dijkstra(
    'SELECT id, source, target, st_length(geom) as cost FROM public.t01roadnetwork',
    15883, 10967, false, false
  ) as di
  JOIN public.t01roadnetwork pt
  ON di.id2 = pt.id ;
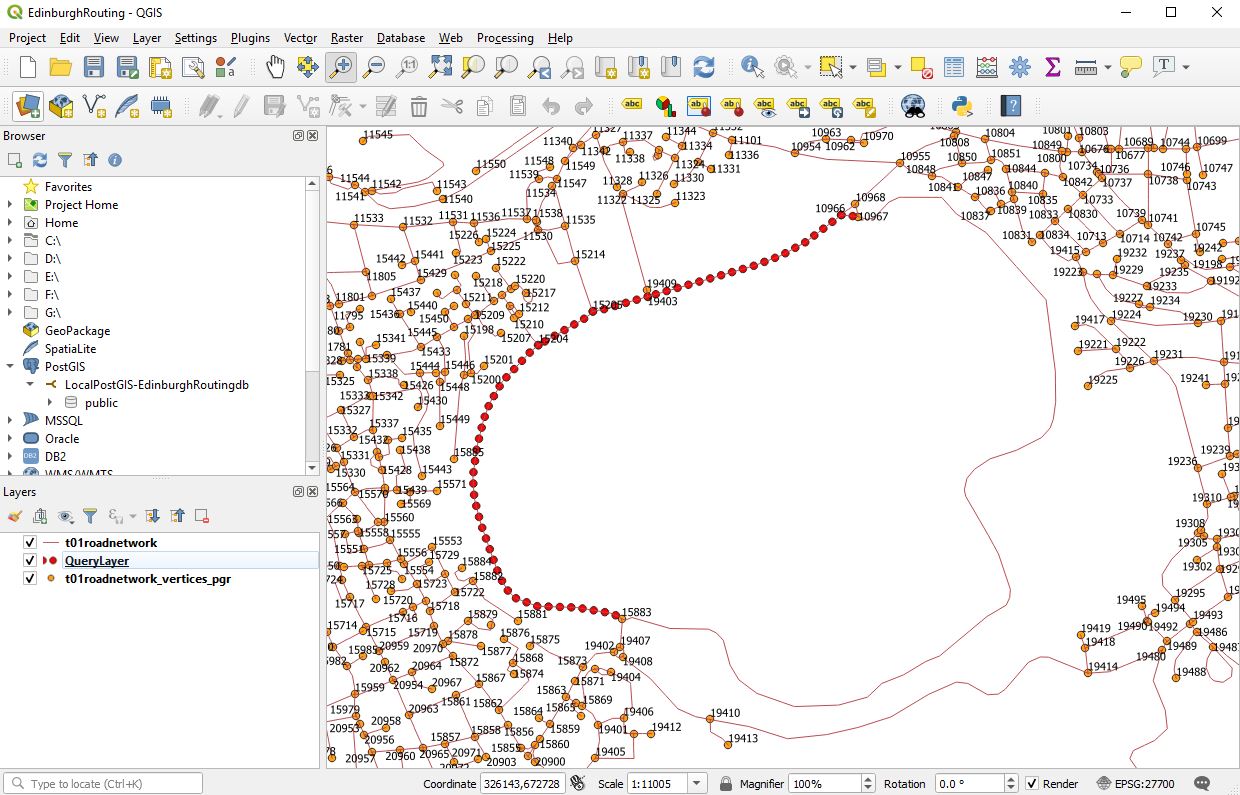
Now we can load this as a new layer and then improve the symbology
Doing this we get.
It should be noted that the line you see is a collection of lines. In my next post I will go through and indicate how we can amalgamate that into a single line for storage in a table.
Congratulations if you have got this far you should be able to measure the shortest distance between any two points on a valid network by altering the numbers.
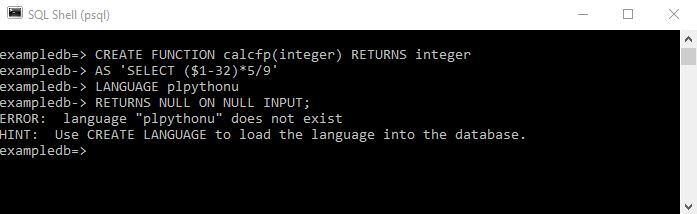
Note: As of PostgreSQL 9.1, most procedural languages have been made into “extensions”, and should therefore be installed with CREATE EXTENSION not CREATE LANGUAGE. Direct use of CREATE LANGUAGE should now be confined to extension installation scripts. If you have a “bare” language in your database, perhaps as a result of an upgrade, you can convert it to an extension using CREATE EXTENSION langname FROM unpackage
As per the nature of recursion a function is a variable is a function.
Previously in 005 and 006 we wrote functions that returned subsets of queries they were effectively dynamic queries where I entered a parameter that was used in a select query. This effectively meant that although the function was returning a variable this was a query of a select statement.
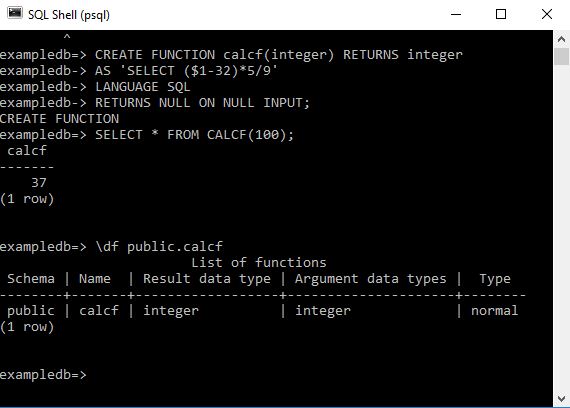
What if we wish just to return a single value as in say translate centigrade to fahrenheit or some other calcuation.
In such case you simply state the function should return a variable and you state the variable type.
eg
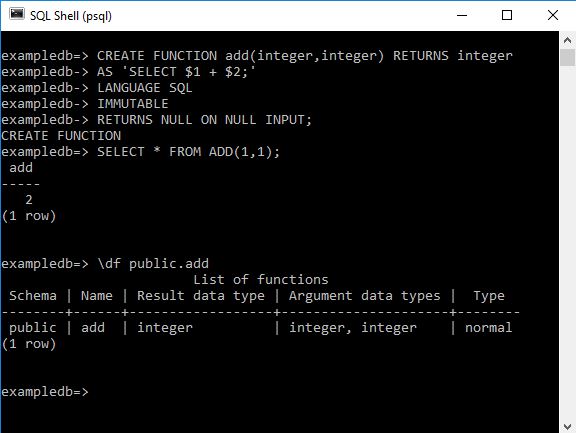
CREATE FUNCTION add(integer,integer) RETURNS integer
AS 'SELECT $1 + $2;'
LANGUAGE SQL
IMMUTABLE
RETURNS NULL ON NULL INPUT;
There are a few interesting things here which should be born in mind
In this case the addition is performed in SQL
I have to specifically name the language of the calculation (SQL) which suggests that if you stated another language it might accept it!
You still need to select the function to run it. This indicates that postgres 9.5 doesn’t executve functions as per some environments (ms access for example) – I have read that version 11 changed this and allows you to execute or perform a function. Ms Access you don’t even need to write execute simply the name of the function with the integers.
Variables are refererred to as to their input position unlike VBA where you dimension the variable and give it a name. I am unclear at the moment the advantages of the former or later but it is interesting nonetheless. I first came across something similar with autohotkey.
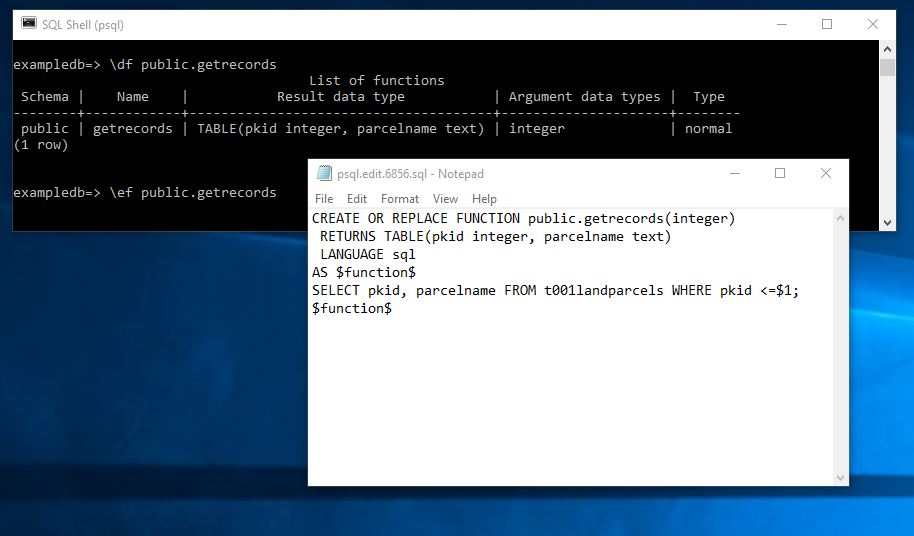
In 005 when last we left our intrepid explorers we were wondering if having defined an inline table that contains the definition of the selection purely in the user defined function how do we see what that selection is as it might not be a presently defined object. SetOF references an object we can execute independently of the function Table() – does not.
Well apparently magically you can run the following.
Like all platforms it is possible to create bespoke functions in Postgres
For the following I assume;
1. Postgres 9.5 is installed with the server running (syntax should be the same for other versions)
2. A database called exampledb has been created
3. In this database there exists table called t001landparcels with some records and a field called PKID
4. You are logged into the exampledb with a username called general that has been granted CREATEDB role.
5. You are in psql
The following can be used to create a simple function
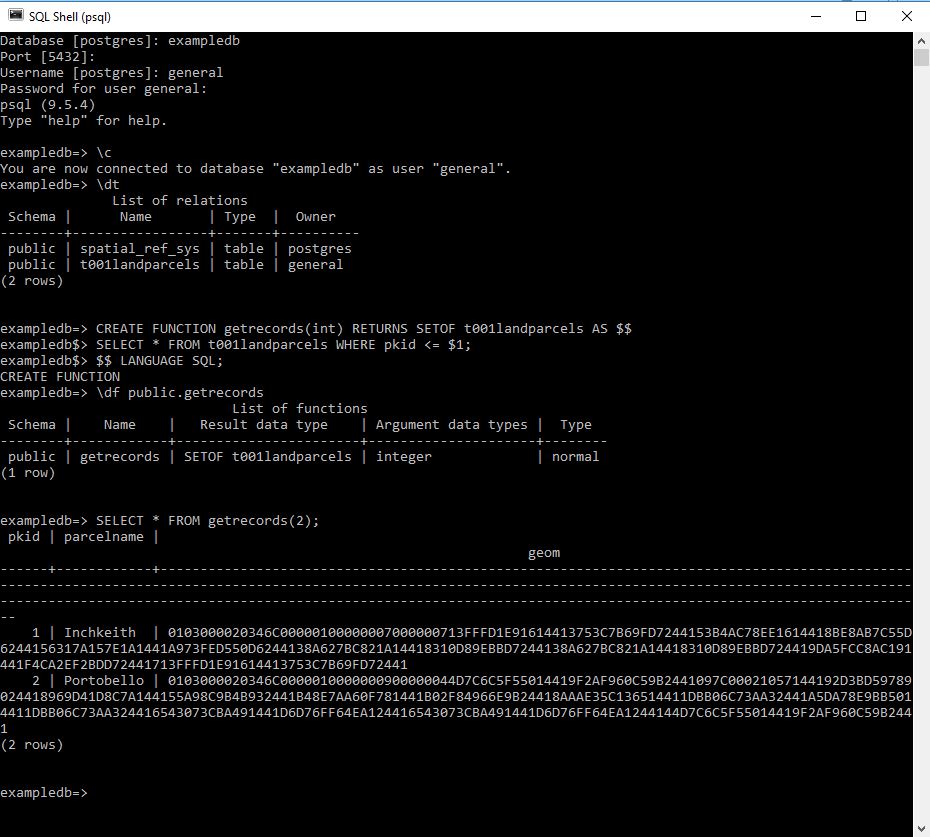
CREATE FUNCTION getrecords(int) RETURNS SETOF t001landparcels AS $$
SELECT * FROM t001landparcels WHERE pkid <= $1;
$$ LANGUAGE SQL;
If you have been careful and done this exactly the same with my initial assumptions it should return
CREATE FUNCTION
This tells us that the functioned has been created this will now exist in the schema the table is as a permanent addition.
We can identify the function by either listing all the functions and scrolling through
\df public.*
or listing the individual function
\df public.getrecords
This should return your newly created function
Now to run the function – unlike MS Access you can’t simply run the function you need to allocate it to a select statement.
SELECT * FROM getrecords(2);
This should return everything you are looking for.
Now you should be able to drop the function using the following SQL
DROP FUNCTION getrecords(int);
Note how you have to define the function with its parameter I have read (no idea whether its true) that in version 10 of postgress you can simply use
DROP FUNCTION getrecords;
Writing code in psql does require accuracy so getting things to work does usually involve some experimentation. I have removed much of this from my screenshots!
An alternative is as follows
CREATE FUNCTION getrecords(int) RETURNS TABLE (pkid integer, parcelname text) as $$
SELECT pkid, parcelname FROM t001landparcels WHERE pkid <=$1;
$$ Language SQL;
This appears to result in the same answer I am not clear what the difference is yet – note the result would have been the same if I had defined the table with the additon of a geometry column.
Note I dropped the old getrecords function before I created this one. Not sure what would have happened if I had tried to create one over the other.
I found this second method in stackoverflow when investigating functions with the following to me slightly mysterious quote
This is effectively the same as using SETOF tablename, but declares the table structure inline instead of referencing an existing object, so joins and such will still work.
Which sounds to me as important but I’m struggling at present to understand its meaning!
I will investigate later but what I think he is talking about is that you don’t need to have a defined object before hand eg in setof this is SETOF t001landparcels
I quite often like to have things broken down rather than all in functions and it might prefer to have it as a setof something that I can more clearly see.
Which leads me to my next question how do you get the definition of a function see 006
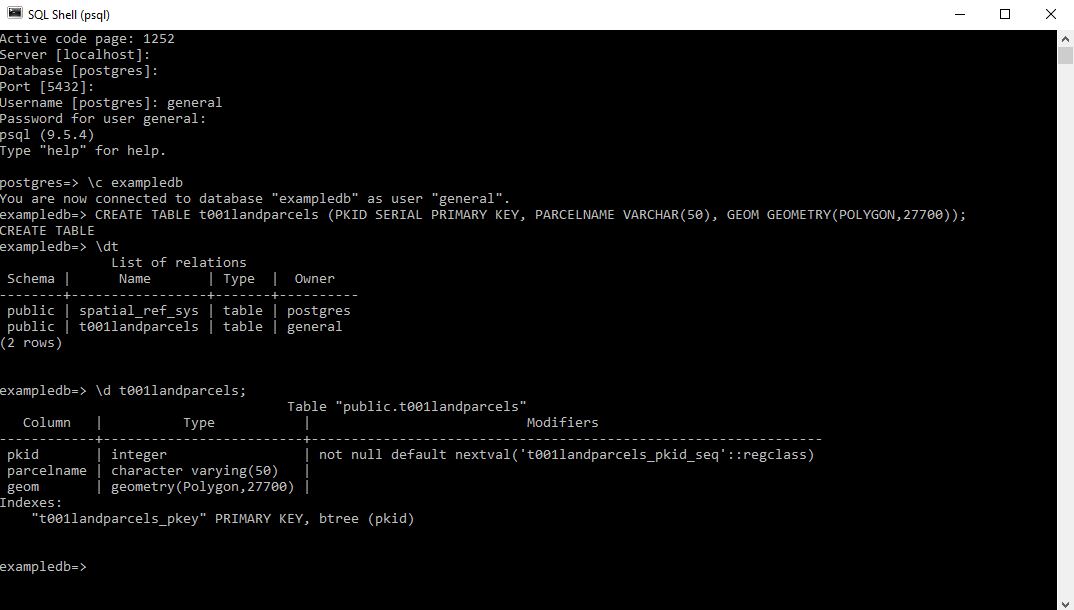
For this you will need to have a version of Postgres Database engine installed and running and you will need to have created a database which has the PostGis extension installed.
Open psql
Login to the database you wish to create the table in
Here I do this and then check on the tables with the \dt command before inspecting the columns itself using the \d command.
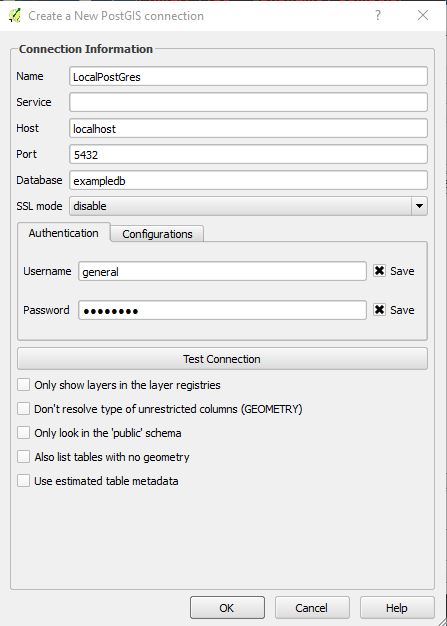
and here I open up QGIS and link to my local postgres instance and the exampledb database;
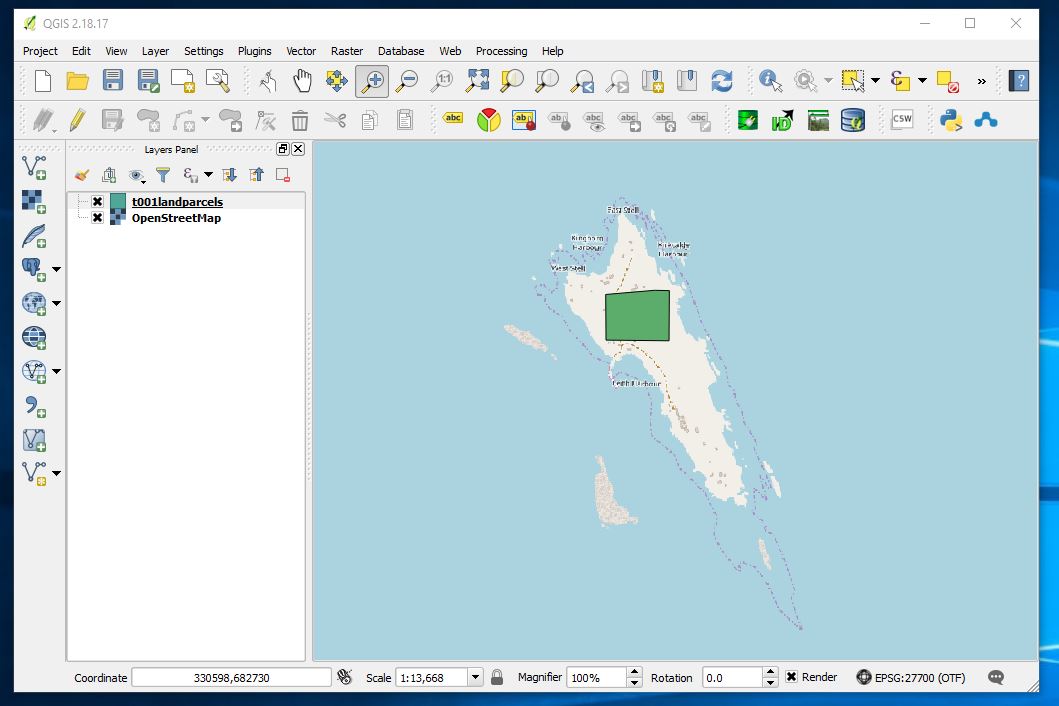
and here I connect to it and draw a polygon. If you are wondering where it is this is InchKeith in the Firth of Forth and island very visible from George Street in Edinburgh. If you have flown into Edinburgh you will have flown almost over it.
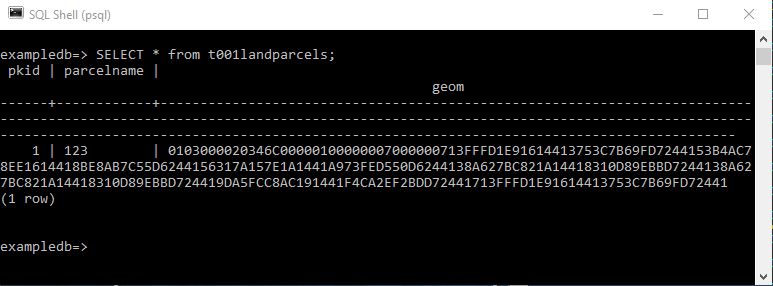
and here after having digitised a single polygon I look at the contents of the table
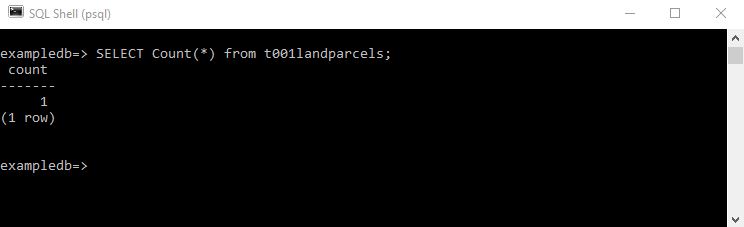
SELECT count(*) FROM t001landparcels;
Produces the more helpful count of records in the table.
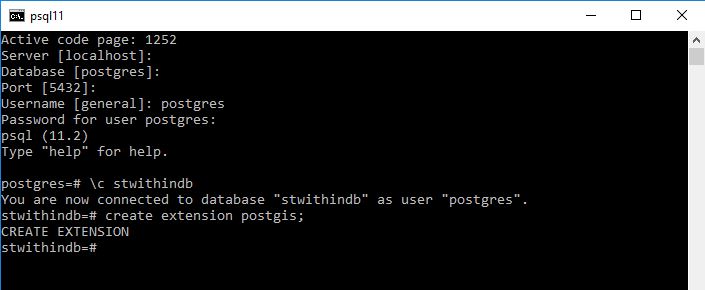
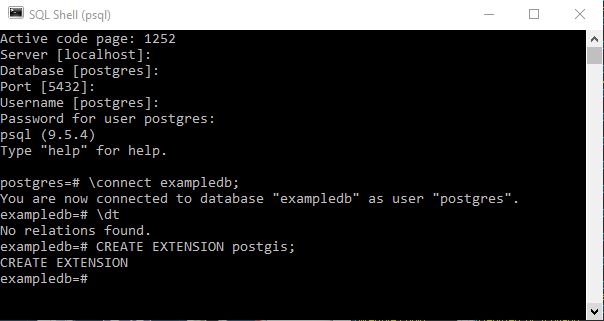
So you have an existing database in PostGres that you wish to add the PostGIS extension to.
You will need to be logged in with a username that has superuser privileges.
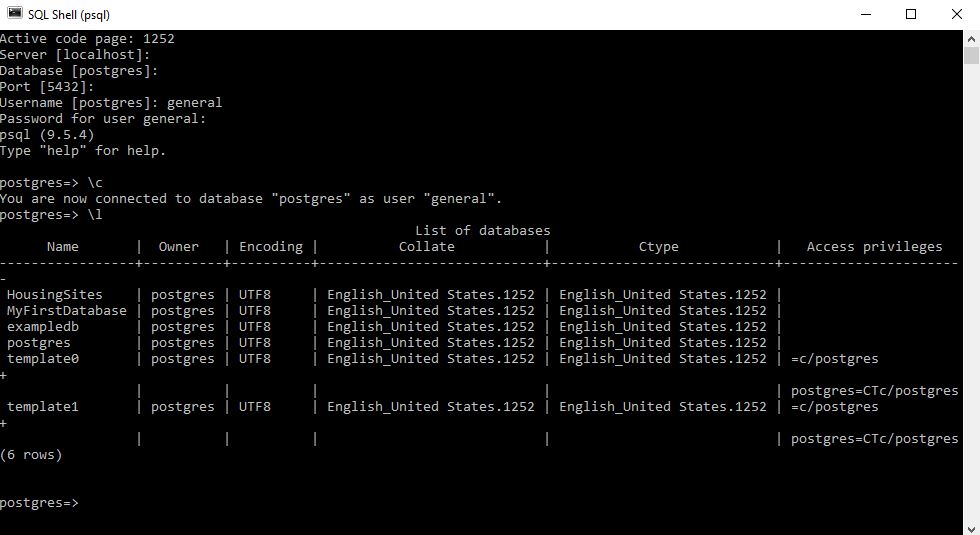
Here let me do this using the postgres default account that on my instance has superuser access.
Here rather than logging in at the start I am choosing to change the connection to a different database
This is done by using
\c DatabaseName;
or
\connect DatabaseName;
Please note that the semicolon is vital in performing the instruction.
The way I have discovered to do this is by opening the database and then allocating the postgis extension to the database once it is open.
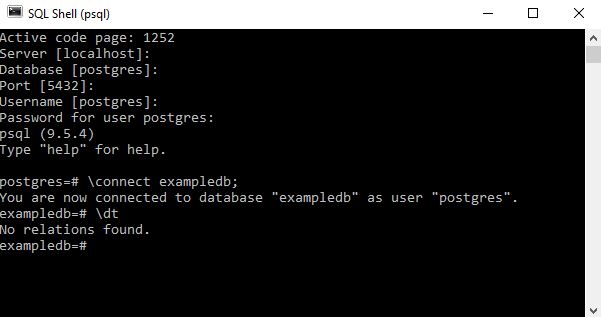
Let us first examine the tables in our blank database before the extension is enabled.
\dt
Now let us enable the extension.
CREATE EXTENSION postgis;
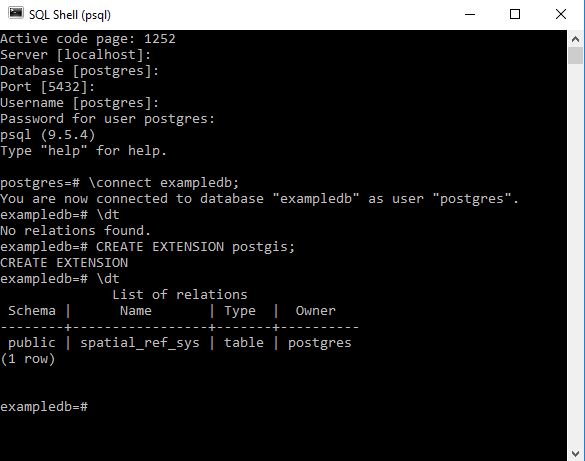
Let us now examine the database tables
\dt
Enabling the PostGIS extension adds this table along with the ability to add geometry types of varaibles within tables.